
Altech ATP035S12
Altech Mobile Air Conditioner ATP035S12 User Manual
Model: ATP035S12
1. Introduction
This manual provides comprehensive instructions for the safe and efficient operation, installation, and maintenance of your Altech Mobile Air Conditioner, model ATP035S12. Please read this manual thoroughly before using the appliance and retain it for future reference.
2. Safety Information
Always observe the following basic safety precautions when using electrical appliances to reduce the risk of fire, electric shock, or injury.
- Ensure the power supply matches the voltage specified on the rating label.
- Do not operate the unit with a damaged cord or plug.
- Keep the appliance away from heat sources and direct sunlight.
- Do not block air inlets or outlets.
- Always unplug the unit before cleaning or servicing.
- This appliance is not intended for use by persons (including children) with reduced physical, sensory or mental capabilities, or lack of experience and knowledge, unless they have been given supervision or instruction concerning use of the appliance by a person responsible for their safety.
- Children should be supervised to ensure that they do not play with the appliance.
3. Product Overview
The Altech ATP035S12 is a compact and efficient mobile air conditioner designed for cooling indoor spaces. It features an energy efficiency class A rating and comes with a remote control for convenient operation.
3.1 Main Unit

The main unit houses the compressor, fan, and control panel. Its compact design allows for easy placement in various rooms. The unit is equipped with wheels for mobility.
3.2 Remote Control

The remote control allows for convenient adjustment of settings from a distance. It includes buttons for power, mode selection (Auto, Cool, Dry, Fan), temperature adjustment, fan speed (High, Med, Low), swing, sleep mode, and timer functions.
4. Setup and Installation
Proper installation is crucial for the efficient operation of your mobile air conditioner. This unit is designed for portable installation.
4.1 Unpacking
- Carefully remove the air conditioner from its packaging.
- Check for any damage that may have occurred during transit. If damaged, contact your retailer.
- Ensure all accessories are present: exhaust hose, window kit, remote control, and user manual.
4.2 Placement
- Place the unit on a flat, stable surface.
- Ensure there is at least 30 cm (12 inches) of clear space around the unit for proper airflow.
- Position the unit near a window or opening for the exhaust hose.
4.3 Exhaust Hose Installation
- Attach one end of the exhaust hose to the air outlet on the back of the unit.
- Extend the exhaust hose to the nearest window or opening.
- Use the provided window kit to seal the opening around the exhaust hose, preventing hot air from re-entering the room.
- Keep the exhaust hose as short and straight as possible to maximize cooling efficiency.
Note: The unit features automatic condensate evaporation, reducing the need for manual drainage in most conditions.
5. Operating Instructions
Familiarize yourself with the control panel and remote control functions for optimal use.
5.1 Power On/Off
- Plug the power cord into a grounded electrical outlet.
- Press the ON/OFF button on the control panel or remote control to turn the unit on or off.
5.2 Mode Selection
Press the MODE button to cycle through the available operating modes:
- Cool Mode: For cooling the room. Adjust temperature using the TEMP ▲/▼ buttons.
- Fan Mode: Circulates air without cooling.
- Dry Mode: Dehumidifies the air.
- Auto Mode: The unit automatically selects the operating mode based on the ambient temperature.
5.3 Temperature Adjustment
In Cool mode, use the TEMP ▲ and TEMP ▼ buttons on the remote control to set your desired temperature.
5.4 Fan Speed
Press the FAN SPEED button to select between High, Medium, or Low fan speeds.
5.5 Timer Function
The timer function allows you to set a specific time for the unit to turn on or off.
- Timer On: Press TIMER ON, then use TEMP ▲/▼ to set the desired delay before the unit turns on.
- Timer Off: Press TIMER OFF, then use TEMP ▲/▼ to set the desired delay before the unit turns off.
5.6 Sleep Mode
Press the SLEEP button to activate sleep mode, which adjusts the temperature and fan speed for comfortable sleeping conditions and energy saving.
6. Maintenance
Regular maintenance ensures optimal performance and extends the lifespan of your air conditioner.
6.1 Cleaning the Air Filter
- Unplug the unit before cleaning.
- Locate and remove the air filter (usually at the back or side of the unit).
- Clean the filter with a vacuum cleaner or wash it with warm, soapy water. Rinse thoroughly.
- Allow the filter to dry completely before reinserting it.
- Clean the air filter every two weeks or more frequently if the unit is used often.
6.2 Cleaning the Unit Exterior
- Wipe the exterior of the unit with a soft, damp cloth.
- Do not use harsh chemicals, abrasives, or solvents, as these can damage the surface.
6.3 Storage
- If storing the unit for an extended period, ensure it is clean and dry.
- Drain any accumulated water from the unit (if applicable, though this model features auto-evaporation).
- Store the unit in a dry, cool place, covered to protect it from dust.
7. Troubleshooting
Before contacting customer support, refer to the following table for common issues and their solutions.
| Problem | Possible Cause | Solution |
|---|---|---|
| Unit does not turn on. | No power supply; Power cord not plugged in; Fuse blown/Circuit breaker tripped. | Check power outlet; Plug in power cord securely; Reset circuit breaker or replace fuse. |
| Unit does not cool effectively. | Air filter clogged; Exhaust hose blocked or improperly installed; Room too large; Doors/windows open. | Clean air filter; Ensure exhaust hose is clear and sealed; Close doors/windows; Consider unit capacity for room size. |
| Unit is noisy. | Unit not on a level surface; Obstruction in fan; Normal operating noise. | Place on a level surface; Check for obstructions; Some noise is normal during operation (65 dBA). |
| Remote control not working. | Batteries dead or incorrectly inserted; Obstruction between remote and unit. | Replace batteries; Ensure clear line of sight to the unit's receiver. |
8. Specifications
Technical data for the Altech Mobile Air Conditioner ATP035S12.
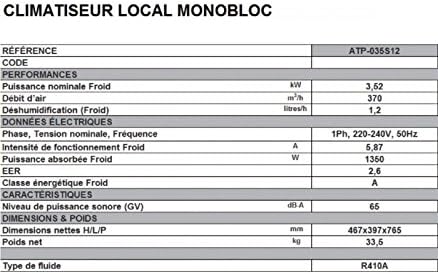
| Feature | Specification |
|---|---|
| Model Number | ATP035S12 |
| Energy Class | A |
| Cooling Capacity | 3500 Watts (3.5 kW) / 3520 BTU |
| E.E.R (Energy Efficiency Ratio) | 2.60 |
| Power Consumption (Cooling) | 1350 W |
| Voltage | 220-240V, 50Hz (Monophase) |
| Current (Cooling) | 5.87 A |
| Air Flow Rate | 370 m³/h |
| Dehumidification Capacity | 1.2 liters/hour |
| Noise Level (Acoustic Power) | 65 dBA |
| Refrigerant | R410A |
| Dimensions (L x W x H) | 467 x 397 x 765 mm |
| Net Weight | 33.5 kg |
| Installation Method | Portable |
| Special Features | Remote Controlled, Timer, Auto Restart, Automatic Condensate Evaporation |
9. Warranty and Support
Information regarding product warranty and customer support was not available in the provided data. Please refer to the documentation included with your purchase or contact your retailer for details on warranty coverage and support services for your Altech Mobile Air Conditioner ATP035S12.
Ask a question about this manual
Ask about setup, troubleshooting, compatibility, parts, safety, or missing instructions. Manuals+ will review the question and use this page’s manual context to help answer it.