
1. Introduction
This manual provides detailed instructions for the installation, configuration, operation, and maintenance of the Planet GS-4210-24T2S 24-Port Layer 2 Managed Gigabit Ethernet Switch. Please read this manual thoroughly before operating the device to ensure proper usage and optimal performance. Keep this manual for future reference.
2. Product Overview
The Planet GS-4210-24T2S is a Layer 2 Managed Gigabit Ethernet Switch designed for local area networks, offering cost-effective advantages for SMB office networks. It provides intelligent Layer 2 data packet switching and management functions, a user-friendly web interface, and stable operation. This model features a fanless design and green technology for quiet, energy-efficient, high-speed, and reliable network environments. The switch is equipped with 24 10/100/1000BASE-T Gigabit Ethernet ports and 2 additional 100/1000BASE-X SFP interfaces, with an inner power system, making it a rack-mountable solution for enhanced data security and network traffic management.
Key Features:
- 24 10/100/1000TX ports for Gigabit Ethernet connectivity.
- 2 100/1000X SFP interfaces for fiber optic connections.
- Managed Layer 2 switch capabilities.
- Operating Temperature: 0 to 50°C.
- Power Consumption: Max. 14W / 47 BTU.
- Throughput: 38.6Mpps @ 64Bytes (Switch Fabric: 52Gbps / non-blocking).
- Supports advanced switch management functions including dynamic port link aggregation, 802.1Q VLAN and Q-in-Q VLAN, Multiple Spanning Tree Protocol (MSTP), Loop and BPDU Guard, IGMP Snooping, and MLD Snooping.
- Robust QoS features with broadcast / multicast / unicast storm control, per port bandwidth control, 802.1p / CoS / IP DSCP QoS priority and remarking.
- Link Layer Discovery Protocol (LLDP) for discovering neighboring devices.
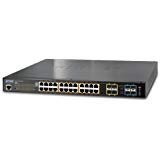
Figure 2.1: Front view of the Planet GS-4210-24T2S Switch, showing 24 RJ45 Gigabit Ethernet ports and 2 SFP ports on the right side.
3. Setup
3.1 Package Contents
Verify the package contains the following items:
- Planet GS-4210-24T2S Switch
- Power Cord
- Rack-mounting Kit (brackets and screws)
- Quick Installation Guide
3.2 Physical Installation
- Rack Mounting: Attach the provided rack-mounting brackets to the sides of the switch using the included screws. Secure the switch into a standard 19-inch equipment rack. Ensure adequate ventilation around the device.
- Desktop Placement: If not rack-mounting, place the switch on a flat, stable surface. Ensure there is sufficient space for airflow around the unit.
- Power Connection: Connect the power cord to the AC inlet on the rear panel of the switch and then to a grounded power outlet.
- Network Connections:
- RJ45 Ports: Connect standard Ethernet cables (Cat5e or higher) from your network devices (servers, workstations, other switches) to the 10/100/1000BASE-T ports on the front panel.
- SFP Ports: Insert compatible SFP transceivers into the 100/1000BASE-X SFP slots. Connect fiber optic cables from your fiber-enabled devices or backbone network to the SFP transceivers.
3.3 Initial Configuration Access
The switch can be managed via a web-based interface or a console port. For initial setup, it is often easiest to use the web interface if your network allows for direct connection and IP address assignment.
- Default IP Address: Refer to the Quick Installation Guide for the default IP address (commonly 192.168.0.100 or similar).
- Default Credentials: The default username and password are typically 'admin' and 'admin' respectively. Change these immediately after initial login for security.
- Accessing Web Interface: Connect a computer to any of the switch's RJ45 ports. Configure your computer's IP address to be in the same subnet as the switch's default IP. Open a web browser and enter the switch's default IP address.
4. Operating
4.1 Basic Operation
Once powered on and connected, the GS-4210-24T2S switch will begin forwarding Ethernet frames between connected devices. The LEDs on the front panel indicate the status of each port (link/activity) and the overall system status.
4.2 Web Management Interface
The web management interface provides comprehensive control over the switch's features. After logging in, you can configure various settings:
- System Settings: Change IP address, hostname, time settings, and user accounts.
- Port Configuration: Configure port speed, duplex mode, flow control, and enable/disable ports.
- VLAN Management: Create and manage 802.1Q VLANs and Q-in-Q VLANs to segment network traffic.
- Link Aggregation: Group multiple physical ports into a single logical link to increase bandwidth and provide redundancy.
- QoS (Quality of Service): Prioritize network traffic for critical applications like VoIP and video streaming using 802.1p, CoS, or IP DSCP.
- Spanning Tree Protocol (STP/MSTP): Prevent network loops and provide path redundancy.
- IGMP/MLD Snooping: Optimize multicast traffic delivery.
- Security Features: Configure port security, access control lists (ACLs), and authentication methods.
- Monitoring: View port statistics, system logs, and device status.
Refer to the full user manual (available for download from the manufacturer's website) for detailed instructions on each configuration option.
5. Maintenance
5.1 Firmware Updates
Periodically check the Planet website for new firmware versions. Firmware updates can provide new features, performance improvements, and security patches. Follow the instructions provided with the firmware package for the update process, typically involving uploading the firmware file via the web management interface.
5.2 Configuration Backup and Restore
Regularly back up your switch's configuration settings. This allows for quick restoration of settings in case of a device reset or replacement. The web management interface provides options to download the current configuration file and upload a saved configuration file.
5.3 Cleaning
Ensure the switch remains free of dust and debris. Use a soft, dry cloth to clean the exterior. Do not use liquid or aerosol cleaners. Ensure ventilation openings are not obstructed.
5.4 Environmental Considerations
Operate the switch within its specified temperature range (0 to 50°C). Avoid exposing the device to excessive heat, humidity, or direct sunlight. Ensure proper airflow around the unit to prevent overheating.
6. Troubleshooting
This section provides solutions to common issues you might encounter.
6.1 No Power
- Verify the power cord is securely connected to both the switch and a working power outlet.
- Check the power outlet with another device to ensure it is functional.
- Ensure the power switch (if present) is in the 'ON' position.
6.2 No Link on Port
- Check the Ethernet cable connection at both ends. Ensure it is securely plugged in.
- Verify the cable is not damaged and is of the correct type (Cat5e or higher for Gigabit).
- Ensure the connected device is powered on and functioning correctly.
- Try connecting to a different port on the switch or using a different cable.
- For SFP ports, ensure the SFP transceiver is correctly seated and compatible, and the fiber cable is intact.
6.3 Cannot Access Web Management Interface
- Ensure your computer's IP address is in the same subnet as the switch's IP address.
- Verify the switch's IP address. If it has been changed from the default, use the new IP.
- Check network connectivity between your computer and the switch.
- Clear your browser's cache or try a different web browser.
- If you have forgotten the password, a factory reset may be necessary (refer to the full manual for instructions, as this will erase all configurations).
6.4 Network Performance Issues
- Check for excessive broadcast/multicast traffic using the switch's monitoring tools.
- Verify port speed and duplex settings are correctly configured and match the connected devices.
- Inspect cables for damage or improper termination.
- Ensure QoS settings are correctly applied if prioritizing specific traffic.
7. Specifications
| Feature | Specification |
|---|---|
| Model Number | GS-4210-24T2S |
| Ports | 24 x 10/100/1000BASE-T Gigabit Ethernet, 2 x 100/1000BASE-X SFP |
| Switch Type | Managed Layer 2 |
| Switch Fabric | 52 Gbps, non-blocking |
| Throughput | 38.6 Mpps @ 64Bytes |
| Operating Temperature | 0 to 50°C (32 to 122°F) |
| Power Consumption | Max. 14W / 47 BTU |
| Item Weight | 3 Pounds |
| Dimensions (L x W x H) | Standard 1U rack-mountable (specific dimensions not provided, refer to product datasheet) |
| Manufacturer | Planet Technology |
| Color | Green (referring to product color, not environmental) |
8. Warranty and Support
8.1 Product Warranty
This Planet product is covered by a manufacturer's warranty. The specific terms and duration of the warranty may vary by region and retailer. Please refer to the warranty card included with your product or visit the official Planet Technology website for detailed warranty information.
8.2 Technical Support
For technical assistance, troubleshooting, or further inquiries regarding the GS-4210-24T2S switch, please contact Planet Technology's customer support. Support resources, including FAQs, drivers, and additional documentation, are typically available on the official Planet Technology website. When contacting support, please have your product model number and serial number ready.


