
1. Introduction
This manual provides comprehensive instructions for the safe and efficient operation, setup, and maintenance of the MG Scientific Tissue Processor Microprocessor Based Fully Automatic 410. This advanced laboratory instrument is designed for automated tissue processing, a critical step in histology for preparing tissue samples for microscopic examination.
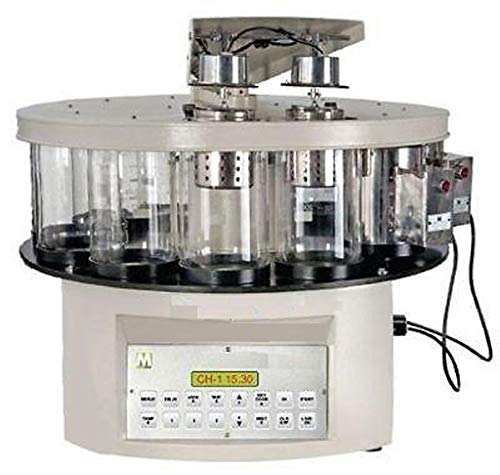
An image of the MG Scientific Tissue Processor, a microprocessor-based, fully automatic laboratory instrument. It features a circular array of glass beakers for tissue processing, a control panel with a digital display, and various buttons for programming and operation.
2. Key Features
- Feather Touch Keypad: For intuitive and precise control.
- P.I.D. Temperature Control: Ensures accurate and stable temperature regulation with a digital display.
- Programmable Timing Sequence: Supports 12 stages, with durations from 1 minute to 9 hours and 59 minutes per stage.
- Delay Action: Allows for delayed start programming from 1 hour to 99 hours.
- Battery Backup: Retains programmed data in case of power interruption.
- High Capacity: Accommodates 50-100 tissue cassettes.
- Integrated Safety Device: Enhances operational safety.
- Dual Wax Baths: Two thermostatically controlled wax baths, each with a 2-liter capacity.
3. Components Included
The following components are supplied with your MG Scientific Tissue Processor:
- Stainless Steel Basket Rotor - 2 Nos.
- Stainless Steel Basket - 2 Nos.
- Tissue Capsules - 24 Nos.
- Beakers (2 Ltrs capacity) - 10 Nos.
- Thermostatically Controlled Wax Baths - 2 Nos.
- Dust cover - 1 No.
- Instruction manual - 1 No.
4. Setup Instructions
Follow these steps to set up your tissue processor:
- Unpacking: Carefully remove all components from the packaging. Retain packaging for future transport or storage.
- Placement: Position the unit on a stable, level, and vibration-free surface in a well-ventilated area. Ensure adequate space around the unit for operation and maintenance.
- Power Connection: Connect the power cord to a grounded electrical outlet. Verify that the power supply matches the unit's requirements (230-240V, 50-60Hz).
- Component Installation: Install the provided beakers, stainless steel baskets, and wax baths into their designated positions according to the unit's design.
- Initial Inspection: Before first use, visually inspect all connections and components for any signs of damage or loose parts.
5. Operating Instructions
This section details the general operating procedures for the tissue processor:
- Power On: Turn on the main power switch, typically located on the rear or side of the unit. The digital display on the control panel will illuminate.
- Temperature Setting: Use the feather touch keypad to access the temperature setting menu. Input the desired temperature for the wax baths, ensuring it is within the operational range of 0-85°C. The P.I.D. controller will automatically maintain this set temperature.
- Programming Timing Sequence:
- Access the programming mode via the dedicated button on the keypad.
- Input the desired duration for each of the 12 processing stages. Durations can be set from 1 minute up to 9 hours and 59 minutes.
- Confirm each stage setting to save the program.
- Delay Action (Optional): If a delayed start is required, program the delay time using the keypad. The delay can be set from 1 hour to 99 hours.
- Loading Samples: Carefully place the tissue cassettes, containing the samples, into the stainless steel baskets. Ensure proper loading to prevent damage or obstruction.
- Start Process: Press the 'Start' button on the control panel to initiate the automatic tissue processing cycle.
- Monitoring: Monitor the progress of the cycle and current stage information on the digital display.
- Safety Features: The integrated safety device will activate and display an alert in case of any detected operational anomalies or errors. Refer to the troubleshooting section if an alert occurs.
- Process Completion: Upon completion of the programmed cycle, the unit will typically sound an alert. Carefully remove the processed tissue cassettes.
6. Maintenance
Regular maintenance ensures the longevity and optimal performance of your tissue processor:
- Cleaning: Regularly clean the exterior surfaces of the unit with a soft, damp cloth. Avoid abrasive cleaners or solvents.
- Beaker and Basket Inspection: Periodically inspect the glass beakers and stainless steel baskets for any cracks, chips, or corrosion. Replace damaged components immediately.
- Wax Bath Cleaning: Ensure the wax baths are kept clean and free of residual wax or debris. Follow laboratory protocols for wax disposal.
- Electrical Connections: Periodically check all electrical connections for security and signs of wear.
- Dust Cover: Use the provided dust cover when the unit is not in operation to protect it from dust and contaminants.
- Professional Servicing: For internal maintenance, calibration, or complex repairs, contact a qualified service technician or MG Scientific customer support.
7. Troubleshooting
This section addresses common issues you might encounter:
- Unit Not Powering On:
- Check if the power cord is securely plugged into both the unit and a functional electrical outlet.
- Verify that the main power switch is in the 'ON' position.
- Incorrect Temperature Reading/Control:
- Confirm the temperature setting on the digital display.
- Allow sufficient time for the unit to reach the set temperature.
- If the issue persists, contact customer support for calibration or service.
- Processing Cycle Not Starting:
- Ensure all programming steps for the timing sequence have been completed and confirmed.
- Check the digital display for any error messages or alerts from the safety device.
- Verify that the 'Start' button was pressed correctly.
- Data Loss After Power Interruption:
- The unit is equipped with battery backup for data retention. If data is lost, the backup battery may need inspection or replacement. Contact customer support.
8. Technical Specifications
| Model | 410 |
| Brand | MGM |
| Beaker Capacity | 2 Liters (per beaker) |
| Tissue Cassette Capacity | 50-100 |
| Safety Device | Yes |
| Wax Baths | 2 |
| Wax Bath Capacity | 2 Liters (per bath) |
| Temperature Range | 0-85°C |
| Dimensions (LxWxH) | 560mm x 560mm x 510mm |
| Power Requirements | 230-240V, 50-60Hz |
| Manufacturer | MG Scientific |
| ASIN | B01FW6MTXW |
9. Warranty Information
This product comes with a standard manufacturer's warranty. For specific warranty terms, conditions, and duration, please refer to the warranty card included with your purchase or contact MG Scientific directly. Keep your proof of purchase for warranty claims.
10. Customer Support
For technical assistance, spare parts, service inquiries, or any questions regarding the operation of your MG Scientific Tissue Processor, please contact MG Scientific customer support. Refer to the contact information provided with your purchase documentation or visit the official MG Scientific website.
