
1. Important Safety Instructions
Read all instructions carefully before installation and use. Failure to follow these instructions may result in serious injury or property damage. Keep this manual for future reference.
- Installation must be performed by qualified personnel in accordance with local safety regulations.
- Ensure the power supply is disconnected before performing any maintenance or repair work.
- Do not allow children to play near the gate opener or its controls.
- Keep hands and clothing clear of the gate's moving parts.
- Regularly inspect the gate opener for signs of wear or damage.
- The photo cells must be installed and maintained correctly to ensure proper safety operation.
2. Product Overview
The Beninca Bull 424R is a robust 24VDC operator designed for intensive use with sliding gates. It features advanced electronic settings for precise control and reliable performance.
- Silent, Powerful, and Reliable: Engineered for consistent operation.
- LCD Display: Facilitates easy programming and configuration.
- Internal Limit-Switches: Provides accurate gate positioning.
- Easy Access to Board: Simplifies maintenance and adjustments.
- Multiple Feature Electronic Setting: Allows for customized operation.
- Digital Adjusting for Torque & Timing: Ensures smooth and safe gate movement.

Image 2.1: The complete Beninca Bull 424R gate opener kit, including the motor unit, gear racks, remote controls, receiver, photo cell, and warning light.
3. Package Contents
Verify that all components listed below are present in your package:
- 1x Beninca Bull 424R Gate Opener Motor Unit
- 1x Receiver
- 2x Remote Controls
- 5x Gear Racks (39 inches each)
- 1x Photo Cell Set (Transmitter and Receiver)
- Mounting Hardware and Fasteners (not explicitly listed but implied for installation)
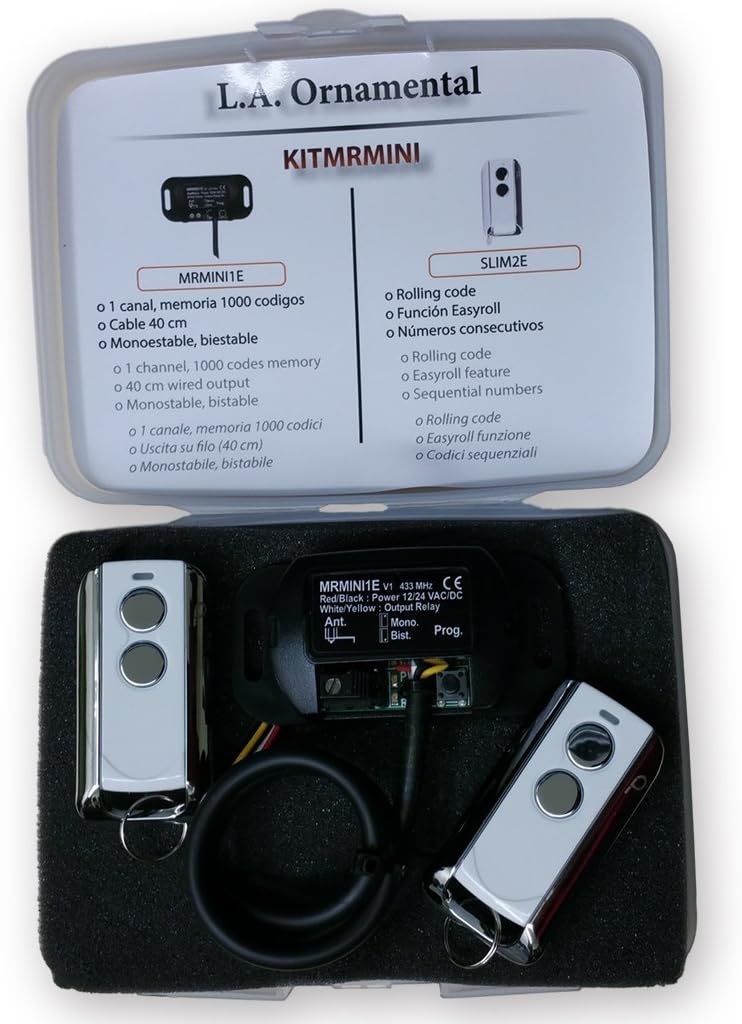
Image 3.1: Close-up view of the receiver unit and two remote controls, typically included in the kit.
4. Setup and Installation
Installation of the Beninca Bull 424R gate opener requires technical expertise. It is highly recommended that installation be performed by a qualified professional to ensure proper function and safety.
4.1. Pre-Installation Checks
- Ensure the gate moves freely and smoothly without obstruction.
- Verify that the gate structure is sound and capable of supporting the opener's weight and forces.
- Confirm availability of a suitable power supply (24VDC).
4.2. Mounting the Motor Unit
- Position the motor unit on a stable, level concrete base adjacent to the gate.
- Secure the motor unit using appropriate anchor bolts.
- Ensure the motor's output pinion aligns correctly with the gate's gear rack.
4.3. Installing Gear Racks
- Attach the gear racks along the length of the gate, ensuring they are level and parallel to the gate's movement.
- Maintain a small clearance (approximately 1-2mm) between the rack and the motor pinion to allow for gate movement.
- Connect the 39-inch rack sections securely.
4.4. Wiring and Electrical Connections
- Connect the motor unit to the control board according to the wiring diagram provided in the full technical manual.
- Install the photo cells at appropriate heights and positions to detect obstructions. Wire them to the control board.
- Connect the receiver unit to the control board.
- Ensure all electrical connections are secure and insulated.
4.5. Programming the Remote Controls
The receiver unit allows for programming of the remote controls. Refer to the specific instructions for the receiver model (MRMINI1E or SLIM2E) for detailed programming steps.

Image 4.1: A Beninca remote control, used for operating the gate opener.
5. Operating Instructions
Once installed and programmed, the Beninca Bull 424R gate opener is designed for straightforward operation.
5.1. Opening/Closing the Gate
- Press the programmed button on your remote control once. The gate will begin to open or close.
- Pressing the button again during movement will typically stop the gate. A third press will reverse its direction.
- The photo cells will detect any obstruction in the gate's path and automatically stop or reverse the gate's movement for safety.
5.2. Manual Release
In case of power failure or malfunction, the gate can be operated manually:
- Locate the manual release mechanism on the motor unit (refer to the full technical manual for exact location).
- Insert the provided key or handle and turn it to disengage the motor.
- The gate can now be moved by hand.
- To re-engage, reverse the manual release procedure.
6. Maintenance
Regular maintenance ensures the longevity and safe operation of your gate opener.
- Monthly: Inspect the gate's movement for any stiffness or obstruction. Clean the gear rack and motor pinion.
- Quarterly: Check all mounting bolts and fasteners for tightness. Verify the proper functioning of the photo cells by obstructing their beam.
- Annually: Have a qualified technician inspect the entire system, including electrical connections, motor, and safety features.
- Keep the area around the gate opener clear of debris, vegetation, and water.
7. Troubleshooting
If you encounter issues with your gate opener, consult the following common troubleshooting steps:
- Gate does not respond to remote:
- Check remote control battery.
- Ensure the receiver is powered and correctly connected.
- Reprogram the remote control if necessary.
- Gate stops or reverses unexpectedly:
- Check for obstructions in the gate's path.
- Clean photo cell lenses and ensure they are aligned.
- Inspect the gate for mechanical binding or damage.
- Motor runs but gate does not move:
- Verify the manual release mechanism is fully engaged.
- Inspect the gear rack and motor pinion for damage or misalignment.
- No power to the unit:
- Check the main power supply and circuit breaker.
- Inspect all electrical connections for loose wires.
If problems persist, contact a qualified technician or BENINCA customer support.
8. Specifications
| Feature | Detail |
|---|---|
| Manufacturer | Beninca |
| Part Number | Beninca Bull 424R |
| Model Number | Beninca Bull 424R |
| Power Supply | 24VDC (for intensive use) |
| Control Board | Integrated with LCD display |
| Limit Switches | Internal |
| Remote Control Frequency | 433 MHz (typical for MRMINI1E receiver) |
| Batteries Included | No |
| Batteries Required | No (for main unit, remotes require small batteries) |
| First Available Date | May 10, 2016 |
9. Warranty and Support
For specific warranty information, please refer to the documentation provided with your purchase or contact BENINCA directly. Keep your proof of purchase for warranty claims.
For technical support, installation assistance, or spare parts, please contact your authorized BENINCA dealer or visit the official BENINCA website for contact information.