
Atosa AT751L63
Atosa AT751L63 Full Size Chafer Instruction Manual
Model: AT751L63
1. Introduction
Thank you for choosing the Atosa AT751L63 Full Size Chafer. This chafer is designed to keep food warm and presentable for extended periods, making it ideal for catering events, buffets, and banquets. Constructed from durable stainless steel, it offers reliability and ease of cleaning. Please read this manual thoroughly before initial use to ensure proper setup, operation, and maintenance, thereby maximizing the lifespan and performance of your unit.
2. Safety Instructions
- Always operate the chafer on a stable, heat-resistant surface.
- Keep away from flammable materials.
- Use only approved chafer fuel. Follow fuel manufacturer's instructions for safe handling and lighting.
- Never leave burning fuel unattended.
- Do not touch hot surfaces. Use appropriate heat-resistant gloves or utensils.
- Ensure adequate ventilation when using chafer fuel.
- Keep children and pets away from the chafer during operation.
- Allow the unit to cool completely before cleaning or storing.
- Do not immerse the entire chafer in water.
3. Package Contents
Upon unpacking, please verify that all components are present and undamaged. If any parts are missing or damaged, contact your supplier immediately.
- Chafer Frame
- Water Pan (Full Size)
- Food Pan (Full Size)
- Lid
- Fuel Holders (typically two)
4. Setup Instructions
Follow these steps for proper assembly and preparation of your chafer:
- Unpack and Clean: Carefully remove all components from the packaging. Wash all pans and the lid with warm, soapy water, rinse thoroughly, and dry completely before first use.
- Position the Frame: Place the chafer frame on a stable, level, and heat-resistant surface where it will be used. Ensure there is adequate space around the unit.
- Insert Water Pan: Place the large water pan into the chafer frame.
- Add Water: Pour approximately 1 to 2 inches of hot water into the water pan. Using hot water will help the chafer reach operating temperature faster and conserve fuel. Do not overfill.
- Place Fuel Holders: Position the fuel holders into their designated slots beneath the water pan in the chafer frame. Open the fuel cans and place them into the holders. Do not light the fuel yet.
- Insert Food Pan: Place the food pan containing your prepared, hot food directly into the water pan. Ensure it sits securely.
- Cover with Lid: Place the lid securely on top of the food pan to retain heat and moisture.
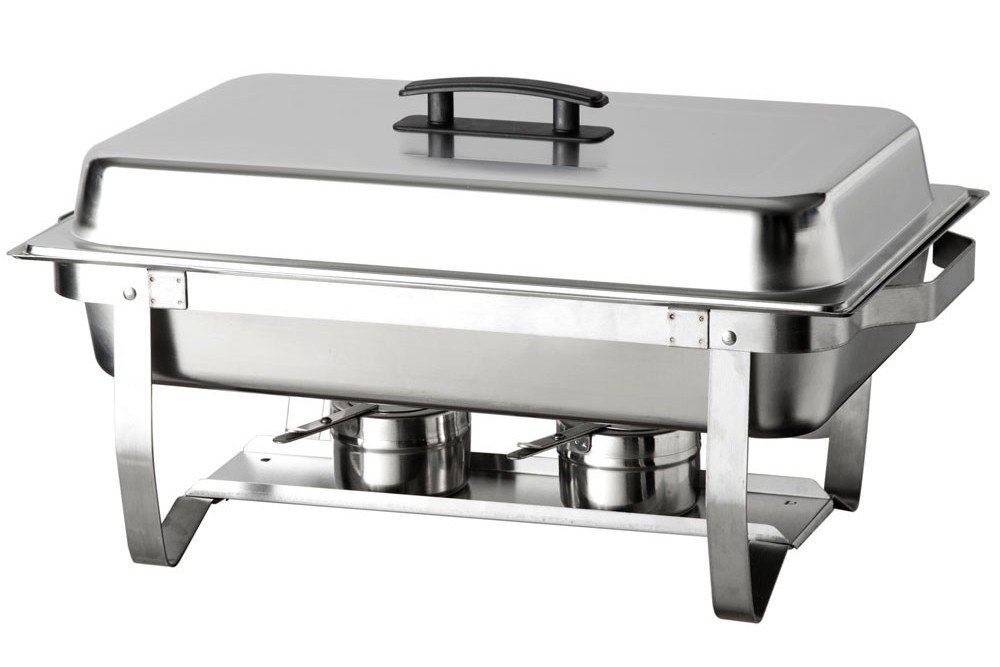
Image 1: Fully assembled Atosa AT751L63 Full Size Chafer, showing the lid, food pan, water pan, and frame with fuel holders underneath.
5. Operating Instructions
Once the chafer is assembled and filled with food, proceed with operation:
- Light the Fuel: Using a long-stem lighter or match, carefully light the chafer fuel cans. Place the lids back onto the fuel holders to contain the flame and prevent accidental contact.
- Monitor Temperature: The hot water in the water pan will create steam, which gently heats the food pan above it, keeping your food warm. Periodically check the food temperature to ensure it remains above safe serving temperatures (typically 140°F / 60°C).
- Serving: When serving, lift the lid carefully, allowing condensation to drip back into the water pan. Replace the lid promptly after serving to maintain heat.
- Refilling Fuel: If fuel cans run out during an event, extinguish the old cans, allow them to cool, and replace them with new ones. Always use caution when handling hot fuel holders.
- Extinguishing Fuel: To extinguish the fuel, use the snuffer tool (often part of the fuel can lid) to cover the flame. Allow the cans to cool completely before handling or disposing.
6. Cleaning and Maintenance
Proper cleaning and maintenance will extend the life of your Atosa chafer.
- Cool Down: After use, extinguish all fuel and allow the entire chafer unit to cool down completely before attempting to clean. This may take a significant amount of time.
- Disassemble: Remove the lid, food pan, water pan, and fuel holders from the frame. Dispose of empty fuel cans properly.
- Empty Water: Carefully empty any remaining water from the water pan.
- Wash Components: Wash the food pan, water pan, and lid with warm, soapy water. For stubborn food residue, you may need to soak the pans. Use a soft cloth or sponge to avoid scratching the stainless steel finish.
- Clean Frame: Wipe down the chafer frame with a damp cloth. For stainless steel, a mild stainless steel cleaner can be used to maintain its luster. Avoid abrasive cleaners or scouring pads.
- Rinse and Dry: Rinse all components thoroughly with clean water and dry them completely to prevent water spots and corrosion.
- Storage: Store the chafer in a clean, dry place. Stacking components carefully can save space.
7. Troubleshooting
| Problem | Possible Cause | Solution |
|---|---|---|
| Food not staying warm |
|
|
| Fuel not lighting |
|
|
| Water spots on stainless steel |
|
|
8. Specifications
- Model: AT751L63
- Brand: Atosa
- Type: Full Size Chafer
- Material: Stainless Steel
- Product Dimensions: 38.1 x 57.91 x 29.97 cm (15 x 22.8 x 11.8 inches)
- Product Weight: 5.21 kg (11.49 lbs)
9. Warranty and Support
For warranty information or technical support regarding your Atosa AT751L63 Full Size Chafer, please refer to the warranty card included with your purchase or visit the official Atosa website. You may also contact Atosa customer service directly for assistance with product inquiries, parts, or service.
Note: Warranty terms and conditions may vary by region and retailer. Please retain your proof of purchase for warranty claims.
Ask a question about this manual
Ask about setup, troubleshooting, compatibility, parts, safety, or missing instructions. Manuals+ will review the question and use this page’s manual context to help answer it.