
1. Safety Information
Always read and understand all safety warnings and instructions before operating this tool. Failure to follow warnings and instructions may result in serious injury.
- Eye Protection: Always wear ANSI Z87.1 approved safety glasses with side shields.
- Hearing Protection: Wear hearing protection to prevent hearing damage.
- Hand Protection: Wear gloves to protect hands from splinters and debris.
- Work Area: Keep the work area clean and well-lit. Do not operate in explosive atmospheres.
- Air Supply: Ensure the air compressor is properly maintained and regulated to the specified operating pressure.
- Tool Handling: Never point the tool at yourself or others. Keep fingers away from the trigger when not actively nailing.
- Maintenance: Disconnect air supply before making adjustments, clearing jams, or servicing the tool.
2. Product Overview
The AeroPro 9021N/NS framing nailer is designed for heavy-duty work, capable of driving 21-degree plastic collated nails from 2 inches up to 3-1/2 inches long. Its robust construction features a heat-treated special alloy iron drive pin, wear-resisting bumper, and durable O-rings for continuous performance. The lightweight aluminum magazine, finished in black, contributes to its overall ease of use.

Figure 2.1: The AeroPro 9021N/NS 21 Degree Framing Nailer, showcasing its robust design and aluminum magazine.
Key Features:
- Moving cylinder engine designed to reduce recoil.
- Accepts 2" up to 3-1/2" plastic collated framing nails with 70 capacity.
- Aluminum magazine for durability and reduced weight.
- Open nose design for easy nail jam clearance.
- Actuation: Single and bump fire modes.
3. Setup
3.1. Loading Nails
To load the nailer, ensure the air supply is disconnected. Pull back the magazine follower and insert a strip of 21-degree plastic collated framing nails into the magazine. The nailer accommodates nails from 2 inches to 3-1/2 inches long, with a maximum capacity of 70 nails. Push the magazine follower forward until it locks the nails in place.

Figure 3.1: A hand demonstrating the process of loading nails into the nailer's magazine.
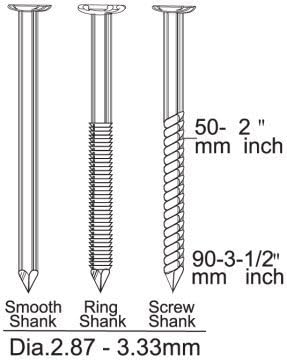
Figure 3.2: Diagram illustrating the compatible nail types (smooth, ring, and screw shank) and their dimensions for the AeroPro 9021N/NS framing nailer.
3.2. Connecting Air Supply
Connect a 3/8 inch air hose to the nailer's precise interface. Ensure the air compressor is set to an operating pressure between 80-120 PSI (5.8-8 bar). The maximum operating pressure is 120 PSI (8.3 bar). Always check for secure connections before operation.
Video 3.1: This video demonstrates key features of the 9021 framing nail gun, including tool-less depth adjustment, 360-degree exhaust, safety switch design, precise air hose interface, aluminum magazine, nail loading, operating pressure, and its application in framing, wall sheathing, siding installation, and pallet building.
4. Operating Instructions
4.1. Firing Modes
The AeroPro 9021N/NS supports both single and bump fire actuation modes. Select the appropriate mode based on your task requirements. Single fire provides precise nail placement, while bump fire allows for faster nailing on larger surfaces.
4.2. Depth Adjustment
The nailer features a tool-less depth adjustment mechanism. This allows for quick and easy modification of nail depth to suit different materials and project needs. Refer to the video in Section 3.2 for a visual demonstration of this feature.
4.3. Nailing Procedure
Position the nailer firmly against the workpiece. For single fire, depress the safety contact and then pull the trigger. For bump fire, hold the trigger and press the safety contact against the workpiece at each desired nailing point. The moving cylinder engine is designed to reduce recoil, enhancing user comfort and control.

Figure 4.1: An individual utilizing the AeroPro 9021N/NS framing nailer for a construction task, demonstrating its practical application.
5. Maintenance
Regular maintenance ensures the longevity and optimal performance of your AeroPro framing nailer.
- Lubrication: Apply a few drops of pneumatic tool oil into the air inlet before each use or after extended periods of operation.
- Cleaning: Keep the tool clean and free of debris. The open nose design facilitates easy removal of nail jams.
- Inspection: Periodically inspect the drive pin, bumper, and O-rings for wear and tear. Replace worn components as necessary.
- Storage: Store the tool in a dry, clean environment when not in use.
6. Troubleshooting
- Nail Jams: If a nail jams, disconnect the air supply immediately. Utilize the open nose design to safely clear the jammed nail.
- Inconsistent Nailing Depth: Check the air pressure setting and adjust the tool-less depth adjustment mechanism. Ensure nails are compatible with the tool.
- Air Leaks: Inspect air hose connections and O-rings for damage or improper seating.
- Tool Not Firing: Verify air supply is connected and pressurized. Check if the safety contact is fully depressed against the workpiece. Ensure the magazine contains nails.
7. Specifications
| Feature | Detail |
|---|---|
| Model Number | RHF9021N |
| Nail Type | 21 Degree Plastic Collated Framing Nails |
| Nail Length | 2" to 3-1/2" |
| Magazine Capacity | 70 nails |
| Operating Pressure | 80-120 PSI (5.8-8 bar) |
| Maximum Operating Pressure | 120 PSI (8.3 bar) |
| Item Weight | 7.93 pounds |
| Product Dimensions | 20 x 5.25 x 14.2 inches |
| Manufacturer | AeroPro |
8. Warranty and Support
For warranty information, technical support, or replacement parts, please contact AeroPro customer service directly. Refer to the product packaging or the official AeroPro website for contact details.

