1. Introduction
This instruction manual provides comprehensive guidance for the installation, operation, and maintenance of your NB North Bayou Dual Monitor Desk Mount Stand F160. This full-motion swivel computer monitor arm is designed to support two screens ranging from 17 to 27 inches, with a load capacity of 4.4 to 19.8 lbs (2-9 kg) for each display. Utilizing this mount can significantly improve your ergonomic setup and free up valuable desk space.

Image 1.1: The NB North Bayou Dual Monitor Desk Mount Stand F160, showcasing its dual arm design and VESA mounting plates.

Image 1.2: Illustration demonstrating the ergonomic benefits of using a monitor arm, promoting correct posture compared to an unadjusted setup.
2. Safety Information
Please read all safety warnings and instructions carefully before installation and use. Failure to do so may result in property damage, serious injury, or death.
- Weight Capacity: Do not exceed the maximum load capacity of 19.8 lbs (9 kg) per monitor. Ensure your monitors are within the specified weight range.
- Tension Adjustment: Do NOT adjust the tension screw without a monitor mounted on the arm. Adjusting tension without load can cause the arm to spring up unexpectedly, leading to injury.
- Desk Compatibility: Ensure your desk is sturdy enough to support the combined weight of the mount and monitors.
- Children: Keep children away from the product during installation. Small parts may be a choking hazard.
- Proper Installation: Follow all installation steps precisely. If you are unsure about any part of the installation, seek professional assistance.
Unsuitable Desktops for Installation
Certain desktop types are not suitable for installing this monitor mount. Attempting to install on these surfaces may result in damage to the desk or instability of the mount.
- Fragile Desktops: Desktops made of fragile materials such as marble or glass are not recommended.
- Too Narrow Clamp Surface: Desks with a clamp surface that is too narrow due to a table bottom baffle may not provide sufficient grip.
- Irregular or Beveled Edges: Desktops with irregular or beveled edges may prevent the clamp from securing properly.

Image 2.1: Visual guide illustrating desktop types that are not suitable for monitor mount installation, including fragile, narrow, or irregular surfaces.
3. Package Contents
Verify that all components are present and undamaged before beginning installation. If any parts are missing or damaged, please contact customer support.

Image 3.1: Overview of the NB North Bayou F160 monitor mount components, including the dual arms, desk clamp, grommet mount parts, and hardware kit.
Typical Components Included:
- Dual Monitor Arms (2 units)
- Desk Clamp Base
- Grommet Mount Base
- VESA Mounting Plates (2 units)
- Hardware Kit (screws, washers, spacers, Allen wrenches)
- Instruction Manual
4. Specifications
| Feature | Specification |
|---|---|
| Compatible Screen Size | 17 - 27 inches (per monitor) |
| Load Capacity | 4.4 - 19.8 lbs (2 - 9 kg) per monitor |
| VESA Compliance | 75x75mm, 100x100mm |
| Rotation | 360° |
| Tilt Angle | +85° to -30° |
| Swivel Angle | ±90° |
| Upright Lift (Height Adjustment) | Up to 10.2 inches (260mm) |
| Max Extension | 20.8 inches (530mm) |
| Desk Thickness (C-Clamp) | 0.59 - 3.54 inches (15 - 90mm) |
| Desk Thickness (Grommet) | 0.59 - 3.54 inches (15 - 90mm) |
| Grommet Hole Diameter | 0.39 - 1.97 inches (10 - 50mm) |
| Material | Aluminum |
| Product Dimensions | 26.3 x 5.71 x 6.77 inches |
| Item Weight | 11 pounds |

Image 4.1: Diagram illustrating the key specifications and adjustable ranges of the monitor mount, including screen size compatibility, load capacity, VESA patterns, and various movement angles.
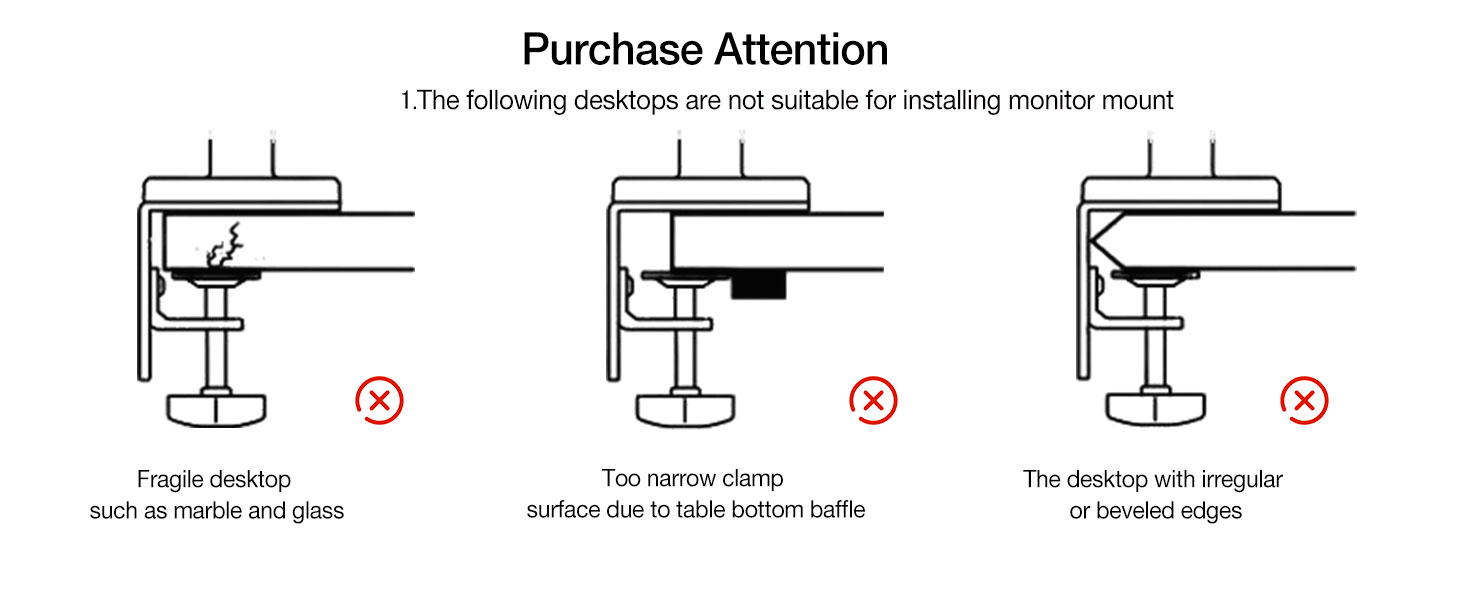
Image 4.2: Detailed diagram showing the maximum extension (20.8 inches / 530mm) and height adjustment range (10.2 inches / 260mm) of the monitor arms.
5. Setup and Installation
The NB North Bayou F160 offers two primary installation methods: C-Clamp and Grommet Mount. Choose the method that best suits your desk setup.
5.1 VESA Compatibility and Monitor Preparation
Before mounting, confirm your monitor's VESA hole position. The mount supports VESA patterns of 75x75mm and 100x100mm.
- Locate the square pattern of four holes on the back of your monitor.
- If your monitor has an embedded VESA hole and the panel can be placed directly, use the provided screws.
- If the embedded position is small or the panel cannot be placed inside, use the included heightening pads and lengthened screws from the hardware package.

Image 5.1: Guide to confirming VESA hole positions on the back of a monitor and selecting appropriate screws and spacers for mounting.
5.2 Choosing Your Mounting Method
Both C-Clamp and Grommet mount options are provided. All necessary tools and mounting accessories are included in the package.

Image 5.2: Comparison of the C-Clamp and Grommet mount installation methods, showing desk thickness requirements for each.
C-Clamp Installation:
This method is suitable for wooden desktops with a thickness between 0.59 and 3.54 inches (15-90mm).
- Attach the C-clamp base to the edge of your desk, ensuring it is securely tightened.
- Slide the monitor arm onto the pole of the C-clamp base.
- Attach your monitors to the VESA plates on the arms using the appropriate screws.

Image 5.3: A close-up view of the C-Clamp installation method, showing the clamp securely fastened to a desk edge.
Grommet Mount Installation:
This method requires a hole in your desk with a diameter between 0.39 and 1.97 inches (10-50mm). The desk thickness must be within 0.59 and 3.54 inches (15-90mm).
- Insert the grommet mount through the hole in your desk.
- Secure the grommet mount from underneath the desk using the provided hardware.
- Slide the monitor arm onto the pole of the grommet base.
- Attach your monitors to the VESA plates on the arms using the appropriate screws.
6. Operation and Adjustments
The NB North Bayou F160 offers extensive adjustability to achieve your optimal viewing angle and ergonomic setup.
6.1 Full Motion Capabilities
- Rotation: Both screens can rotate 360° for landscape or portrait orientation.
- Tilt: Adjust the tilt angle from +85° (upward) to -30° (downward) to reduce glare and optimize viewing.
- Swivel: Each arm can swivel ±90° at various joints, allowing you to position your monitors precisely.
- Height Adjustment: The arms allow for an upright lift of up to 10.2 inches (260mm).
- Extension: The maximum extension of the arms is 20.8 inches (530mm), providing flexibility for various desk depths.

Image 6.1: Top-down view illustrating the 360° rotation and ±90° swivel capabilities of the monitor arms.

Image 6.2: Diagram showing the tilt angle adjustment range from +85° to -30°.
6.2 Gas Spring Tension Adjustment
The gas spring mechanism allows for smooth and effortless height adjustments. Proper tension adjustment is crucial for the arms to hold your monitors securely at the desired height.

Image 6.3: Step-by-step guide for adjusting the gas spring tension using an Allen wrench. This is critical for ensuring the monitor stays at the desired height.
- Important: Ensure a monitor is mounted on the arm before adjusting tension.
- If the monitor keeps rising up, reduce the tension by turning the screw towards the "-" direction.
- If the monitor drops down, increase the tension by turning the screw towards the "+" direction.
- Multiple turns may be needed to achieve the correct tension.
6.3 Cable Management
Integrated cable management clips help keep your workspace tidy and organized.
- Route monitor cables (power, video) along the underside of the arms using the provided clips or channels.
- This helps to conceal cables and reduce clutter on your desk.

Image 6.4: View of the monitor arm demonstrating the integrated cable management system, which helps to route and conceal cables for a cleaner workspace.
7. Maintenance
Regular maintenance ensures the longevity and optimal performance of your monitor mount.
- Cleaning: Wipe down the mount with a soft, damp cloth. Avoid abrasive cleaners or solvents that could damage the finish.
- Check Connections: Periodically check all screws and connections to ensure they remain tight and secure. Re-tighten if necessary.
- Lubrication: The gas spring mechanism is designed for long-term use and typically does not require lubrication. If you notice any stiffness, consult the manufacturer's support.
8. Troubleshooting
This section addresses common issues you might encounter with your monitor mount.
Monitor Does Not Stay at Desired Height (Rises or Drops)
This is typically due to incorrect gas spring tension for the weight of your monitor.
- Solution: Adjust the gas spring tension screw as described in Section 6.2.
- If the monitor rises, turn the tension screw towards the "-" (minus) direction to decrease tension.
- If the monitor drops, turn the tension screw towards the "+" (plus) direction to increase tension.
- Remember to make small adjustments and test the arm's movement after each adjustment.
Mount Feels Unstable or Wobbly
- Solution: Ensure the desk clamp or grommet mount is securely tightened to the desk. Check that the desk itself is stable and not flexing under the weight.
- Verify that the monitor is properly attached to the VESA plate and all screws are tightened.
Difficulty Moving Arms
- Solution: If the arms are too stiff to move, the tension might be too high for your monitor's weight. Adjust the gas spring tension slightly towards the "-" direction.
- Check if any cables are snagged or preventing free movement.
9. Warranty and Support
For warranty information and customer support, please refer to the documentation included with your purchase or contact NB North Bayou directly through their official channels.
You can also visit the NB North Bayou Store on Amazon for more product information and support resources.


