Introduction
The iPower GLHTMTCONTROL Digital Heat Mat Thermostat Controller is designed to provide precise temperature control for various applications. It is ideal for maintaining optimal temperatures for seed germination, plant rooting, reptile habitats, home brewing, and fermentation processes. This controller ensures a stable and customized temperature environment within a range of 40°F to 108°F (5°C to 42°C).
This manual provides essential information on the safe and effective use of your iPower thermostat controller, including setup, operation, and troubleshooting.

Image: The iPower GLHTMTCONTROL Digital Heat Mat Thermostat Controller, showing the main unit, temperature probe, and power plug.
Safety Information
- Do not immerse the digital controller unit or the thermostatic sensor probe in liquid or very wet soil.
- Ensure the total electrical load of connected appliances does not exceed the controller's maximum specifications (120V / 8.3A / 1000W).
- Always plug the heat mat or heating appliance into the thermostat controller first, then plug the thermostat controller's power cord into a grounded electrical outlet.
- Place the temperature sensor in the area where temperature control is critical.
- This controller is designed to power off heating equipment when the set temperature is reached and does not increase the heating power of the equipment.
Product Overview
The iPower GLHTMTCONTROL features a clear LED display and intuitive buttons for easy operation. It includes a temperature sensor probe for accurate readings.

Image: A detailed view of the controller with labels pointing to the Fahrenheit indicator, Celsius indicator, LED display, Set Button, Up Button, Down Button, Heating indicator, Power indicator, and Outlet Socket.
Components:
- Digital Thermostat Controller Unit
- Temperature Sensor Probe with Suction Cup
- Integrated Power Cord with Three-Prong Grounded Plug
- Integrated Outlet Socket for Heating Appliance
Setup
- Connect Heating Appliance: Plug your heat mat or other heating appliance into the outlet socket located on the bottom of the thermostat controller.
- Position Sensor Probe: Place the temperature sensor probe in the desired area where you need to monitor and control the temperature. For heat mats, the sensor is typically placed between the heat mat and the growing tray, or directly in the medium. For reptile enclosures, place it near the heat source but away from direct contact with the animal.
- Power On: Plug the thermostat controller's power cord into a standard 120V AC grounded electrical outlet. The LED display will illuminate.

Image: An angled view of the iPower GLHTMTCONTROL controller, showing the power cord and sensor probe connected, ready for use.
Operating Instructions
Setting the Desired Temperature:
- Press and hold the SET button for 3 seconds to enter the temperature selection mode. The display will flash.
- Use the UP or DOWN buttons to adjust the temperature to your desired setting.
- Press the SET button again to confirm and exit the temperature selection mode. The display will stop flashing and show the current temperature.

Image: The iPower GLHTMTCONTROL controller with text overlay demonstrating how to press and hold the SET button to enter temperature selection mode, then use UP or DOWN buttons to adjust.
Switching Between Celsius and Fahrenheit:
- To display the temperature in Celsius (°C), press and hold the DOWN button for 3 seconds.
- To display the temperature in Fahrenheit (°F), press and hold the UP button for 3 seconds.

Image: Two iPower GLHTMTCONTROL controllers side-by-side, illustrating how to press and hold the DOWN button for Celsius and the UP button for Fahrenheit.
Maintenance
The iPower GLHTMTCONTROL Digital Heat Mat Thermostat Controller requires minimal maintenance. Keep the unit clean and dry. Avoid exposing it to extreme temperatures or direct sunlight for prolonged periods. Regularly check the sensor probe and cables for any signs of damage. Do not attempt to open or repair the unit yourself, as this will void the warranty and may pose a safety risk.
Troubleshooting
The controller's LED display may show error codes to indicate specific issues:
- E1: This indicates that the actual temperature detected by the sensor is below 0°C (32°F).
- E2: This indicates that the actual temperature detected by the sensor is higher than 60°C (108°F).
- E3: This indicates that the temperature sensor is not working properly. Please check the sensor connection and reinstall it if necessary. Ensure the sensor cable is not damaged.
If you encounter other issues not listed here, please refer to the support section for assistance.
Specifications
| Model Number | GLHTMTCONTROL |
| Voltage | 120 Volts |
| Frequency | 60 Hz |
| Maximum Amperage | 8.3 Amps |
| Maximum Wattage | 1000 Watts |
| Temperature Control Range | 40°F - 108°F (5°C - 42°C) |
| Temperature Display Range | 32°F - 140°F (0°C - 60°C) |
| Display Type | LED |
| Product Dimensions | 4 x 10.3 x 5.9 inches |
| Item Weight | 1 pound (16 ounces) |
| Material | Metal, Copper |
| UPC | 799441253914 |
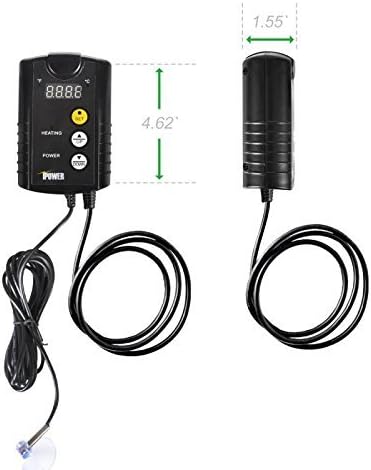
Image: A diagram illustrating the dimensions of the iPower GLHTMTCONTROL controller, showing its height and width.
Warranty and Support
For warranty information or technical support, please contact iPower customer service. Details can typically be found on the product packaging or the official iPower website. Please have your model number (GLHTMTCONTROL) and proof of purchase ready when contacting support.
You can visit the iPower store for more information: iPower Store on Amazon


