
1. Introduction
This manual provides comprehensive instructions for the Xerox Color C60 Press Digital Laser Production Printer. It covers essential information regarding the setup, operation, maintenance, and technical specifications of this high-volume digital press, which offers print, copy, and scan functionalities. Designed for commercial printing, in-house printing, and publishing environments, the Xerox Color C60 is engineered to enhance output capabilities, color quality, and overall efficiency.
Please read this manual thoroughly to ensure proper use and to maximize the performance and longevity of your device.
2. Product Overview

Figure 1: Front view of the Xerox Color C60 Press Digital Laser Production Printer. This image displays the main unit with its integrated control panel on the left, multiple paper input trays at the bottom, and the output tray at the top.
The Xerox Color C60 is a versatile digital production printer designed for demanding print environments. It integrates multiple functions including printing, copying, and scanning, and comes standard with a 5PB Integrated Fiery Color Server for advanced color management.
Key Features:
- Print, Copy, Scan functionality
- Up to 65 pages per minute (ppm) print speed
- High print resolution of up to 2400 x 2400 dpi
- Multiple paper trays for a total standard capacity of 3,260 sheets
- Supports various paper sizes up to 13" x 19" (SRA3+)
- Integrated Fiery Color Server for professional color output
- Automatic duplex printing
3. Setup Instructions
3.1 Unpacking and Placement
- Ensure the printer is placed on a stable, level surface capable of supporting its weight (approximately 604 pounds).
- Remove all packaging materials, including any internal shipping restraints. Refer to the packing list for all included components: the Xerox Color C60 unit, power cord, and any initial consumables.
- Ensure adequate ventilation around the unit.
3.2 Power Connection
- Connect the provided power cord to the printer's power inlet.
- Plug the other end of the power cord into a grounded electrical outlet. The printer requires 110-127 VAC, 50/60 Hz.
- Do not use extension cords or power strips unless they are rated for the printer's power requirements.
3.3 Network and Driver Installation
- Connect the printer to your network using an Ethernet cable. The printer supports Ethernet connectivity.
- For driver installation, visit the official Xerox support website. Drivers are downloadable from the manufacturer's website.
- Follow the on-screen instructions provided by the driver installer for your operating system.
4. Operating Instructions
4.1 Loading Paper
The Xerox Color C60 features multiple paper trays and a bypass tray.
- Main Trays (2 x 500 sheets): Open the designated tray, fan the paper stack, and load it with the print side facing down (or as indicated by the tray guide). Adjust the paper guides to fit the paper size.
- Tandem Tray (840 sheets + 1140 sheets): For higher capacity, load paper into the tandem trays following the same procedure as the main trays.
- Bypass Tray (250 sheets): Use for special media, envelopes, or smaller quantities of paper. Load paper face up, adjusting guides.
The printer supports paper sizes from 5.5" x 7.2" up to 13" x 19" (A3+/SRA3/A3/A4/A5).
4.2 Basic Printing
- From your computer, open the document you wish to print.
- Select Print from the application's menu.
- Choose the "Xerox Color C60" printer from the list of available printers.
- Access Printer Properties or Preferences to configure print settings such as:
- Paper Size and Type
- Color or Black & White
- Single-sided or Duplex (two-sided) printing
- Number of copies
- Output tray selection
- Click Print to send the job to the printer.
4.3 Copying Documents
- Place your original document face down on the scanner glass or face up in the automatic document feeder (ADF).
- On the printer's control panel, select the Copy function.
- Adjust settings such as:
- Number of copies
- Color or Black & White
- Enlargement/Reduction
- Two-sided copying
- Image quality settings
- Press the Start button to begin copying.
4.4 Scanning Documents
The Xerox Color C60 features a flatbed scanner.
- Place your original document on the scanner glass or in the ADF.
- On the printer's control panel, select the Scan function.
- Choose your desired scan destination (e.g., Scan to Email, Scan to Folder, Scan to USB).
- Configure scan settings such as:
- Resolution
- Color Mode (Color, Grayscale, Black & White)
- File Format (e.g., PDF, JPEG, TIFF)
- Two-sided scanning
- Press the Start button to begin scanning.
5. Maintenance
5.1 Consumables
The Xerox Color C60 uses four toner cartridges: Black, Cyan, Magenta, and Yellow. Monitor toner levels through the control panel or printer software. Replace cartridges when indicated by the printer.
Note: This pre-owned unit typically includes consumables at an average of 30% capacity.
5.2 Cleaning
- Exterior: Wipe the exterior surfaces with a soft, damp, lint-free cloth. Do not use abrasive cleaners or solvents.
- Scanner Glass: Gently clean the scanner glass with a soft cloth moistened with glass cleaner. Ensure no residue is left behind.
- Automatic Document Feeder (ADF) Rollers: Periodically clean the ADF rollers to prevent paper feed issues. Refer to the printer's on-screen instructions or the full service manual for detailed steps.
5.3 Firmware Updates
Periodically check the Xerox support website for firmware updates. Keeping the printer's firmware up-to-date ensures optimal performance and access to the latest features and security enhancements.
6. Troubleshooting
This section provides solutions to common issues. For more complex problems, refer to the comprehensive service manual or contact technical support.
- Paper Jams: Follow the on-screen instructions displayed on the printer's control panel to locate and clear paper jams. Always power off the printer before attempting to clear jams in hard-to-reach areas.
- Print Quality Issues:
- Check toner levels and replace any low cartridges.
- Perform a print head cleaning or calibration from the printer's maintenance menu.
- Ensure you are using appropriate paper types for your print job.
- Connectivity Problems:
- Verify that the Ethernet cable is securely connected to both the printer and the network port.
- Restart the printer and your network router/switch.
- Check network settings on the printer's control panel.
- Error Codes: If an error code appears on the control panel, note the code and consult the Xerox support website or the full service manual for specific troubleshooting steps.
7. Specifications
| Feature | Detail |
|---|---|
| Model Name | Xerox Color C60 |
| Functions | Printer, Copier, Scanner |
| Print Speed (Color/Mono) | Up to 65 ppm |
| Print Resolution | Up to 2400 x 2400 dpi |
| Monthly Duty Cycle | Up to 300,000 pages |
| Average Monthly Print Volume | 10,000 to 50,000 pages |
| Paper Sizes Supported | 13" x 19", 12" x 18", 11" x 17", 8.5" x 11", 8.5" x 14", 5.5" x 7.2" (A3+/SRA3/A3/A4/A5) |
| Standard Paper Capacity | 3,260 sheets (2 x 500-sheet main trays, 840-sheet + 1140-sheet tandem tray, 250-sheet bypass tray) |
| Maximum Paper Capacity | 7,260 sheets (with optional trays) |
| Duplex Printing | Automatic |
| Scanner Type | Flatbed |
| Connectivity | Ethernet, USB (for local connection/Fiery server) |
| Electrical Requirements | 110-127 VAC, 50/60 Hz |
| Dimensions (W x D x H) | 31 x 55 x 62 inches |
| Item Weight | 604 pounds |
| Included Components | Xerox Color C60 unit, Power cord, Average 30% consumables |
Optional Accessories:
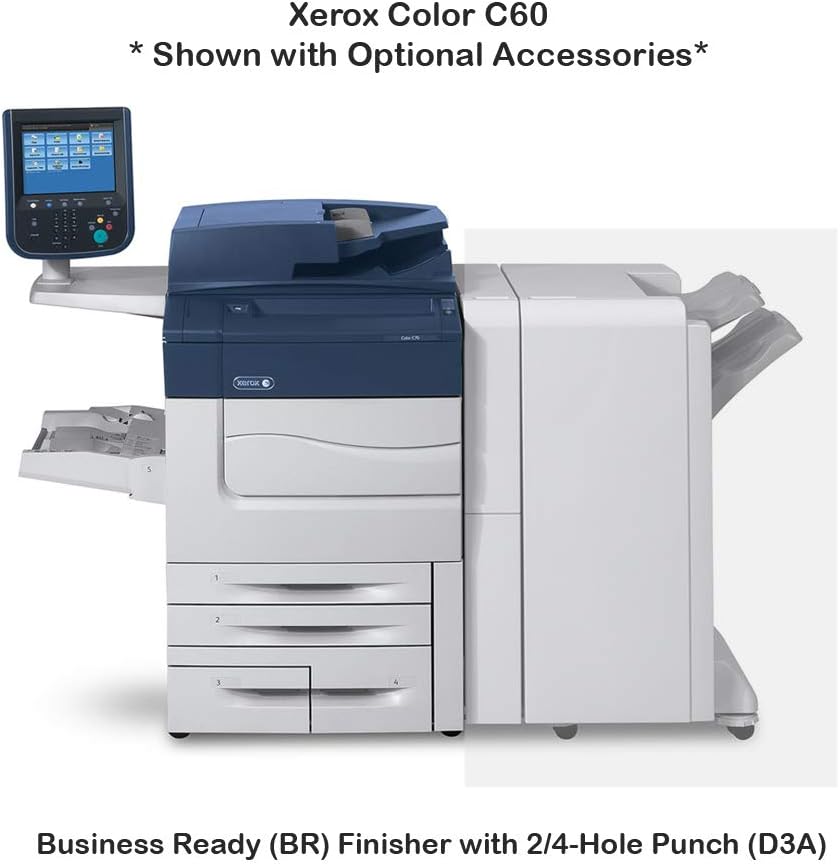
Figure 2: Xerox Color C60 with optional Business Ready (BR) Finisher with 2/4-Hole Punch (D3A). This image illustrates how the finisher unit integrates with the main printer, providing stapling and hole-punching capabilities.

Figure 3: Xerox Color C60 with optional One Tray Oversize High Capacity Feeder with Cabinet (XY9) and Booklet Maker Finisher with 2/4-Hole Punch (D4A). This configuration shows additional paper input capacity and advanced finishing options for booklet creation.
The Xerox Color C60 supports various optional accessories, including feeders and finishers, to expand its capabilities. These options can increase paper capacity and provide advanced finishing functions like stapling, hole-punching, and booklet making.
8. Warranty and Support
8.1 Warranty Information
This Xerox Color C60 unit comes with a 30-Day Parts Warranty. Please retain your purchase documentation for warranty claims.
8.2 Technical Support
For technical assistance, driver downloads, or further documentation, please visit the official Xerox support website. For support related to your purchase, contact ABD Office Solutions.


