
Introduction
Thank you for purchasing the VILTROX JY-680Ch Flash Speedlite. This high-performance flash unit is designed for Canon DSLR cameras, offering advanced features such as High-Speed Sync (HSS), ETTL/TTL automatic flash, and a powerful Guide Number of GN58. This manual provides detailed instructions for proper setup, operation, maintenance, and troubleshooting to ensure optimal performance and longevity of your device.
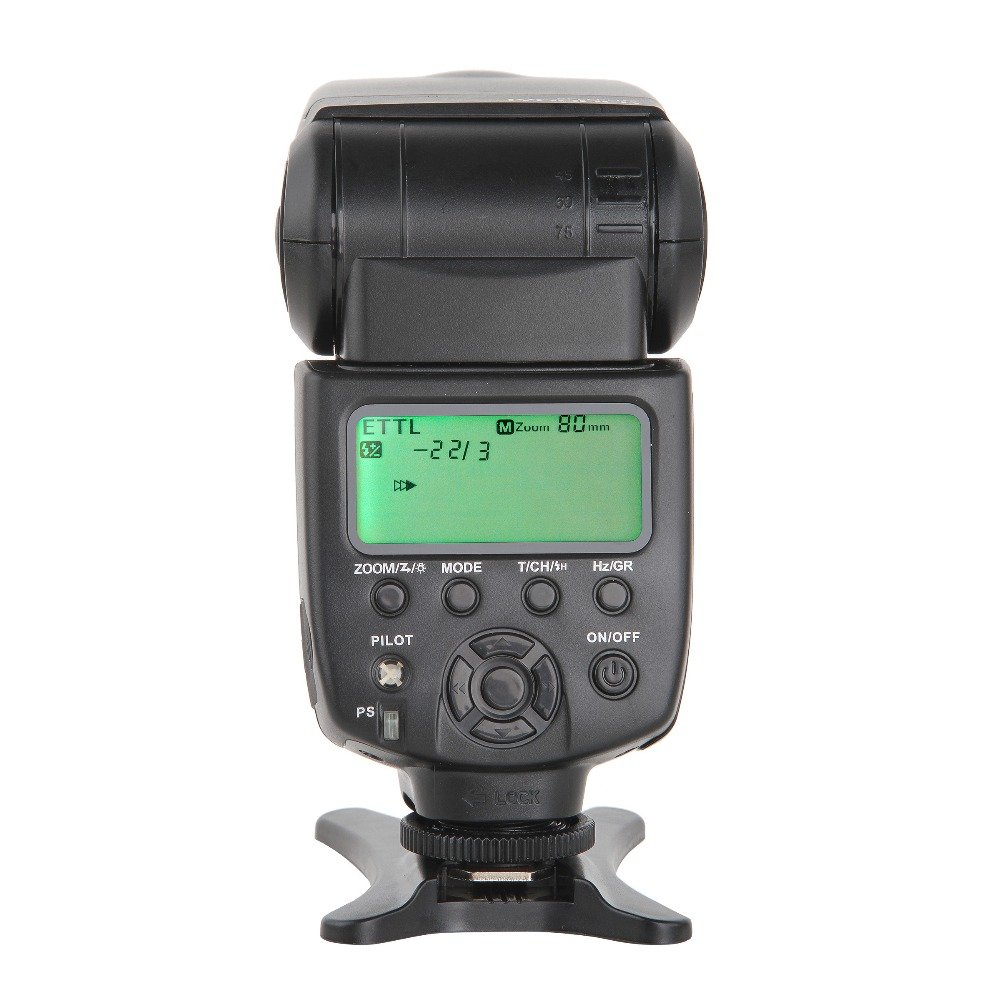
Figure 1: VILTROX JY-680Ch Flash Speedlite main unit.
1. Setup
1.1 Battery Installation
The VILTROX JY-680Ch Flash Speedlite requires 4 AA batteries (not included).
- Locate the battery compartment on the side of the flash unit.
- Slide the battery compartment cover open.
- Insert 4 AA batteries, ensuring correct polarity (+/-) as indicated inside the compartment.
- Close the battery compartment cover securely.
1.2 Mounting to Camera
The flash unit features a hot shoe mount for secure attachment to your Canon DSLR camera.
- Ensure both the camera and flash are powered off.
- Slide the flash's hot shoe foot into the camera's hot shoe slot.
- Rotate the locking ring on the flash unit clockwise until it is securely tightened. Do not overtighten.

Figure 2: Flash unit mounted on a Canon DSLR camera.

Figure 3: Detail of the hot shoe mount and locking ring.
1.3 Initial Power On
After mounting the flash and installing batteries, power on the unit.
- Press and hold the ON/OFF button on the flash unit until the LCD screen illuminates.
- The flash will perform a self-test and display the current settings.
2. Operating Instructions
2.1 Control Panel Overview
The control panel features an LCD screen and several buttons for adjusting flash settings.

Figure 4: Control panel with LCD and function buttons.
- ZOOM/Z/☀: Adjusts zoom level or enters zoom setting.
- MODE: Cycles through flash modes (TTL, M, Multi).
- T/CH/★: Sets wireless channel/group or enters custom function settings.
- Hz/GR: Sets stroboscopic frequency (Hz) in Multi mode or group in wireless mode.
- PILOT: Test flash button.
- ON/OFF: Power on/off button.
- PS: Power Save switch.
- Directional Pad: Navigates menus and adjusts values.
2.2 Flash Modes
Press the MODE button to switch between the following flash modes:
- ETTL/TTL Mode: Automatic flash exposure control. The flash output is automatically adjusted based on the camera's metering system.
- Manual (M) Mode: Allows manual control over flash output power (1/1 to 1/128). Use the directional pad to adjust power levels.
- Multi (Stroboscopic) Mode: Fires a series of rapid flashes during a single exposure, ideal for capturing multiple movements of a subject. Adjust frequency (Hz) and number of flashes using the Hz/GR button and directional pad.
2.3 High-Speed Sync (HSS)
The JY-680Ch supports High-Speed Sync (HSS) up to 1/8000 second, allowing you to use flash at shutter speeds faster than your camera's native sync speed. This is useful for freezing fast action or using wide apertures in bright conditions.
- Enable HSS through your camera's flash control menu or the flash unit's custom functions, if applicable. Refer to your camera's manual for specific instructions.
2.4 Auto/Manual Zooming
The flash head can automatically or manually adjust its zoom position to match the focal length of your lens, optimizing light coverage.
- Auto Zoom: In TTL mode, the flash will automatically adjust its zoom position (24-105mm) to match the lens's focal length.
- Manual Zoom: Press the ZOOM/Z/☀ button and use the directional pad to manually set the zoom position (e.g., 24mm, 35mm, 50mm, 70mm, 80mm, 105mm).
2.5 Wireless Flash System (Master/Slave)
The JY-680Ch supports Canon's optical wireless flash system, allowing it to function as both a master and slave unit.
- Master Mode: When mounted on a camera, the flash can control other compatible slave flash units. Use the T/CH/★ and Hz/GR buttons to set groups and channels.
- Slave Mode: The flash can be triggered wirelessly by a master flash or camera's built-in flash. Set the flash to slave mode and match the channel/group settings with the master unit.
2.6 PC Synchronous Interface
The flash unit includes a 2.5mm PC synchronous interface for connecting to cameras or external triggers that support PC sync.
- Connect a 2.5mm PC sync cable (not included) from the flash unit to your camera's PC sync terminal or an external trigger.
- This allows for synchronized flash firing, especially useful in studio setups or with older camera models.
2.7 Exposure Lock (FEL)
The flash supports Flash Exposure Lock (FEL) for both on-camera and wireless TTL modes. This feature allows you to lock the flash exposure for a specific part of your scene, then recompose and shoot.
- Refer to your Canon camera's manual for instructions on how to activate FEL. Typically, this involves pressing a dedicated FEL button on your camera.
3. Maintenance
3.1 Cleaning
- Use a soft, dry cloth to clean the flash unit's exterior.
- For stubborn dirt, slightly dampen the cloth with water or a mild cleaning solution, then wipe dry immediately.
- Do not use strong solvents or abrasive cleaners.
- Keep the hot shoe contacts clean and free of debris.
3.2 Storage
- Remove batteries if the flash will not be used for an extended period to prevent leakage.
- Store the flash in a cool, dry place, away from direct sunlight and extreme temperatures.
- Use the included mini stand or a protective case to prevent damage.
3.3 Battery Care
- Always use fresh, high-quality AA batteries.
- Do not mix old and new batteries, or different types of batteries.
- Dispose of used batteries responsibly according to local regulations.
4. Troubleshooting
| Problem | Possible Cause | Solution |
|---|---|---|
| Flash does not power on. |
|
|
| Flash does not fire. |
|
|
| Flash exposure is incorrect. |
|
|
| Wireless flash not working. |
|
|
Note: The flash unit features a temperature test (high-temperature alarm) to prevent overheating. If the alarm activates, allow the flash to cool down before further use.
5. Specifications
| Feature | Detail |
|---|---|
| Model | JY-680Ch |
| Guide Number | GN58 (ISO 100, 105mm) |
| Flash Modes | ETTL/TTL, Manual (M), Multi (Stroboscopic) |
| High-Speed Sync (HSS) | Up to 1/8000 second |
| Zoom Range | Auto and Manual (24-105mm) |
| Wireless Function | Canon optical wireless system (Master/Slave) |
| PC Sync Port | 2.5mm |
| Power Source | 4 x AA batteries (not included) |
| Dimensions (LxWxH) | 21.6 x 8.6 x 7.1 cm (approx.) |
| Weight | 363 g (without batteries) |
| Compatible Mountings | Canon Hot Shoe |
6. Warranty and Support
VILTROX products are designed for reliability and performance. This product is covered by a limited warranty against defects in materials and workmanship. Please refer to the warranty card included with your purchase for specific terms and conditions, including the warranty period and coverage details.
For technical support, service, or inquiries regarding your VILTROX JY-680Ch Flash Speedlite, please contact VILTROX customer service through their official website or the retailer from whom you purchased the product.
Online Resources: For the latest information, firmware updates, and additional support, visit the official VILTROX website: www.viltrox.com