
FAS LA400PKGU Dual EM
Liftmaster LA400PKGU Dual Swing Automatic Gate Opener Kit User Manual
Model: LA400PKGU Dual EM | Brand: FAS
1. Introduction
This manual provides detailed instructions for the installation, operation, maintenance, and troubleshooting of the Liftmaster LA400PKGU Dual Swing Automatic Gate Opener Kit. This kit is designed to automate dual swing gates, offering convenience and enhanced security.
The system includes two gate arms, one control unit, and a photocell for safety. It is solar-ready and features a battery backup system for continued operation during power outages. The integrated MyQ® Technology allows for secure monitoring and control of your gate operator from anywhere using the MyQ App.

Figure 1: Main components of the LA400PKGU Dual Swing Automatic Gate Opener Kit.
2. Product Features and Capacities
- Dual Arm System: Designed for dual swing gates.
- Maximum Gate Size: Supports gates up to 16 feet each.
- Maximum Gate Weight: Capable of handling gates up to 850 lbs each.
- Battery Backup: Provides up to 400 cycles or 97 days of standby power.
- MyQ® Technology: Allows secure monitoring and control via the MyQ App.
- Photocell Included: Enhances safety by detecting obstructions.
- Solar Ready: Compatible with solar power systems for remote installations.

Figure 2: Recommended gate capacities based on length and weight.

Figure 3: Key product highlights including battery backup and MyQ technology.
3. Setup and Installation
Proper installation is crucial for the safe and efficient operation of your gate opener. It is recommended that installation be performed by a qualified professional. Ensure all local electrical codes and safety regulations are followed.
3.1 Pre-Installation Checklist
- Verify gate dimensions and weight are within specified limits (max 16ft length, 850lbs weight per gate).
- Ensure adequate clearance for gate swing.
- Confirm power source availability (AC or solar).
- Gather all necessary tools and hardware.
3.2 Mounting the Gate Arms
Securely mount the two gate arms to the gate and gate posts using appropriate brackets and fasteners. Ensure the arms are level and aligned for smooth operation. Refer to the detailed diagrams in the separate installation guide for precise measurements and mounting points.
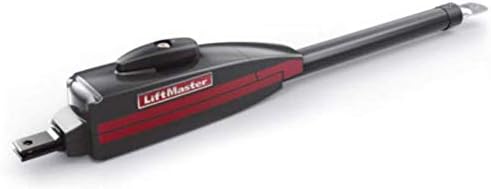
Figure 4: A single gate opener arm.
3.3 Control Box and Wiring
Mount the control box in a secure, weather-protected location near the gate. Connect the gate arms, photocell, and power supply to the control board as per the wiring diagram provided in the full installation manual. Ensure all connections are tight and insulated.

Figure 5: The control box for the gate opener system.
3.4 Photocell Installation
Install the photocell across the gate opening to provide an entrapment protection device. This is a critical safety feature that prevents the gate from closing if an obstruction is detected. Follow the specific instructions for photocell alignment and wiring.

Figure 6: Installed gate opener on a swing gate.
4. Operating Instructions
Your Liftmaster LA400PKGU gate opener can be operated using various methods:
4.1 Remote Control Operation
Press the designated button on your remote control to open or close the gate. Ensure you are within range and have a clear line of sight to the gate for safe operation.
4.2 MyQ® App Control
Download the MyQ App from your device's app store. Follow the in-app instructions to connect your gate opener to your MyQ account. Once connected, you can monitor the gate status and operate it remotely from your smartphone or tablet.
4.3 Keypad Entry
If an external keypad is installed, enter your programmed access code to open the gate. Unique codes can be assigned for different users if desired.
4.4 Magnetic Loop Detection (Optional)
For automatic opening upon vehicle approach, a magnetic loop can be installed and buried in the driveway. When a vehicle crosses the loop, the gate will automatically open. The detection range is approximately 40 yards.
5. Maintenance
Regular maintenance ensures the longevity and reliable performance of your gate opener. Perform the following checks periodically:
- Clean Components: Keep gate arms, photocells, and the control box free from dirt, debris, and insect nests.
- Check Connections: Periodically inspect all wiring connections for tightness and signs of wear or corrosion.
- Lubrication: Apply appropriate lubricant to moving parts of the gate arms as recommended in the full product manual.
- Battery Check: Ensure the battery backup is functioning correctly. Test it by temporarily disconnecting main power to see if the gate operates on battery power.
- Safety Feature Test: Regularly test the photocell by placing an object in its path to ensure the gate reverses or stops.
6. Troubleshooting
If you encounter issues with your gate opener, refer to the following common problems and solutions:
| Problem | Possible Cause | Solution |
|---|---|---|
| Gate not responding to remote/keypad. | Dead remote battery, power outage, loose wiring, remote out of range. | Replace remote battery. Check main power and circuit breaker. Inspect wiring connections. Move closer to the gate. |
| Gate opens but does not close. | Photocell obstruction or misalignment, safety sensor issue. | Clear any obstructions from the photocell path. Clean photocell lenses. Realign photocell. Consult full manual for sensor diagnostics. |
| Gate stops unexpectedly. | Obstruction detected, motor overheating, power fluctuation. | Check for physical obstructions. Allow motor to cool down. Verify stable power supply. |
For more complex issues, refer to the complete troubleshooting section in your product's detailed manual or contact customer support.
7. Specifications
- Model: LA400PKGU Dual EM
- Brand: FAS
- Manufacturer: FAS
- Auto Part Position: Outside
- Material: Aluminum, Plastic
- Included Components: 2 Arms, 1 Controller, Battery Backup, Receiver, Photocell
- Max Gate Length (each): 16 Feet
- Max Gate Weight (each): 850 lbs
- Power Source: Solar Ready (requires additional solar panel kit)
8. Warranty and Support
A limited parts warranty of 2 years is provided by Liftmaster for this product. For warranty claims, technical support, or further assistance, please refer to the contact information provided in your product packaging or visit the official Liftmaster support website.
For additional resources and frequently asked questions, please visit the Liftmaster Support Page.
Related documentsLA400PKGU Dual EM


Ask a question about this manual
Ask about setup, troubleshooting, compatibility, parts, safety, or missing instructions. Manuals+ will review the question and use this page’s manual context to help answer it.