
Introduction
The OpenBox V8 Combo is a versatile satellite and terrestrial receiver designed to provide high-definition entertainment. It supports DVB-S2 and DVB-T2 standards, offering a wide range of channels and multimedia capabilities. This manual will guide you through the setup, operation, and maintenance of your device.

Figure 1: Front view of the OpenBox V8 Combo receiver.
Package Contents
Before proceeding with the setup, please ensure all items are present in the package:
- OpenBox V8 Combo Receiver
- Remote Control (Note: Remote control may not be included with all packages, as per product specifications.)
- Power Adapter (Please ensure you have the correct plug type for your region.)
- HDMI Cable
- User's Manual (This document)
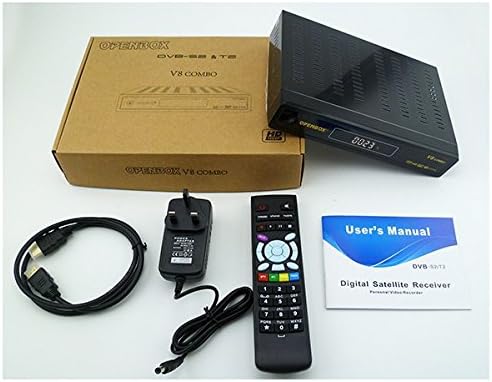
Figure 2: Contents typically included with the OpenBox V8 Combo package, including the receiver, remote, power adapter, HDMI cable, and user manual.
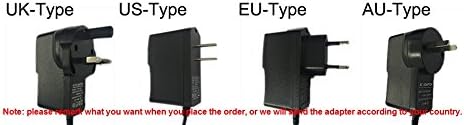
Figure 3: Various power adapter plug types (UK, US, EU, AU) that may be supplied with the device. Ensure you have the correct type for your region.
Setup Guide
Follow these steps to set up your OpenBox V8 Combo receiver:
- Connect to TV: Use the provided HDMI cable to connect the HDMI OUT port on the receiver to an HDMI IN port on your television.
- Connect to Antenna/Dish:
- For Satellite (DVB-S2): Connect your satellite dish LNB cable to the "LNB IN" port on the receiver.
- For Terrestrial (DVB-T2): Connect your terrestrial antenna cable to the "RF IN" port on the receiver.
- Connect to Network (Optional):
- Wired Connection: Connect an Ethernet cable from your router to the LAN port on the receiver.
- Wireless Connection: The device supports Wi-Fi. Refer to the "Network Settings" section in Operating Guide for Wi-Fi setup.
- Connect Power: Plug the power adapter into the DC IN port on the receiver, then plug the adapter into a wall outlet.
- Power On: Turn on your television and select the correct HDMI input source. The receiver should power on automatically or can be turned on using the power button on the front panel or remote control.

Figure 4: Illustrative diagram showing connections for the OpenBox V8 Combo, including HDMI to TV and network connections.
Operating Guide
Initial Setup and Channel Scan
- Upon first power-on, the receiver may guide you through an initial setup wizard. Follow the on-screen prompts.
- Navigate to the "Installation" or "Channel Search" menu using the remote control.
- Select your satellite or terrestrial antenna type and perform an automatic or manual channel scan. The receiver supports automatic, manual, and network search for channels.
- Once the scan is complete, save the channels.
Basic Functions
- Channel Navigation: Use the CH+/CH- buttons on the remote to change channels. Enter channel numbers directly using the numeric keypad.
- Volume Control: Use the VOL+/VOL- buttons to adjust volume.
- Menu Access: Press the "MENU" button to access the main menu for settings and features.
- Electronic Program Guide (EPG): Press the "EPG" button to view program schedules for up to 7 days.
- OSD Language: The On-Screen Display (OSD) supports multiple languages including English, German, French, Portuguese, Spanish, Italian, Russian, Turkish, Polish, Arabic, and Farsi. Adjust this in the system settings.
Multimedia Playback
The OpenBox V8 Combo features a USB input for playing multimedia files from external storage devices such as USB disks or mobile hard drives. It supports various video and image formats.
- Supported Video Formats: MPEG2/MPEG1, AVS, AVI, MKV, MP4, FLV, F4V, TS, M2TS, MOV, 3GP, MP3, AAC.
- Supported Image Formats: JPEG, BMP, PNG, GIF.

Figure 5: Visual representation of supported media formats and compatible storage devices like mobile hard disks, USB disks, and SD cards (with adapter).
Advanced Features
- Wi-Fi Connectivity: Connect to your home network wirelessly for internet-based features.
- DLNA Support: Stream media content from compatible devices (e.g., smartphones, tablets) to your TV via the receiver.
- PVR (Personal Video Recorder): Record TV programs to an external USB storage device.
- Parental Control: Set up parental controls for channels to restrict access to certain content.
- Software Upgrade: Update the receiver's firmware via USB.
Maintenance
To ensure the longevity and optimal performance of your OpenBox V8 Combo receiver, follow these maintenance guidelines:
- Cleaning: Use a soft, dry cloth to clean the exterior of the receiver. Do not use liquid cleaners or abrasive materials.
- Ventilation: Ensure the receiver is placed in a well-ventilated area. Do not block the ventilation openings.
- Power Off: If the receiver will not be used for an extended period, disconnect it from the power outlet.
- Firmware Updates: Periodically check for and install firmware updates via USB to improve performance and add new features.
Troubleshooting
If you encounter issues with your OpenBox V8 Combo, refer to the following common problems and solutions:
| Problem | Possible Cause / Solution |
|---|---|
| No Power |
|
| No Signal / No Picture on TV |
|
| Remote Control Not Working |
|
| Cannot Connect to Wi-Fi |
|
Specifications
Key technical specifications for the OpenBox V8 Combo receiver:
| Feature | Detail |
|---|---|
| Brand | Unknown |
| Compatible Devices | Television |
| Special Features | HD Compatible, Full HD, Wi-Fi, USB Input |
| Connectivity Technology | USB, Ethernet, LAN, HDMI |
| ASIN | B01D8TGI5U |
| UPC | 802483886894 |
| Video Decode | MPEG-2 MP@HL, MPEG4/H.264 BP MP&HP@L4.1, AVS profile@L6.1/4.0/2.0 |
| Channels Number | 10000 channels TV and Radio programmable |
| OSD Language | English, German, French, Portuguese, Spanish, Italian, Russian, Turkish, Polish, Arabic, Farsi |
| EPG | Fully support to 7 days Electronic Program Guide(EPG); XML EPG |
| Picture Formats | JPEG, BMP, PNG, GIF Supported |
| Timer | 5 event timers, off/Once/Daily/Weekly Mode |
| Subtitle | Subtitle support |
| Teletext | VBI insertion for Teletext, CC and WSS |
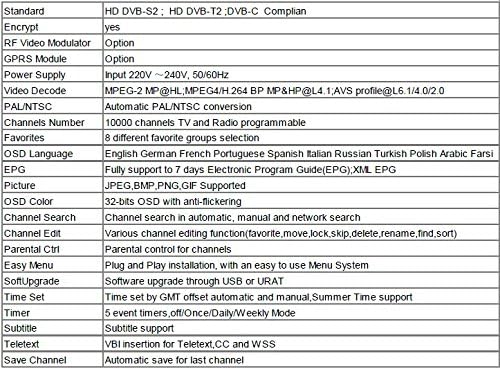
Figure 6: Detailed technical specifications table for the OpenBox V8 Combo receiver.
Warranty and Support
For warranty information, please refer to the documentation provided at the time of purchase or contact your retailer. For technical support, please reach out to the product manufacturer or your point of sale.
This product is designed for reliable operation. Should you require assistance beyond the scope of this manual, professional support is recommended.
