1. Introduction
This manual provides essential instructions for the setup, operation, and maintenance of your Sony PSHX500 Hi-Res USB Turntable. Please read this manual thoroughly before using the product to ensure proper and safe operation.
The Sony PSHX500 turntable allows you to enjoy the authentic sound of vinyl records and convert tracks to portable, Hi-Res Audio. It offers superior quality analog sound and the ability to digitally capture music for personal listening on compatible Hi-Res Audio players.
Key Features:
- High-quality audio technologies for optimal analog playback.
- Integrated shell for improved durability, cartridge stabilization, and enhanced sound focus.
- Supports both phono and line output for versatile connection options.
- Hi-Res audio conversion up to DSD quality via USB connection to a PC.
- Supplied software for editing and transferring tracks to compatible portable players.
- DSD Native AD converter for direct analog to DSD 2.8 MHz or 5.6 MHz digital conversion.
2. What's in the Box
Verify that all items listed below are included in your package:
- Adaptor
- USB cable
- Phone cable
- Instruction manual

Figure 2.1: Sony PSHX500 Turntable with dust cover. This image shows the complete turntable unit, including the platter, tonearm, and clear dust cover.
3. Setup
3.1 Unpacking and Placement
- Carefully remove all components from the packaging.
- Place the turntable on a stable, level surface away from direct sunlight, heat sources, and excessive vibration.
- Ensure adequate ventilation around the unit.
3.2 Tonearm Balance and Tracking Force Adjustment
Proper tonearm balance and tracking force are crucial for optimal sound quality and to prevent damage to your records and stylus.
- Remove the stylus protector.
- Gently release the tonearm clamp.
- Rotate the counterweight at the rear of the tonearm until the tonearm is perfectly balanced (floating horizontally).
- Once balanced, hold the counterweight steady and rotate only the tracking force ring until "0" aligns with the center line on the tonearm.
- Rotate the entire counterweight (including the ring) to set the recommended tracking force. For the PSHX500, the recommended tracking force is typically 3 grams. Refer to the included manual for precise values.

Figure 3.1: Tonearm and counterweight. This image highlights the tonearm assembly, including the counterweight for balancing and adjusting tracking force.
3.3 Anti-Skate Adjustment
Adjust the anti-skate dial to match the tracking force setting. This helps prevent the stylus from skipping and ensures even wear on the record grooves.
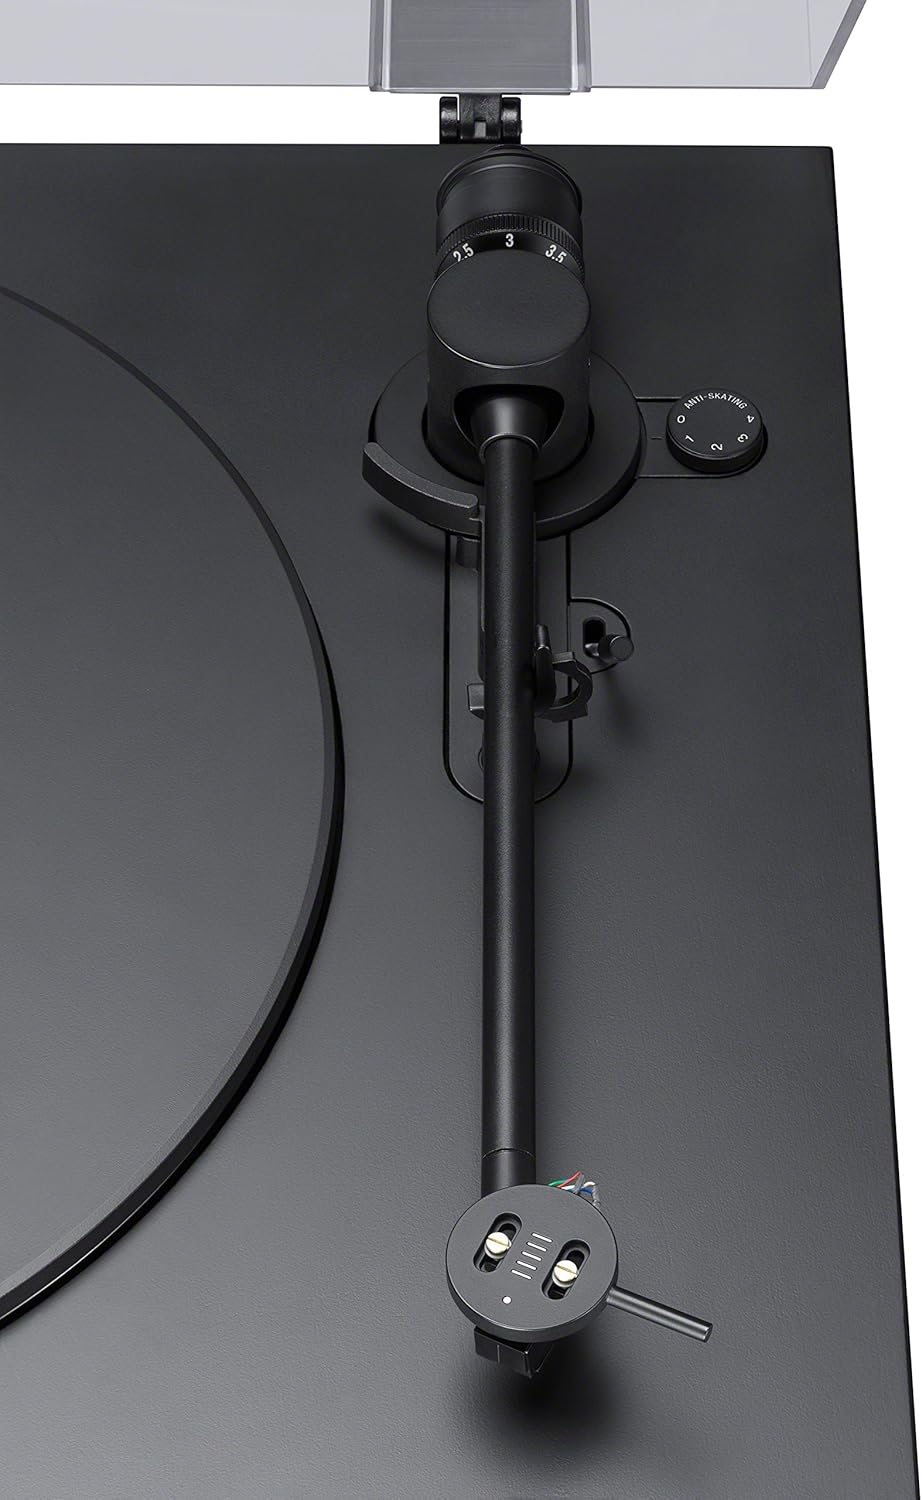
Figure 3.2: Tonearm base and anti-skate dial. This image shows the base of the tonearm with the anti-skate adjustment dial, which helps maintain proper stylus alignment.
3.4 Connecting to Audio System
The PSHX500 supports both phono and line output. Select the appropriate setting on the back of the unit based on your amplifier's input type.
- Phono Output: Connect the RCA cables (red for right, white for left) to your amplifier's PHONO input. Connect the ground wire to the amplifier's ground terminal.
- Line Output: Connect the RCA cables to your amplifier's LINE or AUX input. The ground wire connection is not typically required for line output.

Figure 3.3: Rear panel connections. This image displays the rear of the turntable, showing the PHONO/LINE output selector, RCA audio outputs, ground terminal, USB port, and DC power input.
3.5 Connecting to a Computer (for Hi-Res Audio Recording)
To digitize your vinyl collection, connect the turntable to your PC or Mac using the supplied USB cable.
- Connect one end of the USB cable to the USB port on the turntable.
- Connect the other end of the USB cable to an available USB port on your computer.
- Install the dedicated recording software provided by Sony. This software allows you to record your vinyl in Hi-Res formats like DSD or WAV.

Figure 3.4: Turntable connected to a computer. This image shows the Sony PSHX500 turntable connected to a laptop, illustrating the USB connection for digital archiving.
4. Operating Instructions
4.1 Playing a Record
- Place a record on the platter.
- Select the appropriate speed (33 1/3 RPM or 45 RPM) using the speed selector dial.
- Move the tonearm lift lever to the UP position to raise the tonearm.
- Manually position the tonearm over the desired starting groove of the record.
- Move the tonearm lift lever to the DOWN position to gently lower the stylus onto the record.
- At the end of the record, manually lift the tonearm and return it to its rest.

Figure 4.1: Turntable in operation. This image shows a top-down view of the turntable with a vinyl record on the platter and the tonearm positioned to play.
4.2 Recording Vinyl to Hi-Res Audio
With the turntable connected to your computer via USB and the Sony recording software installed:
- Open the Sony recording software on your computer.
- Select your desired recording format (e.g., DSD 2.8 MHz, DSD 5.6 MHz, or WAV).
- Start playing your vinyl record on the turntable.
- Initiate recording within the software. The software will capture the audio from the turntable.
- After recording, use the software to edit tracks, add metadata, and save the files to your computer.
- Transfer the recorded Hi-Res audio files to a compatible portable player or device for listening.
Video 4.1: Sony Turntable Record. This video demonstrates the process of playing a record on the Sony turntable, showcasing its operation.
5. Maintenance
5.1 Cleaning the Turntable
- Wipe the dust cover and cabinet with a soft, dry cloth. Do not use abrasive cleaners or solvents.
- Keep the dust cover closed when not in use to prevent dust accumulation.
5.2 Cleaning the Stylus
A clean stylus is essential for optimal sound quality and to prolong the life of your records. Use a soft brush designed for stylus cleaning, brushing gently from back to front.
5.3 Cleaning Records
Always clean your records before playing them to remove dust and debris. Use a carbon fiber brush or a record cleaning solution and cloth, following the product instructions.
6. Troubleshooting
| Problem | Possible Cause | Solution |
|---|---|---|
| No sound or low volume | Incorrect PHONO/LINE selector setting; loose audio cables; amplifier input issue. | Ensure PHONO/LINE selector matches your amplifier input. Check all cable connections. Verify amplifier input is selected correctly. |
| Skipping or distorted sound | Incorrect tracking force or anti-skate; dirty stylus or record; damaged record. | Re-adjust tracking force and anti-skate. Clean the stylus and record. Inspect the record for damage. |
| Turntable not spinning | Power not connected; belt dislodged (if applicable); speed selector in OFF position. | Check power connection. Ensure the speed selector is set to 33 or 45. Consult the full manual for belt installation/check. |
| Recording software issues (e.g., freezing, low signal) | Software compatibility; driver issues; incorrect input level. | Ensure software is up-to-date. Install all necessary audio drivers for your computer. Use the gain option in the software to boost the signal if needed (up to +6 dB). |
7. Specifications
| Feature | Detail |
|---|---|
| Product Dimensions | 18.5 x 16.32 x 6.2 inches |
| Item Weight | 8.8 pounds |
| Manufacturer | Sony |
| Item Model Number | PSHX500 |
| Maximum Rotational Speed | 45 RPM |
| Included Components | Adaptor, USB cable, Phone cable, manual |
| Special Feature | Portable |
| Material | Plastic |
| Color | Black |
| Compatible Devices | Personal Computer |
8. Warranty and Support
For warranty information, technical support, or service inquiries, please refer to the warranty card included with your product or visit the official Sony support website. Keep your proof of purchase for warranty claims.
Online resources and FAQs may also be available on the Sony Store or Sony's official support pages.


