
1. Important Safety Instructions
When using electrical appliances, basic safety precautions should be followed, including the following:
- Read all instructions before using the appliance.
- Do not attempt to operate this oven with the door open as this can result in harmful exposure to microwave energy.
- Do not place any object between the oven front face and the door or allow soil or cleaner residue to accumulate on sealing surfaces.
- Do not operate the oven if it is damaged. It is particularly important that the oven door closes properly and that there is no damage to the: (1) door (bent), (2) hinges and latches (broken or loosened), (3) door seals and sealing surfaces.
- The oven should not be adjusted or repaired by anyone except properly qualified service personnel.
- Ensure the appliance is properly grounded.
- Do not immerse the cord or plug in water.
- Close supervision is necessary when the appliance is used by or near children.
- Do not use the oven for purposes other than heating food.
2. Product Overview
2.1. Microwave Oven Components

Figure 1: Front view of the Sharp R-369T Microwave Oven, showcasing its 33L capacity, 6 microwave power levels, and various cooking functions.
The Sharp R-369T is a 33-liter solo microwave oven designed for efficient food preparation. It features a sleek silver finish and a black glass door. Key components include the oven cavity, glass turntable, control panel, and door with a push-open mechanism.

Figure 2: Interior view of the microwave oven, showing the spacious 33L cavity and the removable glass turntable for even cooking.
The interior includes a 272mm glass turntable that rotates during operation to ensure food is heated evenly. The oven door opens with a simple push mechanism.
2.2. Control Panel
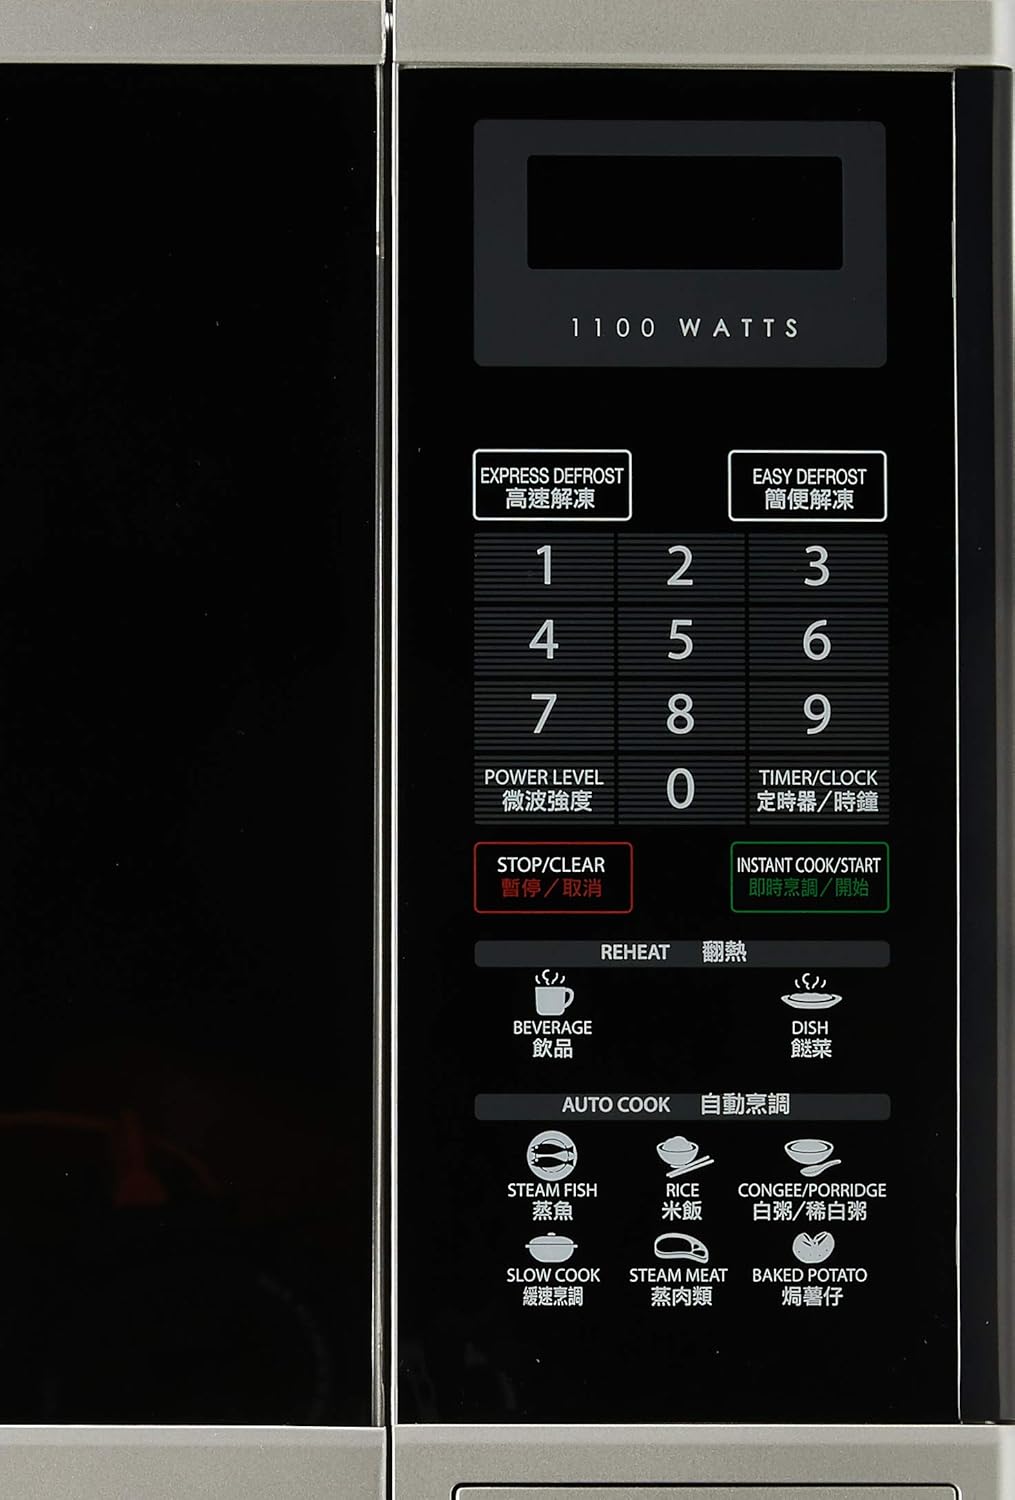
Figure 3: Detailed view of the control panel, featuring numerical keys, function buttons, and the digital display.
The control panel is located on the right side of the oven and features a digital display, numerical keypad (0-9), and various function buttons:
- EXPRESS DEFROST / EASY DEFROST: For quick and convenient defrosting.
- POWER LEVEL: Adjusts microwave power output.
- TIMER/CLOCK: Sets the cooking timer or the current time.
- STOP/CLEAR: Stops current operation or clears settings.
- INSTANT COOK/START: Starts cooking immediately or confirms settings.
- REHEAT: Dedicated buttons for reheating beverages and dishes.
- AUTO COOK: Pre-programmed settings for various food types like Steam Fish, Rice, Congee/Porridge, Slow Cook, Steam Meat, and Baked Potato.
3. Setup and Installation
3.1. Unpacking
Carefully remove the microwave oven and all packing materials from the carton. Check the oven for any damage, such as dents or a misaligned door. Do not operate the oven if it is damaged. Contact your dealer or authorized service center.
3.2. Placement
- Place the oven on a flat, stable surface strong enough to hold its weight (approximately 17kg).
- Ensure adequate ventilation. Leave a minimum of 10 cm (4 inches) clearance at the rear, 20 cm (8 inches) at the top, and 5 cm (2 inches) on each side for proper airflow.
- Do not block air vents.
- Keep the oven away from heat sources, steam, or splashing liquids.
- Do not place the oven near a radio or TV, as it may cause interference.
3.3. Electrical Connection

Figure 4: Rear view of the microwave oven, illustrating the power cord connection and important safety warnings regarding microwave energy.
- Plug the oven into a properly grounded 220V, 50Hz AC outlet with a dedicated circuit.
- Do not use extension cords or adapters.
- Ensure the power cord is not damaged or pinched.
4. Operating Instructions
4.1. Setting the Clock
- Press the TIMER/CLOCK button once.
- Use the numerical keypad to enter the current time (e.g., 12:30 for 12:30 PM).
- Press the TIMER/CLOCK button again to confirm.
4.2. Basic Microwave Cooking
- Place food in a microwave-safe container on the glass turntable.
- Close the oven door securely.
- Press the POWER LEVEL button repeatedly to select the desired power level (e.g., P100 for 100% power, P80 for 80% power). The oven offers 6 microwave power levels.
- Use the numerical keypad to enter the cooking time.
- Press INSTANT COOK/START to begin cooking.
4.3. Defrosting
The oven offers two defrost functions:
- EXPRESS DEFROST: For quick defrosting of smaller items. Follow on-screen prompts or manual for specific weight settings.
- EASY DEFROST: For more controlled defrosting. Refer to the manual for weight and food type guidelines.
- Place frozen food on the turntable.
- Press either EXPRESS DEFROST or EASY DEFROST.
- Enter the weight of the food using the numerical keypad.
- Press INSTANT COOK/START.
4.4. Reheat Functions
The oven includes 2 Reheat Menu keys for common items:
- BEVERAGE: For reheating drinks.
- DISH: For reheating prepared meals.
- Place the item to be reheated on the turntable.
- Press the appropriate REHEAT button (BEVERAGE or DISH).
- The oven will automatically set the time. Press INSTANT COOK/START to begin.
4.5. Auto Cook Functions
The AUTO COOK menu provides pre-programmed settings for various foods:
- STEAM FISH
- RICE
- CONGEE/PORRIDGE
- SLOW COOK
- STEAM MEAT
- BAKED POTATO
- Place the food in a suitable container on the turntable.
- Press the desired AUTO COOK button.
- Select the quantity or weight if prompted (refer to the full manual for specific auto cook settings).
- Press INSTANT COOK/START.
5. Maintenance and Cleaning
Regular cleaning of your microwave oven will ensure its longevity and efficient operation.
5.1. Exterior Cleaning
- Wipe the exterior surfaces with a soft, damp cloth.
- Do not use abrasive cleaners or harsh chemicals.
5.2. Interior Cleaning
- Clean the oven cavity after each use with a mild detergent and a soft cloth.
- For stubborn food splatters, place a bowl of water with lemon slices inside and microwave on high for 2-3 minutes. The steam will loosen the residue, making it easier to wipe clean.
- Ensure the door seals and sealing surfaces are clean to maintain proper operation.
5.3. Glass Turntable
- The glass turntable and roller ring can be removed for cleaning.
- Wash them in warm, soapy water or in the dishwasher.
- Ensure they are completely dry before placing them back in the oven.
6. Troubleshooting
Before contacting service, check the following common issues:
| Problem | Possible Cause | Solution |
|---|---|---|
| Oven does not start | Power cord not plugged in; Door not closed properly; Fuse blown or circuit breaker tripped. | Plug in power cord; Close door securely; Check fuse or reset circuit breaker. |
| Food not heating | Incorrect cooking time or power level set; Door not closed properly. | Adjust time/power; Ensure door is latched. |
| Turntable not rotating | Turntable not properly seated; Obstruction under turntable. | Reposition turntable and roller ring; Remove any obstructions. |
| Sparking inside oven | Metal or foil in oven; Food splatters. | Remove metal objects; Clean oven interior thoroughly. |
If the problem persists after checking these points, please contact an authorized service technician.
7. Specifications
| Brand | Sharp |
| Model | R-369T |
| Capacity | 33 Liters |
| Output Power | 800W (Microwave) |
| Wattage | 1100 watts (Input) |
| Turntable Diameter | 272mm |
| Outside Dimensions (W x H x D) | 520 x 310 x 448 mm |
| Weight | 16.96 kg |
| Voltage | 220 Volts |
| Frequency | 50 Hz |
| Material | Steel |
| Special Features | Programmable, 6 Microwave Power Levels, 2 Reheat Menu Keys, Easy Defrost, Slow Cook Key, Black Glass Door |

Figure 5: Dimensional drawing of the Sharp R-369T Microwave Oven, illustrating its width (520 mm / 52 cm), height (310 mm / 31 cm), and depth (448 mm / 44.8 cm).
8. Warranty and Support
For warranty information and customer support, please refer to the warranty card included with your product or visit the official Sharp website for your region. Keep your purchase receipt as proof of purchase for any warranty claims.
For technical assistance or service inquiries, please contact Sharp customer service.


