Cheerwing X5C-1
Cheerwing Syma X5C-1 Explorers RC Quadcopter Drone User Manual
Model: X5C-1 | Brand: Cheerwing
Introduction
The Cheerwing Syma X5C-1 Explorers RC Quadcopter Drone is an advanced remote-controlled aircraft designed for both beginners and intermediate users. Featuring a 6-axis gyroscope for stable flight and an integrated HD camera, it offers an engaging flying experience with aerial photography capabilities. This manual provides comprehensive instructions for setup, operation, maintenance, and troubleshooting to ensure safe and enjoyable use of your drone.

Image: The Syma X5C-1 drone, showcasing its four propellers, protective guards, and central body with the integrated camera visible at the front.
Package Contents
Please verify that all items listed below are included in your package:
- Syma X5C-1 Quadcopter Drone
- Remote Control Transmitter
- Rechargeable Battery (for drone)
- HD Camera Module
- Main Blades (Propellers)
- Propeller Guards
- Landing Skids
- USB Charging Cable
- Screwdriver
- User Manual (this document)

Image: The retail packaging for the Syma X5C-1, illustrating the drone and its primary components included in the box.
Setup Guide
1. Battery Installation
Drone Battery:
- Ensure the drone's power switch is in the OFF position.
- Open the battery compartment cover located on the underside of the drone.
- Connect the drone battery to the drone's power connector, ensuring correct polarity.
- Carefully place the battery into the compartment and close the cover.
Remote Control Batteries:
- Open the battery cover on the back of the remote control.
- Insert 4 x AA batteries (not included) according to the polarity markings (+/-).
- Close the battery cover securely.

Image: The remote control unit for the Syma X5C-1 drone, showing its dual joysticks, power switch, and LCD display.
2. Propeller and Landing Skid Installation
- Identify the 'A' and 'B' marked propellers. Match them to the corresponding motor shafts on the drone. Propellers with 'A' markings go on diagonally opposite motors, and 'B' markings on the other pair.
- Gently push each propeller onto its motor shaft until it is seated firmly.
- Attach the propeller guards to the arms of the drone using the provided screws and screwdriver.
- Attach the landing skids to the underside of the drone, ensuring they click into place or are secured with screws if applicable.

Image: The Syma X5C-1 drone body without propeller guards, highlighting the motor mounts where propellers are attached.
3. Camera Module Installation
- Locate the camera port on the underside of the drone.
- Connect the camera module's cable to the drone's camera port.
- Secure the camera module in its designated slot.
- Insert a Micro SD card (up to 4GB, included) into the camera module's slot for recording photos and videos.
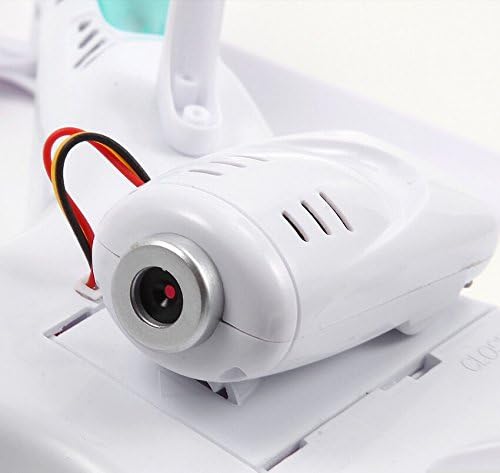
Image: A detailed view of the Syma X5C-1's integrated camera module, showing its lens and connection points.
4. Binding the Drone and Remote Control
- Place the drone on a flat, level surface.
- Turn on the drone's power switch. The indicator lights will flash.
- Turn on the remote control.
- Push the left throttle stick (left joystick) all the way up, then pull it all the way down. You will hear a "beep" sound, and the drone's indicator lights will become solid, indicating successful binding.
Operating Instructions
Basic Flight Controls
- Throttle (Left Stick Up/Down): Controls altitude. Push up to ascend, pull down to descend.
- Yaw (Left Stick Left/Right): Controls rotation around the vertical axis. Push left to rotate counter-clockwise, right to rotate clockwise.
- Forward/Backward (Right Stick Up/Down): Controls forward and backward movement.
- Left/Right Sideward Flight (Right Stick Left/Right): Controls sideward movement (strafe).
Take-off and Landing
- After binding, slowly push the left throttle stick up to take off.
- To land, slowly pull the left throttle stick down until the drone gently touches the ground. Release the stick to stop the motors.
Special Features
- 360° Eversion (Flips): Press the 360° roll button on the remote (usually top right shoulder button), then push the right stick in any direction (forward, backward, left, or right) to perform a flip in that direction. Ensure sufficient altitude (at least 3 meters) before attempting.
- Speed Mode (High/Low): The remote control typically has a button to switch between low and high-speed modes. Low speed is recommended for beginners and indoor flight, while high speed offers more agility for outdoor flight.
Camera Operation
- Taking Photos: While flying, press the photo button on the remote control (refer to remote diagram for exact location). The camera indicator light will flash once to confirm a photo has been taken.
- Recording Video: Press the video button on the remote control. The camera indicator light will start flashing continuously to indicate recording is in progress. Press the button again to stop recording.
- Accessing Files: Turn off the drone and remove the Micro SD card from the camera module. Insert the card into a card reader connected to a computer to view your photos (JPEG) and videos (MP4).
Maintenance
- Cleaning: Use a soft, dry cloth to clean the drone and remote control. Avoid using water or solvents.
- Propeller Inspection: Regularly check propellers for damage (cracks, bends). Replace any damaged propellers immediately to ensure stable flight.
- Battery Care:
- Always use the original charging cable.
- Do not overcharge or over-discharge the battery.
- Store batteries in a cool, dry place away from direct sunlight and heat.
- If the drone will not be used for an extended period, charge the battery to approximately 50% before storage.
- Motor Care: Avoid continuous high-speed operation to prevent motor overheating. Allow motors to cool down between flights.
Troubleshooting
| Problem | Possible Cause | Solution |
|---|---|---|
| Drone does not respond to remote control. | Not bound correctly; low battery in drone or remote. | Re-bind the drone and remote; charge drone battery; replace remote batteries. |
| Drone flies erratically or is unstable. | Propellers damaged or incorrectly installed; drone not calibrated on a flat surface; strong wind. | Check/replace propellers; ensure correct A/B propeller placement; re-calibrate drone on a flat surface; avoid flying in strong winds. |
| Camera not recording or taking photos. | Micro SD card full, corrupted, or not inserted correctly; camera module not connected. | Check Micro SD card (format if necessary, ensure it's not full); ensure camera module is securely connected. |
| Short flight time. | Battery not fully charged; aging battery; continuous high-speed flight. | Ensure battery is fully charged; consider replacing old batteries; fly in lower speed mode or with less aggressive maneuvers. |
Specifications
| Feature | Detail |
|---|---|
| Brand | Cheerwing (Manufactured by Syma) |
| Model Name | X5C-1 Explorers |
| Dimensions | 12.2"L x 12.2"W x 3.1"H |
| Item Weight | 0.61 Kilograms (approx. 1.34 pounds) |
| Control Technology | 2.4Ghz Spread Spectrum |
| Gyroscope | 6-Axis Gyro Stabilization System |
| Camera | Integrated HD Camera (720p Video Capture Resolution) |
| Media Type | Micro SD (up to 4GB) |
| Battery Capacity | 500 Milliamp Hours (LiPo) |
| Maximum Range | Approx. 100 Meters |
| Skill Level | Intermediate |
Warranty and Support
For warranty information, technical support, or to purchase replacement parts, please contact Cheerwing customer service or visit the official Syma website.
- Official Syma Website: www.symatoys.com
- Cheerwing Amazon Store: Cheerwing Store on Amazon
Please retain your proof of purchase for any warranty claims.
Ask a question about this manual
Ask about setup, troubleshooting, compatibility, parts, safety, or missing instructions. Manuals+ will review the question and use this page’s manual context to help answer it.