
1. Introduction
The UE Systems Ultraprobe 100 is an entry-level ultrasonic inspection instrument designed for cost-effective detection of high-frequency sounds. It is primarily used for troubleshooting operating equipment, identifying leaks, and detecting electrical discharges. The device converts these high-frequency signals into an audible range, allowing users to hear and visualize them via a headset and an LED meter.
The Ultraprobe 100 utilizes the heterodyning principle, similar to a radio, to accurately translate high-frequency sounds into an easily recognizable and understandable audible format. Its design emphasizes portability, ease of use, and effective detection in various environments, including noisy settings, due to its directional and localized sensing capabilities.
Key Features:
- Best in class entry level Ultrasound instrument
- Ideally for point & shoot trouble shooting
- Very directional and localized
- Can be easily blocked or shielded
- Can be used in noisy environment
2. Kit Contents
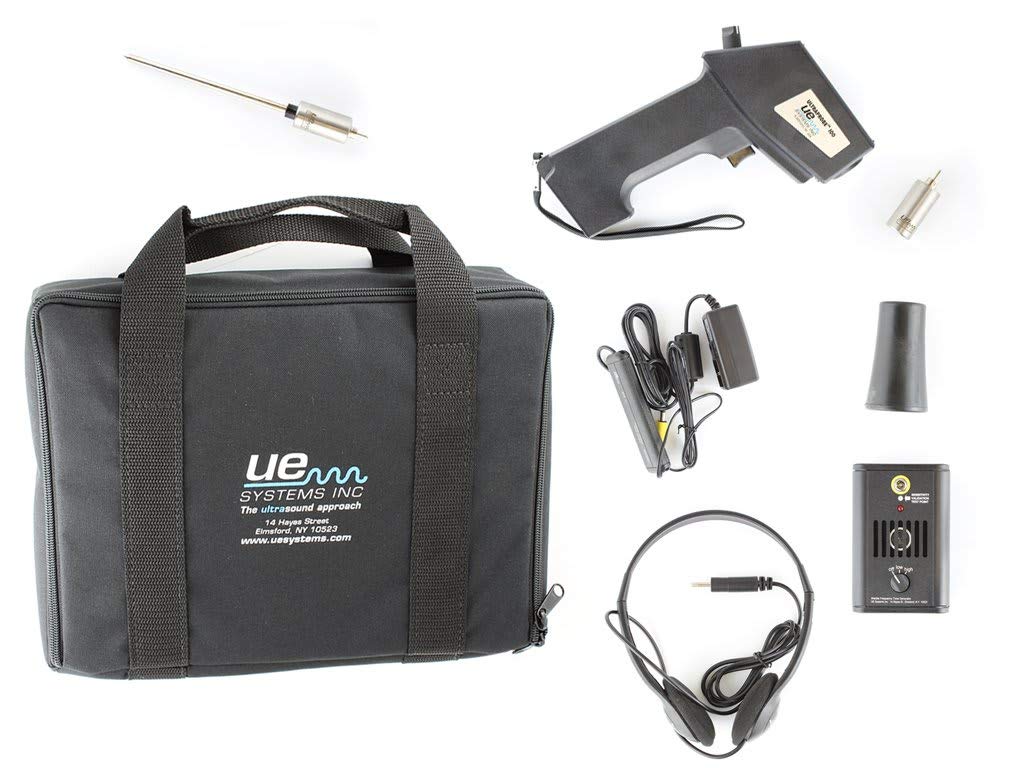
The Ultraprobe 100 Ultrasonic Detection Kit includes the following components:
- Ultraprobe 100 Instrument (main gun-shaped unit)
- Deluxe Noise Attenuating Headphones
- Scanning Module (for airborne ultrasound detection)
- Rubber Focusing Probe (for narrowing the field of detection)
- Contact Probe (for internal ultrasound detection)
- Battery Recharger
- Carrying Case
3. Setup
- Charge the Battery: Connect the battery recharger to the Ultraprobe 100 instrument and a power outlet. Allow sufficient time for the battery to fully charge before initial use.
- Attach Headphones: Plug the deluxe noise attenuating headphones into the headphone jack located on the Ultraprobe 100 instrument.
- Select and Attach Probe:
- For airborne ultrasound detection (e.g., leaks, electrical discharge), attach the Scanning Module to the front of the Ultraprobe 100.
- For internal ultrasound detection (e.g., bearing inspection), attach the Contact Probe to the front of the Ultraprobe 100.
- The Rubber Focusing Probe can be placed over the Scanning Module to narrow the field of detection for pinpointing sources.
4. Operating Instructions
- Power On: Turn on the Ultraprobe 100 instrument using the power switch.
- Adjust Sensitivity: Use the sensitivity control knob to adjust the gain. Start with a lower sensitivity and gradually increase it until a clear signal is heard in the headphones and observed on the LED meter.
- Scan the Area: Point the Ultraprobe 100 towards the area of interest. Move the instrument slowly to scan for ultrasonic emissions.
- Interpret Signals:
- Audible Signals: Listen for distinct sounds in the headphones. Different types of ultrasound (e.g., leaks, electrical arcing, mechanical friction) produce characteristic sounds.
- LED Meter: Observe the LED bar graph. Higher LED illumination indicates a stronger ultrasonic signal.
- Pinpoint Source: As you approach the source of the ultrasound, the audible signal will intensify, and the LED meter will show a higher reading. Use the directional nature of the Ultraprobe to pinpoint the exact location. The Rubber Focusing Probe can assist in this process.
- Power Off: After use, turn off the Ultraprobe 100 instrument to conserve battery life.
5. Maintenance
- Cleaning: Wipe the instrument and probes with a soft, dry cloth. Avoid using abrasive cleaners or solvents.
- Battery Care: Recharge the battery regularly, especially after extended periods of non-use. Do not overcharge or allow the battery to fully discharge for prolonged periods.
- Storage: Store the Ultraprobe 100 and its accessories in the provided carrying case in a cool, dry place when not in use.
- Probe Inspection: Periodically inspect probes for any signs of wear or damage. Replace if necessary to ensure optimal performance.
6. Troubleshooting
- No Sound/Weak Signal:
- Ensure headphones are securely plugged in and functioning.
- Check battery charge level. Recharge if low.
- Increase sensitivity setting.
- Verify the correct probe is attached for the application.
- Excessive Background Noise:
- Decrease sensitivity.
- Use the Rubber Focusing Probe to narrow the detection field.
- Ensure the scanning module is properly attached and not obstructed.
- LED Meter Not Responding:
- Check battery charge.
- Ensure the unit is powered on.
- If the issue persists, contact customer support.
7. Specifications
| Feature | Detail |
|---|---|
| Product Dimensions | 13.25 x 10.25 x 4 inches |
| Item Weight | 3.7 Pounds |
| Model Number | UP100KT |
| Brand | Ultimate Ears (UE Systems) |
| Sensor Type | Ultrasonic |
| Alarm | Audible |
| Manufacturer | UE SYSTEMS INC |
8. Warranty and Support
For warranty information, technical support, or service inquiries, please refer to the documentation provided with your purchase or visit the official UE Systems website.
You can also visit the Ultimate Ears Store on Amazon for more product information.