
1. Introduction
Welcome to the user manual for your Caleffi 740000 Wireless Programmable Thermostat. This device is engineered to provide efficient and precise control over your heating system, ensuring optimal comfort and energy savings. Please read these instructions carefully before installation and operation to ensure proper use and to maximize the lifespan of your product. This manual covers installation, operation, maintenance, and troubleshooting.
2. Safety Information
Always observe the following safety precautions to prevent damage to the device or injury to yourself:
- Electrical Safety: Installation should only be performed by qualified personnel to avoid electrical hazards. Ensure power is disconnected before any wiring.
- Placement: Do not install the thermostat in areas exposed to direct sunlight, drafts, or near heat sources, as this can affect temperature readings.
- Moisture: Keep the device away from water and high humidity environments.
- Cleaning: Use a dry, soft cloth for cleaning. Do not use abrasive cleaners or solvents.
- Battery Handling: Replace batteries only with the specified type. Dispose of used batteries responsibly according to local regulations.
3. Product Overview
The Caleffi 740000 is a compact and user-friendly wireless programmable thermostat. It features a clear digital display for easy monitoring of settings and current status, along with intuitive buttons for programming and control.
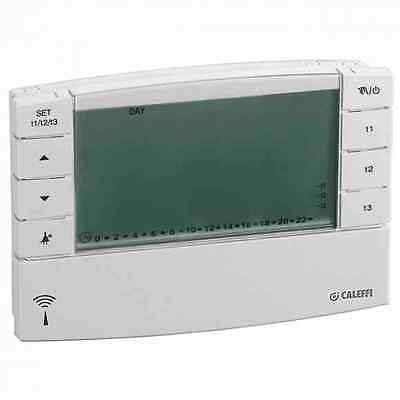
Figure 1: Front view of the Caleffi 740000 Wireless Programmable Thermostat, showing the display and control buttons.
3.1. Components and Controls
- Display Screen: Shows current temperature, time, day, operating mode, and programming schedule.
- SET Button: Used to enter programming mode for time, date, and schedules.
- Up (▲) Button: Adjusts values upwards or navigates through menu options.
- Down (▼) Button: Adjusts values downwards or navigates through menu options.
- Mode Button (Sun/Moon icon): Toggles between comfort and economy modes.
- On/Off Button (⏻/O): Powers the device on or off.
- Program Buttons (1, 2, 3): Selects predefined or custom heating programs.
- Wireless Signal Indicator (bottom left): Displays the status of the wireless connection.
4. Installation and Setup
4.1. Mounting the Thermostat
- Choose a suitable wall location, away from direct heat sources, drafts, or direct sunlight, at approximately 1.5 meters (5 feet) from the floor.
- Carefully detach the front panel from the back plate.
- Mark the drilling points on the wall using the back plate as a template.
- Drill holes and insert wall plugs. Secure the back plate to the wall using screws.
- Ensure any necessary wiring (if applicable for the receiver unit, not the thermostat itself) is connected according to the wiring diagram provided with the receiver unit (sold separately).
- Reattach the front panel to the secured back plate.
4.2. Power Supply (Battery Installation)
The Caleffi 740000 thermostat is battery-powered. Ensure you use the correct type and number of batteries as specified in the technical specifications.
- Open the battery compartment, usually located on the back or side of the thermostat.
- Insert the batteries, observing the correct polarity (+/-).
- Close the battery compartment securely. The thermostat display should power on.
4.3. Initial Configuration and Pairing
Upon first power-up, the thermostat may require initial setup for time, date, and pairing with its receiver unit (if applicable). Refer to the specific instructions for your receiver unit for pairing procedures. The wireless signal indicator on the thermostat will confirm a successful connection.
5. Operating Instructions
5.1. Setting the Time and Date
- Press the SET button. The time or date display will begin to flash.
- Use the ▲ and ▼ buttons to adjust the hour, minute, day, month, and year.
- Press SET again to confirm each setting and move to the next.
- Exit programming mode by waiting a few seconds or pressing a specific button as indicated on the display.
5.2. Programming Heating Schedules
The thermostat allows you to set different temperature programs for various times of the day and week.
- Press the SET button repeatedly until you enter the schedule programming mode (indicated by flashing program numbers or segments on the time scale).
- Use the 1, 2, 3 buttons to select a program slot or a specific day/period.
- Use the ▲ and ▼ buttons to adjust the desired temperature for that period or to set the start/end times.
- Confirm each setting with the SET button.
- Repeat for all desired periods and days.
5.3. Manual Override
To temporarily adjust the temperature without changing the programmed schedule:
- In normal operating mode, use the ▲ or ▼ buttons to set the desired temporary temperature.
- The thermostat will maintain this temperature until the next programmed event or until manually cancelled.
5.4. Mode Selection
Press the Mode (Sun/Moon icon) button to cycle through available operating modes, such as:
- Comfort Mode: Maintains a higher, comfortable temperature.
- Economy Mode: Maintains a lower, energy-saving temperature.
- Anti-freeze Mode: Prevents pipes from freezing by maintaining a minimum temperature.
6. Maintenance
- Cleaning: Wipe the thermostat's exterior with a soft, dry cloth. Do not use liquid cleaners or sprays directly on the device.
- Battery Replacement: When the low battery indicator appears on the display, replace the batteries promptly. Use only the specified type (e.g., AA or AAA, refer to specifications). Ensure correct polarity.
- No User-Serviceable Parts: Do not attempt to open or repair the thermostat yourself. Refer all servicing to qualified personnel.
7. Troubleshooting
If you encounter issues with your Caleffi 740000 thermostat, consult the table below for common problems and solutions.
| Problem | Possible Cause | Solution |
|---|---|---|
| Display is blank | Dead batteries or incorrect battery installation. | Replace batteries, ensuring correct polarity. |
| Thermostat not controlling heating | No wireless connection to receiver, receiver not powered, or incorrect settings. | Check wireless signal indicator. Ensure receiver is powered and correctly wired. Verify thermostat settings and operating mode. |
| Incorrect temperature reading | Thermostat placed in an unsuitable location (e.g., direct sunlight, draft). | Relocate the thermostat to a more appropriate position. |
| Cannot program schedules | Incorrect programming steps or device locked. | Refer to Section 5.2. If locked, check for a child lock feature or reset procedure. |
8. Technical Specifications
| Feature | Detail |
|---|---|
| Manufacturer | Caleffi |
| Product Dimensions (L x W x H) | 1 x 1 x 1 cm |
| Item Weight | 160 grams |
| Model Number | 740000 |
| Color | Neutral |
| Style | Classic |
| Shape | Rectangular |
| Power Source | Battery Powered |
| Voltage | 15 Volts |
| Quantity per Package | 1 |
| Display Style | Textual |
| Mounting Type | Wall Mount |
| Special Features | Backlight |
| Included Components | Chronothermostat |
| Batteries Required | No (Batteries are required for operation but not included) |
| Spare Parts Availability | Information unavailable |
| Connectivity Technology | Radio |
| Controller Type | Push Button |
| Temperature Control Type | Programmable/Manual |
Note: While the specifications state "Batteries Required: No", the "Power Source: Battery Powered" indicates batteries are essential for operation. This likely means batteries are not included in the package. The "Temperature Control Type: User Manual (French)" appears to be a data entry error; the device supports programmable and manual temperature control.
9. Warranty and Support
For warranty information, please refer to the documentation provided with your purchase or contact your retailer. Caleffi products are designed for reliability, but should you require technical assistance or support, please contact Caleffi customer service or visit their official website for detailed support resources.
Online Resources: For the most up-to-date information, FAQs, and additional support, please visit the official Caleffi website.


