
1. Introduction
Thank you for purchasing the Maclean MCE133 Microwave Motion Sensor. This device utilizes microwave technology to detect motion within its detection range, automatically controlling lighting or other connected electrical loads. It offers 360-degree detection, high sensitivity, and adjustable settings for optimal performance in various environments. Please read this manual carefully before installation and use to ensure proper operation and safety.
2. Safety Instructions
- Electrical Hazard: Installation must be performed by a qualified electrician in accordance with all local and national electrical codes.
- Disconnect Power: Always disconnect power at the circuit breaker or fuse box before installing, servicing, or removing the sensor.
- Indoor Use Only: This sensor is designed for indoor use. Do not expose it to rain, moisture, or extreme temperatures.
- Load Capacity: Do not exceed the maximum rated load of 2000W for incandescent lamps or 1000W for LED/fluorescent lamps.
- Mounting: Ensure the sensor is securely mounted to a stable surface.
- Keep out of reach of children.
3. Package Contents
Please check the package for the following items:
- Maclean MCE133 Microwave Motion Sensor Unit
- Mounting Screws
- Wall Plugs
- User Manual (this document)

Figure 3.1: Included mounting hardware (screws and wall plugs).
4. Product Overview
The Maclean MCE133 is a compact, ceiling-mounted microwave motion sensor. It features adjustable settings for light sensitivity (LUX), detection time (TIME), and motion sensitivity (SENS).

Figure 4.1: Maclean MCE133 Microwave Motion Sensor (overall view).
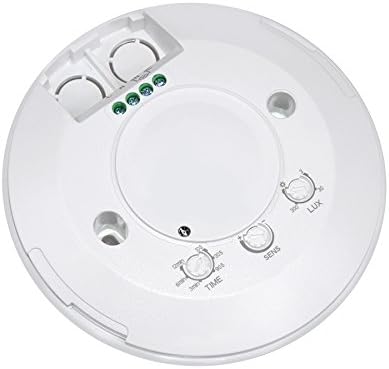
Figure 4.2: Top view showing the adjustable dials for LUX, TIME, and SENS.

Figure 4.3: Bottom view showing the electrical wiring terminals (L, N, Load).
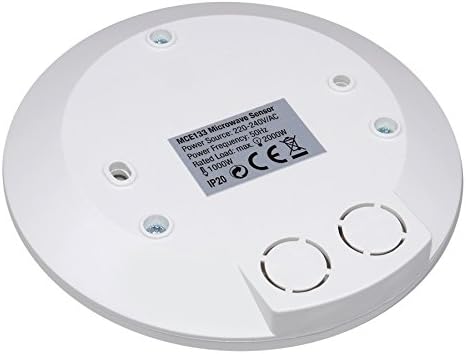
Figure 4.4: Rear label displaying model number, power source, frequency, and rated load.
5. Specifications
| Feature | Specification |
|---|---|
| Brand | Maclean |
| Model Number | MCE133 |
| Color | White |
| Power Source | Wired Electric (220-240V AC) |
| Frequency | 50 Hz |
| Rated Load (Incandescent) | Max 2000W |
| Rated Load (LED/Fluorescent) | Max 1000W |
| Detection Angle | 360 degrees |
| Maximum Range | 8 meters |
| Mounting Type | Ceiling Mount |
| Operating Temperature | 15 to 35 degrees Celsius |
| Item Weight | 0.16 Kilograms |
| Compatible Devices | Lamps |
| Recommended Uses | Room automation and energy management |
6. Setup and Installation
Important: Ensure power is disconnected at the main circuit breaker before beginning installation.
- Choose Location: Select a suitable ceiling location for the sensor. Ensure it is free from obstructions that might block the detection area. Avoid mounting near heat sources or air conditioning vents, which can cause false triggers.
- Prepare Wiring: Open the sensor unit to access the wiring terminals. You will see terminals marked L (Live), N (Neutral), and a symbol for Load (output to the light/device).
- Mount the Base: Use the sensor's base as a template to mark drilling points on the ceiling. Drill holes, insert the wall plugs, and secure the sensor base to the ceiling using the provided screws.
- Connect Wiring: Connect the main power supply wires and the load wires to the sensor terminals as follows:
- Connect the Live (L) wire from the power supply to the 'L' terminal on the sensor.
- Connect the Neutral (N) wire from the power supply to the 'N' terminal on the sensor.
- Connect the Live wire of your light fixture (load) to the 'Load' terminal (often marked with a light bulb symbol) on the sensor.
- Connect the Neutral wire of your light fixture directly to the main Neutral (N) wire from the power supply.
Figure 6.1: Wiring terminals and connection points.
- Secure Sensor Body: Once wiring is complete and secure, attach the main body of the sensor to its base, ensuring it clicks into place or is fastened as per the design.
- Restore Power: Turn the power back on at the circuit breaker. The sensor may go through a brief warm-up period (e.g., 30 seconds) during which the connected light might turn on and off.
7. Operating Instructions and Adjustments
The sensor features three adjustable dials on its top surface (refer to Figure 4.2):
- LUX (Light Sensitivity): This dial controls the ambient light level at which the sensor will activate.
- Turn towards the sun symbol (max): The sensor will activate regardless of ambient light (day or night).
- Turn towards the moon symbol (min): The sensor will only activate when the ambient light is low (e.g., dusk or night).
- TIME (Delay Time): This dial sets how long the connected light will remain on after motion is no longer detected.
- Adjustable typically from 10 seconds to 12 minutes.
- Turn clockwise to increase the delay time, counter-clockwise to decrease it.
- SENS (Sensitivity): This dial adjusts the detection range and sensitivity of the microwave sensor.
- Turn clockwise to increase sensitivity and detection range (up to 8 meters).
- Turn counter-clockwise to decrease sensitivity and detection range.
- Adjust this to prevent unwanted triggers from outside the desired area.
Testing: After installation, set LUX to maximum (sun symbol) and TIME to minimum. Test the detection by moving within the sensor's range. Adjust SENS as needed. Once satisfied with the detection, adjust LUX to your desired ambient light condition and TIME to the preferred duration.
8. Maintenance
- Cleaning: Clean the sensor's surface periodically with a soft, dry cloth. Do not use abrasive cleaners, solvents, or excessive moisture.
- No User-Serviceable Parts: The sensor contains no user-serviceable parts. Do not attempt to open or repair the unit.
- Regular Checks: Periodically check the sensor's functionality to ensure it is operating correctly.
9. Troubleshooting
| Problem | Possible Cause | Solution |
|---|---|---|
| Light does not turn on when motion is detected. |
|
|
| Light stays on continuously. |
|
|
| Light turns on for no apparent reason (false triggers). |
|
|
| Detection range is too short. |
|
|
10. Warranty and Support
Maclean products are designed for reliability and performance. This product is covered by a manufacturer's warranty against defects in materials and workmanship. For warranty claims, technical support, or any questions regarding your Maclean MCE133 sensor, please contact your retailer or the official Maclean customer service. Please have your proof of purchase and model number (MCE133) ready when contacting support.

