
1. Introduction
The Uniden DC1 is a compact 1080p Full HD dash camera designed to record your journeys. Equipped with a 1.5-inch LCD screen, G-Sensor for collision detection, and loop recording functionality, it provides essential video evidence for various driving situations. This manual provides detailed instructions for setting up, operating, and maintaining your Uniden DC1 Dash Cam.
2. Product Overview
The Uniden DC1 features a 140-degree wide-angle lens to capture a broad view of the road. Its built-in G-Sensor automatically detects impacts and protects critical footage. Loop recording ensures continuous recording by overwriting the oldest files when the memory card is full.

Figure 2.1: Front view of the Uniden DC1 Dash Cam with its suction cup mount.
Key Features:
- Full HD 1920x1080 @ 30fps video recording
- 140° Wide View Angle lens
- Loop Recording for continuous operation
- Built-in Microphone for audio recording
- G-Sensor with Collision Detection Mode
- 1.5-inch LCD display
3. What's in the Box
Upon unboxing your Uniden DC1 Dash Cam, you should find the following components:
- Uniden DC1 1080P Full HD Dash Cam unit
- Suction Cup Windshield Mount
- Vehicle Power Adapter (cigarette lighter adapter)
- 8GB Micro SD Card (pre-installed or included separately)
- USB Cable
4. Setup
4.1. Installing the Micro SD Card
Locate the Micro SD card slot on the side of the Uniden DC1. Gently insert the provided 8GB Micro SD card until it clicks into place. Ensure the card is inserted correctly to avoid damage. The device supports up to 32GB Micro SD cards.
4.2. Mounting the Dash Cam
The Uniden DC1 comes with a suction cup mount for easy installation on your vehicle's windshield. Choose a location that does not obstruct your view of the road.
- Clean the chosen area on the windshield thoroughly to ensure a strong suction.
- Attach the suction cup mount to the dash cam unit.
- Press the suction cup firmly against the windshield and then push the lever down to secure it.
- Adjust the angle of the dash cam to ensure the lens captures the road ahead clearly.
Video 4.1: Installation steps for a similar dash cam model. This video demonstrates the process of attaching the mount to the dash cam and securing it to the windshield, as well as connecting the power cable.
Video 4.2: Demonstrates how to assemble and install a Sportway S503 suction cup dash cam mount. This video shows unboxing the mount, assembling its components, and attaching it to a windshield. It also illustrates how to use different joint types for compatibility.
Video 4.3: Shows the assembly and installation of a Sportway S10 suction cup dash cam mount. This video details how to attach the mount to a dash cam and secure it to the windshield, including how to use various joint pieces for different dash cam models.
Video 4.4: Illustrates the assembly and installation of a Sportway S40 suction cup dash cam mount. This video provides instructions on how to connect the mount to a dash cam and securely attach it to the windshield, highlighting the use of different joint components for broader compatibility.
Video 4.5: Details the assembly and installation of a Sportway S501 suction cup dash cam mount. This video guides users through connecting the mount to a dash cam and securing it to the windshield, emphasizing the versatility of the mount with various dash cam models.
4.3. Connecting Power
Connect the vehicle power adapter to the dash cam's power input port and plug the other end into your car's cigarette lighter socket. The dash cam will typically power on automatically when the vehicle starts and begin recording.
Video 4.6: Connection and Use Instruction for a similar dash cam. This video demonstrates connecting the USB cable and installing an APK file on an Android car navigation system, then checking for updates to enable ADAS functionality. This is relevant for connecting the dash cam to a car's infotainment system.
5. Operating Instructions
5.1. Automatic Recording
Once powered on, the Uniden DC1 will automatically begin recording. The recording will be saved in segments (e.g., 1, 3, or 5 minutes) due to the loop recording feature. When the Micro SD card is full, the oldest unprotected files will be overwritten.
5.2. G-Sensor (Collision Detection)
The built-in G-Sensor detects sudden impacts or rapid acceleration/deceleration. When triggered, the current video segment will be automatically locked and saved to prevent it from being overwritten by loop recording. This ensures critical event footage is preserved.
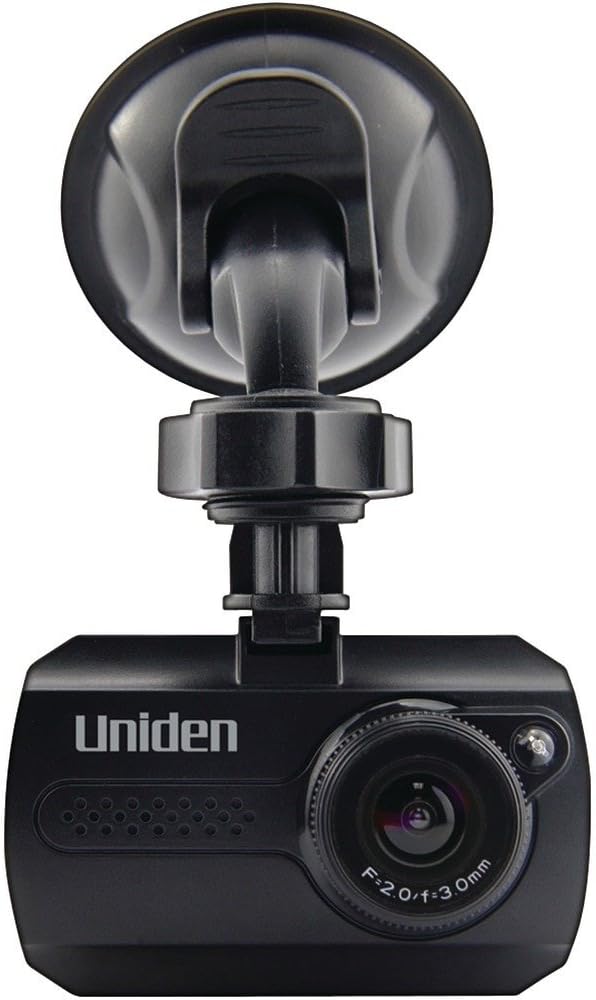
Figure 5.1: The G-Sensor feature automatically locks video footage during collisions, ensuring important events are saved.
5.3. Menu Navigation
Use the buttons located on the side or bottom of the dash cam to navigate through the menu options. Common settings include video resolution, loop recording duration, G-Sensor sensitivity, date/time stamp, and audio recording.
5.4. Playback
To review recorded footage, stop recording and enter playback mode via the menu. You can then browse through the video files on the 1.5-inch LCD screen.
6. Maintenance
6.1. Formatting the Micro SD Card
It is recommended to format the Micro SD card regularly (e.g., once a month) to ensure optimal performance and prevent data corruption. Formatting can be done through the dash cam's menu settings. Warning: Formatting will erase all data on the card. Back up any important files before formatting.
6.2. Cleaning the Device
Use a soft, dry cloth to clean the dash cam's lens and body. Avoid using abrasive cleaners or solvents that could damage the device. Ensure the lens is free of dust and smudges for clear video quality.
7. Troubleshooting
- Dash Cam not powering on: Ensure the power cable is securely connected to both the dash cam and the vehicle's power outlet. Check if the vehicle's power outlet is functioning.
- "No SD Card" error: Verify that the Micro SD card is properly inserted. Try reinserting the card or using a different, compatible Micro SD card. Format the card if necessary (after backing up data).
- Screen/Device locks up: If the device becomes unresponsive, try resetting it. Refer to the device's specific reset procedure (often a small reset button or holding the power button).
- Poor video quality: Ensure the lens is clean and free from obstructions. Check the video resolution settings in the menu.
- Suction cup not sticking: Clean both the windshield and the suction cup thoroughly. Ensure the lever is fully engaged to create a strong vacuum seal. If the weather is cold, warm the suction cup slightly before applying.
8. Specifications
| Feature | Specification |
|---|---|
| Model Name | Dash Cam Recorder, 1-1/2 in. Screen |
| Video Capture Resolution | 1080p (Full HD 1920x1080 @ 30fps) |
| View Angle | 140° |
| Display | 1.5-inch LCD |
| Special Features | G-Sensor, Loop Recording, Built-in Microphone |
| Connectivity Technology | Bluetooth (for certain features/accessories) |
| Mounting Type | Windshield Mount (Suction Cup) |
| Control Method | Touch (on-device buttons) |
| Product Dimensions | 6.85 x 3.45 x 5.45 inches |
| Item Weight | 11.7 ounces |
| Batteries | 2 AAA batteries required (included) |
| Manufacturer | Uniden |
| Date First Available | April 1, 2016 |
9. Warranty and Support
For any product-related issues or inquiries, please contact Uniden customer support. Some dash cam mounts from third-party sellers may offer extended warranty services, such as a 3-year warranty. Please refer to your purchase documentation for specific warranty details.
For general support or to explore other Uniden products, visit the Uniden Store on Amazon.


