
Introduction
This manual provides essential information for the safe and efficient operation of your SINGER Start 1234 Portable Sewing Machine. Please read all instructions carefully before using the machine to ensure proper setup, operation, and maintenance. This machine is designed for basic sewing tasks and is suitable for beginners.

Image: The SINGER Start 1234 Portable Sewing Machine, white with teal accents, ready for use.
Important Safety Instructions
When using an electrical appliance, basic safety precautions should always be followed, including the following:
- Always unplug the sewing machine from the electrical outlet immediately after using and before cleaning, removing covers, or making any user servicing adjustments.
- Do not allow children to use the machine unsupervised.
- Keep fingers away from all moving parts. Special care is required around the sewing machine needle.
- Always use the proper needle plate. The wrong plate can cause the needle to break.
- Do not use bent needles.
- Do not pull or push fabric while stitching. This may deflect the needle, causing it to break.
- Turn the sewing machine off when making any adjustments in the needle area, such as threading the needle, changing the needle, threading the bobbin, or changing the presser foot.
- Never drop or insert any object into any opening.
- Do not operate where aerosol (spray) products are being used or where oxygen is being administered.
- To disconnect, turn all controls to the off position, then remove the plug from the outlet.
Product Overview
The SINGER Start 1234 is a lightweight and portable mechanical sewing machine designed for ease of use. It features a durable metal frame and a variety of functions to assist with common sewing projects.
Key Features:
- 6 Built-In Stitches: Includes essential stitches like straight, zigzag, satin, blind hem, scallop, and a 4-step buttonhole.
- 4-Step Buttonhole: Simplifies the process of creating buttonholes.
- Automatic Bobbin Winding System: Ensures bobbins are wound evenly and stops automatically when full.
- Free Arm: Removable storage compartment converts to a free arm for sewing cuffs, collars, and pant hems.
- Easy Stitch Selection: A simple dial allows for quick stitch changes.
- Built-in Reverse: For reinforcing seams.
- Adjustable Tension Settings: For optimal stitch quality across various fabrics.
- Extra-High Presser Foot Lifter: Accommodates thicker fabrics and multiple layers.
Included Accessories:
The machine comes with a standard set of accessories to get you started:
- All-Purpose Foot
- Zipper Foot
- Buttonhole Foot
- Darning Plate
- Pack of Needles
- Bobbins
- Needle Plate Screwdriver
- Spool Pin Felts
- Seam Ripper / Lint Brush
- Power Line Cord
- Foot Control
- Quick Start Guide
- Instruction Manual

Image: Various accessories including presser feet, bobbins, needles, and a seam ripper.
Setup
Power Connection:
- Ensure the machine's power switch is in the OFF position.
- Connect the foot control plug into the machine's jack.
- Connect the power cord plug into the machine's jack.
- Plug the power cord into a suitable electrical outlet (110 volts for US and Canada).
Bobbin Winding:
- Place a spool of thread on the spool pin.
- Follow the numbered diagram on top of the machine to guide the thread through the bobbin winding tension disc.
- Place an empty bobbin onto the bobbin winder spindle and push it to the right.
- Start the machine; the bobbin will wind automatically and stop when full.
- Cut the thread and remove the wound bobbin.

Image: Close-up of the spool pins and bobbin winder area on the top of the machine.
Threading the Machine:
- Raise the needle to its highest position using the handwheel.
- Place a spool of thread on the spool pin.
- Follow the numbered threading path indicated on the machine, guiding the thread through all tension guides and the take-up lever.
- Thread the needle from front to back.
- Insert the wound bobbin into the bobbin case under the needle plate, ensuring the thread feeds correctly.
- Hold the upper thread, turn the handwheel to lower and raise the needle, catching the bobbin thread. Pull both threads under the presser foot.

Image: Hands demonstrating the threading process of the SINGER Start 1234 sewing machine.
Operating the Machine
Stitch Selection:
To select a stitch, turn the stitch selector dial located on the front of the machine. Align the desired stitch symbol with the indicator mark. The machine has pre-set stitch width and length for each of the 6 built-in stitches.

Image: A hand turning the stitch selector dial on the SINGER Start 1234 machine to choose a stitch pattern.
Basic Sewing:
- Place your fabric under the presser foot.
- Lower the presser foot lever.
- Gently press the foot control to start sewing. The machine will begin stitching.
- Guide the fabric gently with both hands, ensuring it feeds evenly. Do not pull or push the fabric forcefully.
- To reinforce a seam, press the reverse lever/button while sewing.
- When finished, raise the needle to its highest position, lift the presser foot, and pull the fabric away. Cut the threads.

Image: Hands guiding light green polka-dot fabric under the needle of the SINGER Start 1234 machine during sewing.
4-Step Buttonhole Function:
The SINGER Start 1234 features a 4-step buttonhole function. Refer to the specific markings on the stitch selector dial for each step (1, 2, 3, 4) and follow the instructions in the detailed manual for precise buttonhole creation. You will need to use the included buttonhole foot.
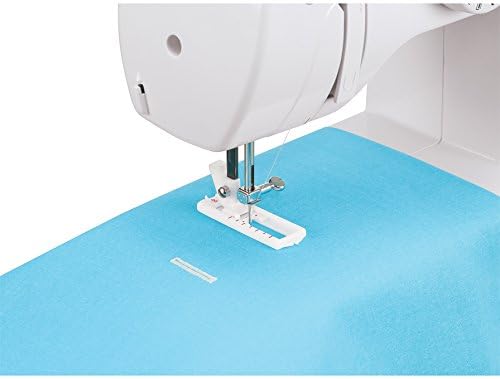
Image: A close-up of the buttonhole foot on the SINGER Start 1234 machine, creating a buttonhole stitch on blue fabric.
Adjusting Thread Tension:
The thread tension dial is located on the front of the machine. For most general sewing, the tension should be set between 3 and 5. Adjust the dial to a lower number for lighter tension or a higher number for tighter tension, depending on your fabric and thread type. Incorrect tension can lead to uneven stitches or thread breakage.

Image: Close-up of the thread tension dial on the SINGER Start 1234 sewing machine, showing numerical settings.
Maintenance
Cleaning:
Regular cleaning helps maintain your machine's performance. Always unplug the machine before cleaning.
- Remove the needle plate and bobbin case.
- Use the provided lint brush to remove lint and dust from the feed dogs and bobbin area.
- Wipe the exterior of the machine with a soft, dry cloth. Do not use harsh chemicals.
Needle Replacement:
Replace the needle regularly, especially after every 8-10 hours of sewing or if it becomes bent or dull. A dull or bent needle can cause skipped stitches, fabric damage, or needle breakage.
- Turn off and unplug the machine.
- Loosen the needle clamp screw.
- Remove the old needle.
- Insert a new needle with the flat side facing the back of the machine, pushing it up as far as it will go.
- Tighten the needle clamp screw securely.
Troubleshooting
Here are solutions to common issues you might encounter:
| Problem | Possible Cause | Solution |
|---|---|---|
| Skipped Stitches | Incorrect needle, bent needle, improper threading. | Replace needle with correct type/size, re-thread machine correctly. |
| Thread Breaks | Incorrect tension, poor quality thread, improperly wound bobbin, bent needle. | Adjust tension, use good quality thread, re-wind bobbin, replace needle. |
| Fabric Jams | Incorrect presser foot, pulling/pushing fabric, lint in feed dogs. | Use correct presser foot, guide fabric gently, clean feed dogs. |
| Needle Breaks | Bent needle, pulling fabric, wrong needle size for fabric, hitting pins. | Replace needle, guide fabric gently, use correct needle, remove pins. |
| Uneven Stitches | Incorrect tension, improper threading, wrong needle. | Adjust tension, re-thread, use correct needle. |
Specifications
- Model Number: 1234
- Dimensions: 13 x 7 x 11.5 inches (33 x 17.8 x 29.2 cm)
- Item Weight: Approximately 9.8 pounds (4.4 kg)
- Stitches: 6 Built-in Stitches (Straight, Zigzag, Satin, Blind Hem, Scallop, 4-Step Buttonhole)
- Stitch Width: 5 millimeters (pre-set)
- Sewing Speed: Up to 750 stitches per minute
- Bobbin Type: Class 15 Transparent
- Power Source: Corded Electric (110 volts for US and Canada)
- Material: Metal frame
- Color: White/Teal

Image: An illustration showing the internal heavy-duty metal frame of the SINGER Start 1234 sewing machine, highlighting its durability.
Warranty and Support
The SINGER Start 1234 sewing machine comes with a limited 25-year warranty. Please refer to the warranty card included with your product for specific terms and conditions.
For further assistance, troubleshooting, or to register your product, please visit the official SINGER website or contact SINGER customer support.
Online Resources:
- Official SINGER Website: www.singer.com
- Product Registration: www.singer.com/register-your-product


