
Soundstream RN1.5000D
Soundstream RN1.5000D Rubicon Nano 5000W Class D 1-Channel Amplifier User Manual
Model: RN1.5000D | Brand: Soundstream
Introduction
The Soundstream RN1.5000D Rubicon Nano amplifier is designed for high-performance audio systems. This manual provides essential information for the proper installation, operation, and maintenance of your amplifier. Rubicon Nano amplifiers feature an optimized Class D design for performance, reliability, and a compact footprint. Key improvements include re-located signal inputs, power/ground, and speaker connections to the leading edge of the chassis for easier installation. Pre-amp and crossover options are conveniently located on the top surface for post-installation adjustments. The circuit board includes increased power supply and output stage components, and monoblock bridging capability.
Key Features
- Rubicon Nano 5000W Class D 1-Channel Amplifier
- RMS Power Range: 1000Wx1@4-ohms / 1500Wx1@2-ohms / Bridged: 2500Wx1@4-ohms
- Maximum Power: 5000 Watts
- MOSFET Power Supply with Audiophile Grade IRTM Transistors
- Hybrid Aluminum Alloy Heatsink for Optimum Dissipation
Product Overview

Figure 1: Top-down view of the Soundstream RN1.5000D Rubicon Nano Amplifier, showcasing its sleek blue finish and the Soundstream logo.

Figure 2: Angled view of the Soundstream RN1.5000D Rubicon Nano Amplifier, highlighting its compact design and heat sink fins.

Figure 3: Rear panel of the Soundstream RN1.5000D Rubicon Nano Amplifier, showing the low-input, high-input, phase switch, master/slave settings, woofer output, fuse bank, and power connections.
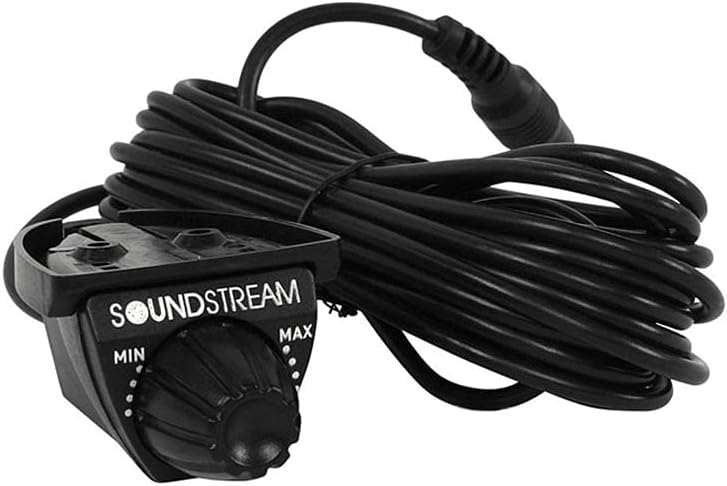
Figure 4: Included remote bass knob for the Soundstream RN1.5000D Rubicon Nano Amplifier, allowing convenient bass level adjustment.
Setup and Installation
Proper installation is crucial for optimal performance and safety. It is recommended that installation be performed by a qualified professional.
1. Mounting the Amplifier
- Choose a secure, well-ventilated location for mounting the amplifier. Avoid mounting in areas exposed to direct sunlight, excessive heat, or moisture.
- Ensure adequate airflow around the amplifier's heatsink for proper cooling.
- Use appropriate hardware to securely fasten the amplifier to a solid surface.
2. Power Connections
- Battery (BATT+) Connection: Connect a heavy-gauge wire (e.g., 4-gauge or larger, depending on cable length and power requirements) directly from the vehicle's positive battery terminal to the amplifier's BATT+ terminal. Install an appropriate fuse holder (not included) within 18 inches (45 cm) of the battery.
- Ground (GND) Connection: Connect a heavy-gauge wire of the same size as the BATT+ wire from the amplifier's GND terminal to a clean, unpainted metal surface on the vehicle's chassis. Ensure a solid electrical connection.
- Remote (REM) Turn-On Connection: Connect a smaller gauge wire (e.g., 18-gauge) from the amplifier's REM terminal to the remote turn-on output of your head unit or other switched 12V source.
3. Audio Input Connections
- Low-Level Input (RCA): Connect RCA cables from your head unit's pre-amp outputs to the amplifier's LOW-INPUT RCA jacks.
- High-Level Input: If your head unit does not have RCA outputs, use the high-level input. Connect speaker wires from your head unit's speaker outputs to the amplifier's HIGH-INPUT terminals.
4. Speaker Output Connections
- Connect your subwoofer(s) to the amplifier's WOOFER output terminals. Ensure correct polarity (+ to + and - to -).
- Refer to the amplifier's specifications for minimum impedance loads. This amplifier is a 1-channel (monoblock) amplifier designed for subwoofers.
Operating Instructions
1. Gain Adjustment
The gain control matches the amplifier's input sensitivity to the output of your head unit. Start with the gain control at minimum and slowly increase it until you hear distortion, then back off slightly. Do not use the gain control as a volume knob.
2. Crossover Settings
The amplifier features adjustable crossover filters. For subwoofer applications, typically use a Low-Pass Filter (LPF) to allow only low frequencies to pass to the subwoofer. Adjust the frequency knob to blend the subwoofer output with your main speakers.
3. Bass Boost
The bass boost control provides an increase in output at a specific low frequency. Use this feature sparingly and adjust carefully to avoid distortion or damage to your speakers.
4. Remote Bass Knob
Connect the included remote bass knob to the amplifier for convenient adjustment of the subwoofer level from the driver's seat.
Maintenance
- Keep the amplifier clean and free from dust and debris. Use a soft, dry cloth for cleaning.
- Ensure all connections remain secure. Periodically check wiring for any signs of wear or corrosion.
- Do not block the heatsink fins, as this can lead to overheating.
Troubleshooting
| Problem | Possible Cause | Solution |
|---|---|---|
| No Power / Amplifier Not Turning On | Blown fuse; Loose power or ground connection; No remote turn-on signal. | Check and replace fuses; Verify all power and ground connections are secure; Check remote wire connection and source. |
| No Audio Output | Loose RCA or speaker connections; Incorrect input selection; Amplifier in protect mode. | Check all audio connections; Ensure correct input (low-level/high-level) is selected; Check for protect light and resolve underlying issue (e.g., overheating, short circuit). |
| Distorted Sound | Gain set too high; Incorrect crossover settings; Speaker impedance mismatch. | Reduce gain setting; Adjust crossover frequencies; Verify speaker impedance is within amplifier's supported range. |
| Amplifier Overheating | Insufficient ventilation; Impedance too low; Prolonged high-power operation. | Ensure proper airflow around amplifier; Check speaker impedance; Reduce volume or allow amplifier to cool down. |
Specifications
| Feature | Detail |
|---|---|
| Brand | Soundstream |
| Model Number | RN1.5000D |
| RMS Power Range | 1000Wx1@4-ohms / 1500Wx1@2-ohms / Bridged: 2500Wx1@4-ohms |
| Maximum Power | 5000 Watts |
| Number of Channels | 1 |
| Item Dimensions (L x W x H) | 18.5 x 9.75 x 3.75 inches |
| Item Weight | 8 pounds |
| Voltage | 16 Volts (DC) |
| Maximum Supply Voltage | 16 Volts (DC) |
| Operating Temperature | 85 Degrees Celsius |
| Mounting Type | Surface Mount |
| Specification Met | FCC |
| Date First Available | January 26, 2016 |
Warranty and Support
For detailed warranty information, please refer to the documentation included with your purchase or contact Soundstream customer support directly. Warranty terms and conditions may vary by region and retailer.
For technical assistance or further inquiries, please visit the official Soundstream website or contact their customer service department.
Online Resources: Soundstream Official Website
Related documentsRN1.5000D


Ask a question about this manual
Ask about setup, troubleshooting, compatibility, parts, safety, or missing instructions. Manuals+ will review the question and use this page’s manual context to help answer it.