
KICKER 42IQ5004
Kicker IQ500.4 Q-Class Amplifier User Manual
Model: 42IQ5004
1. Introduction
This manual provides detailed instructions for the installation, operation, and maintenance of your Kicker IQ500.4 Q-Class Amplifier. Please read this manual thoroughly before attempting installation or operation to ensure proper use and to prevent damage.
The Kicker IQ500.4 is a 4-channel car amplifier featuring advanced digital signal processing (DSP) capabilities, designed to deliver high-quality audio performance in automotive environments.
2. Safety Information
Always observe the following safety precautions:
- Disconnect the vehicle's battery before making any power connections.
- Ensure proper grounding to prevent electrical hazards.
- Do not expose the amplifier to moisture or extreme temperatures.
- Use appropriate gauge wiring for power and speaker connections as specified in the installation section.
- Consult a professional installer if you are unsure about any part of the installation process.
- This product contains chemicals known to the State of California to cause cancer and birth defects or other reproductive harm (Proposition 65 warning).
3. Package Contents
Verify that all items are present in the package:
- Kicker IQ500.4 Q-Class Amplifier
- Mounting Hardware
- User Manual (this document)
- USB Cable (for TWEEQ app connection)
4. Setup and Installation
4.1 Mounting the Amplifier
Select a dry, stable location for mounting the amplifier, ensuring adequate ventilation. Avoid mounting in direct sunlight or areas prone to vibration.
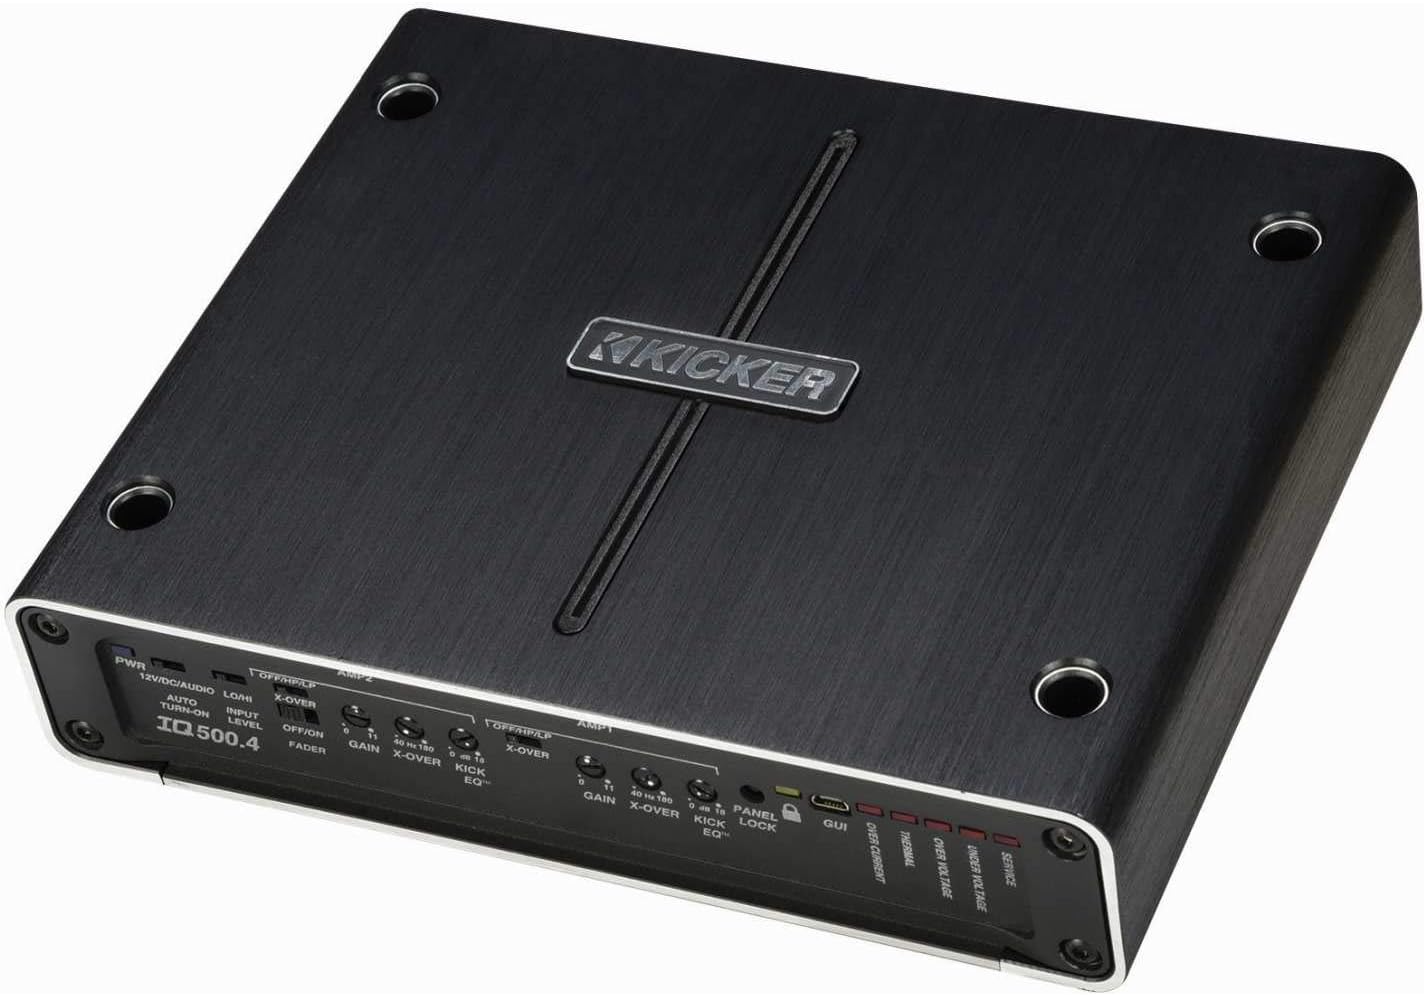
Figure 4.1: Top view of the Kicker IQ500.4 Q-Class Amplifier, highlighting the control panel and overall design.
4.2 Wiring Connections
Ensure all connections are secure and properly insulated. Refer to the diagram below for typical wiring configurations.

Figure 4.2: Rear view of the Kicker IQ500.4 Q-Class Amplifier, detailing the power, ground, remote, input, and output connections.
Power Connections:
- +12V (Power): Connect to the positive terminal of the vehicle's battery using appropriate gauge wire (e.g., 4-gauge for optimal performance).
- GND (Ground): Connect to a clean, unpainted metal surface of the vehicle chassis. Ensure a solid connection.
- REM (Remote Turn-On): Connect to the remote turn-on lead from your head unit.
Input/Output Connections:
- Input (RCA): Connect to the RCA outputs of your head unit or signal processor.
- Output (Speaker): Connect to your speakers. The amplifier supports 4-ohm stable bridged mode.
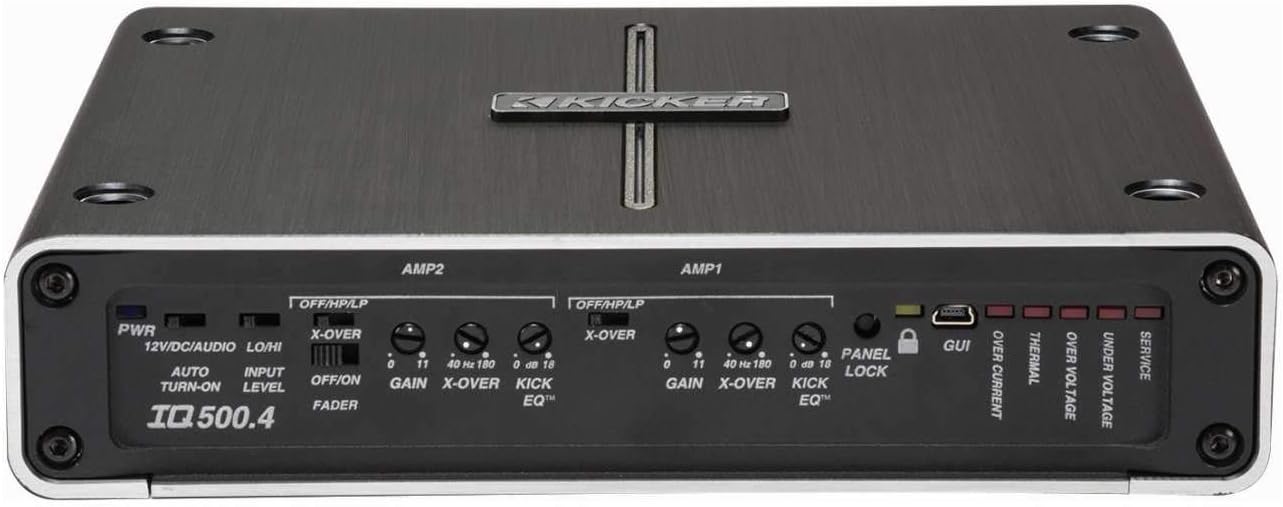
Figure 4.3: Detailed view of the amplifier's control panel, showing gain, crossover, and KickEQ adjustments.

Figure 4.4: Close-up of the input and output terminals, including RCA inputs and speaker wire connections.
5. Operating the Amplifier
5.1 Initial Setup and Gain Matching
After installation, set the gain controls to match the output voltage of your head unit. Start with the gain at minimum and slowly increase until distortion is heard, then back off slightly.
5.2 Digital Signal Processing (DSP) with TWEEQ App
The IQ500.4 features advanced DSP capabilities accessible via the TWEEQ app for PC, iOS, or Android. Download the app from kicker.com/tweeq. Connect your device to the amplifier via USB.
TWEEQ App Features:
- TWEEQ Wizard: Automatically sets basic tune, including speaker type/size and time-alignment based on listening position.
- Input Signal Routing and Mixing: Customize signal paths.
- Variable High- and Low-Pass Filters: Adjustable from 10-20,000 Hz with selectable crossover characteristics (Butterworth, Linkwitz) and slopes (6, 12, 18, 24 dB/octave).
- Variable KickEQ+ Bass Boost: Adjustable from 0-18 dB, 24-80 Hz, with 0.5-10 Q.
- Adjustable Time Delay: Fine-tune sound staging (0-20 ms in 0.02, 0.1, and 1.0 ms increments).
- 31-Band Graphic Equalizer: +/-12 dB/band for precise frequency adjustments.
- Dynamic Compressor/Limiter: Fully adjustable (1:1 to 10:1 ratio).
The Panel Lock function disables onboard controls when using the TWEEQ app, ensuring settings are managed digitally.
6. Maintenance
- Keep the amplifier clean and free of dust. Use a soft, dry cloth for cleaning.
- Ensure proper ventilation around the amplifier to prevent overheating.
- Periodically check all wiring connections for tightness and corrosion.
7. Troubleshooting
| Problem | Possible Cause | Solution |
|---|---|---|
| No Power | Blown fuse; Loose power/ground connection; No remote turn-on signal. | Check/replace fuse; Secure connections; Verify remote wire connection to head unit. |
| No Audio Output | Incorrect input/output connections; Gain set too low; Speaker wires shorted. | Verify RCA and speaker connections; Adjust gain; Check speaker wiring for shorts. |
| Distorted Sound | Gain set too high; Incorrect crossover settings; Speaker impedance mismatch. | Reduce gain; Adjust crossover settings via TWEEQ app; Ensure speaker impedance is compatible. |
| Amplifier Overheating | Insufficient ventilation; Low impedance load; Prolonged high-volume use. | Ensure clear airflow around amplifier; Check speaker impedance; Reduce volume or allow cool-down period. |
8. Specifications
| Feature | Detail |
|---|---|
| Model | IQ500.4 |
| Channels | 4-channel |
| RMS Power (4 ohms) | 65 watts x 4 |
| RMS Power (2 ohms) | 125 watts x 4 |
| RMS Power (Bridged 4 ohms) | 250 watts x 2 |
| CEA-2006 Compliant | Yes |
| Variable High-Pass Filter | 40-180 Hz, 24 dB/octave |
| Variable Low-Pass Filter | 40-180 Hz, 24 dB/octave |
| KickEQ Bass Boost | 0-18 dB at 40 Hz |
| Digital Signal Processing (DSP) | Via TWEEQ app (PC, iOS, Android) |
| Equalizer | 31-band graphic (+/-12 dB/band) |
| Time Delay | 0-20 ms |
| Dimensions (L x W x H) | 9.45 x 7.52 x 2.05 inches |
| Item Weight | 6.67 pounds |
| Voltage | 14.4 Volts |
9. Warranty and Support
For warranty information and technical support, please refer to the official Kicker website or contact Kicker customer service directly. Keep your proof of purchase for warranty claims.
Kicker Official Website: www.kicker.com
Related documents42IQ5004


Ask a question about this manual
Ask about setup, troubleshooting, compatibility, parts, safety, or missing instructions. Manuals+ will review the question and use this page’s manual context to help answer it.