
1. Introduction
This manual provides essential information for the proper installation, operation, and maintenance of your new ATVWorks Foot Shift (Shifter) Lever. This aftermarket component is designed to meet OEM specifications, ensuring reliable performance for compatible Honda ATV models. Please read this manual thoroughly before installation and use to ensure safety and optimal functionality.
2. Safety Information
Always prioritize safety when working on your ATV. Failure to follow these safety guidelines may result in injury or damage to the vehicle.
- Always wear appropriate personal protective equipment, including safety glasses and gloves.
- Ensure the ATV is parked on a level, stable surface with the engine off and the parking brake engaged before beginning any work.
- Allow the engine and exhaust system to cool down completely before handling any components.
- If you are unsure about any step of the installation process, consult a qualified mechanic.
- Keep children and pets away from the work area.
3. Package Contents
Verify that all components are present in the package before proceeding with installation:
- 1 x ATVWorks Foot Shift (Shifter) Lever
- 1 x Rubber Tip (pre-installed)
- 1 x Mounting Bolt
4. Compatibility
This ATVWorks Foot Shift (Shifter) Lever is specifically designed for the following models:
- Honda Foreman 500 (TRX500) FM / TM / FPM
- Years: 2005-2011 ONLY
Important Note:
- This lever is designed for Manual Shift Models ONLY.
- It will NOT fit Electric Shift (ES) Models.
- This product will NOT convert an electric shift model into a manual shift model.
5. Setup and Installation
Follow these steps to install your new foot shift lever. The process generally involves removing the old lever and installing the new one in its place.
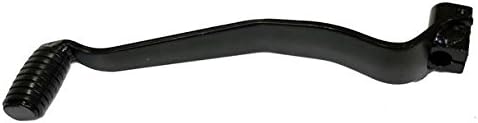
Image: The ATVWorks Foot Shift Lever, featuring a black finish and a ribbed rubber tip for grip.
- Preparation: Ensure the ATV is turned off, cooled down, and securely parked. Locate the existing foot shift lever on the left side of the ATV.
- Remove Old Lever: Using appropriate tools (typically a wrench or socket), loosen and remove the bolt securing the old shift lever to the shift shaft. Carefully slide the old lever off the shaft.
- Inspect Shift Shaft: Clean any debris or corrosion from the shift shaft. Inspect the splines on the shaft for any damage.
- Install New Lever: Align the splines of the new ATVWorks Foot Shift Lever with the splines on the shift shaft. Slide the new lever onto the shaft until it is fully seated. Ensure the lever is positioned correctly for comfortable and effective shifting.
- Secure Lever: Insert the provided mounting bolt through the lever and into the shift shaft. Tighten the bolt securely. Do not overtighten, as this can damage the splines or the bolt. Refer to your ATV's service manual for specific torque specifications if available.
- Test Functionality: Gently attempt to shift through all gears (with the engine off) to ensure the new lever operates smoothly and engages properly. Check for any binding or excessive play.
6. Operating Instructions
The foot shift lever is used to change gears on your manual shift Honda ATV. The standard shift pattern for most ATVs is 1-N-2-3-4-5 (or similar), where 'N' is neutral. Consult your ATV's owner's manual for the exact shift pattern.
- To shift up (e.g., from 1st to 2nd gear), lift the front of the foot lever with your toe.
- To shift down (e.g., from 2nd to 1st gear), press down on the rear of the foot lever with your heel or the ball of your foot.
- Always ensure the clutch is fully disengaged before shifting gears to prevent damage to the transmission.
7. Maintenance
Regular maintenance will extend the life of your foot shift lever and ensure safe operation.
- Regular Inspection: Periodically check the lever for any signs of bending, cracking, or excessive wear, especially on the rubber tip.
- Bolt Tightness: Ensure the mounting bolt remains tight. Loose bolts can lead to play in the lever or damage to the shift shaft splines.
- Cleaning: Keep the lever and surrounding area free of dirt, mud, and debris. Clean with mild soap and water, then rinse thoroughly.
- Lubrication: Apply a small amount of grease or appropriate lubricant to the pivot point of the shift lever and the shift shaft periodically to ensure smooth operation and prevent corrosion.
8. Troubleshooting
If you encounter issues with your foot shift lever, refer to the table below for common problems and potential solutions.
| Problem | Possible Cause | Solution |
|---|---|---|
| Lever feels loose or wobbly | Mounting bolt is loose | Tighten the mounting bolt. |
| Difficulty shifting gears | Lack of lubrication at pivot point; Bent lever; Damaged shift shaft splines | Lubricate the pivot point. Inspect the lever for bending and replace if necessary. Inspect shift shaft splines for damage. |
| Rubber tip is worn or missing | Normal wear and tear | Replace the rubber tip. |
If the problem persists after attempting these solutions, it may indicate an issue with the ATV's transmission or shift mechanism, and professional assistance should be sought.
9. Specifications
| Feature | Detail |
|---|---|
| Brand | ATVWorks |
| Model Number | KDSL110 |
| Replaces OEM Part # | 24700-HP0-A00 |
| Material | Rubber (tip), Metal (lever body) |
| Color | Black |
| Exterior Finish | Painted / Rubber |
| Special Feature | Easy to Install |
| Included Components | Lever with rubber tip, Mounting bolt |
| Item Weight | 0.79 Pounds (approx. 12.6 ounces) |
| Package Dimensions | 13.39 x 4.02 x 1.69 inches |
10. Warranty and Support
ATVWorks stands behind the quality of its products. For information regarding warranty coverage or technical support, please refer to the contact information provided with your purchase or visit the official ATVWorks website. When contacting support, please have your product model number (KDSL110) and purchase details ready.