
Introduction
This manual provides detailed instructions for the safe and efficient operation of your PBD Pioneer CT-W530R Stereo Double Cassette Deck. This unit features dual cassette decks, Synchro Recording, and Dolby NR for enhanced audio quality. Please read this manual thoroughly before using the unit and retain it for future reference.
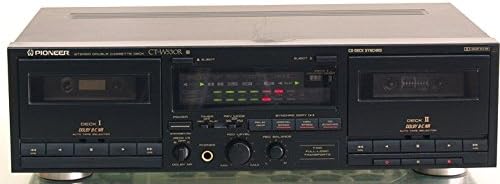
Figure 1: Front view of the Pioneer CT-W530R Stereo Double Cassette Deck, showing both tape decks, control panel, and display.
Safety Information
To ensure safe operation and prevent damage, observe the following precautions:
- Do not expose the unit to rain or moisture.
- Do not block ventilation openings.
- Do not place the unit near heat sources such as radiators or stoves.
- Use only the specified power supply voltage.
- Do not open the casing; refer all servicing to qualified personnel.
- Avoid placing heavy objects on top of the unit.
Setup
1. Unpacking
Carefully remove the cassette deck from its packaging. Retain all packing materials for future transport or storage. Verify that all included accessories, such as AV cables, are present.
2. Placement
Place the unit on a stable, level surface away from direct sunlight, heat sources, and excessive dust or vibrations. Ensure adequate ventilation around the unit.
3. Connections
Connect the CT-W530R to your audio system using the supplied AV cables.
- Audio Output: Connect the AUDIO OUT (RCA L/R) jacks on the rear of the CT-W530R to the TAPE IN or LINE IN jacks on your amplifier or receiver.
- Audio Input: Connect the AUDIO IN (RCA L/R) jacks on the rear of the CT-W530R to the TAPE OUT or LINE OUT jacks on your amplifier or receiver for recording purposes.
- Power: Plug the power cord into a suitable AC outlet.
Operating Instructions
1. Basic Playback
- Press the POWER button to turn on the unit.
- Open the cassette door for either Deck I or Deck II by pressing the EJECT button.
- Insert a cassette tape with the open edge facing upwards. Close the cassette door.
- Select the appropriate tape type (Normal, CrO2, Metal) using the TAPE TYPE SELECTOR if not automatically detected.
- Press the PLAY button for the selected deck.
- Adjust the volume on your amplifier/receiver.
- To stop playback, press the STOP button.
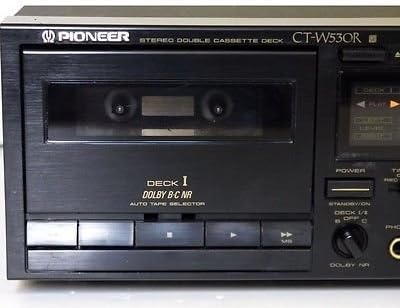
Figure 2: Detailed view of Deck I, showing the cassette compartment and playback controls.

Figure 3: Detailed view of Deck II, showing the cassette compartment and playback controls.
2. Recording
The CT-W530R supports recording on Deck II.
- Insert a blank, recordable cassette into Deck II. Ensure the tape's erase-prevention tabs are intact.
- Select the appropriate tape type for Deck II.
- Set the DOLBY NR switch to B, C, or OFF as desired. Dolby Noise Reduction helps reduce tape hiss during playback.
- Adjust the REC LEVEL and REC BALANCE controls to set the recording level. Monitor the level meters to avoid distortion (peaking into the red zone).
- To start recording, press the REC button (red button) and then the PLAY button simultaneously for Deck II.
- To pause recording, press the PAUSE button. Press again to resume.
- To stop recording, press the STOP button.
Synchro Recording (Tape to Tape Copy)
This feature allows for easy duplication of tapes from Deck I to Deck II.
- Insert the source tape into Deck I and a blank recordable tape into Deck II.
- Ensure both decks are stopped.
- Press the SYNCHRO COPY button. The unit will automatically start playback on Deck I and recording on Deck II.
- You can select NORMAL SPEED or HIGH SPEED for copying. High speed copying will duplicate the tape faster but may result in slightly lower quality.
- The recording will stop automatically when the source tape ends or when you press STOP.
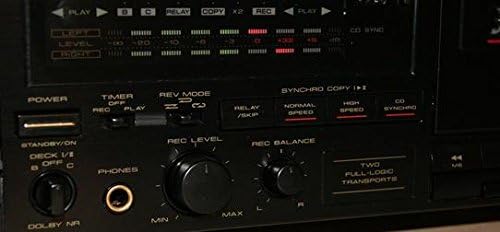
Figure 4: Detailed view of the central control panel, including recording level, balance, Dolby NR, and Synchro Copy buttons.
3. Headphone Output
Connect standard stereo headphones to the PHONES jack on the front panel for private listening. The headphone volume is typically controlled by the main volume of your connected amplifier, or by a dedicated headphone level control if present on the unit (refer to Figure 4 for control layout).
Maintenance
Regular maintenance ensures optimal performance and extends the life of your cassette deck.
- Head Cleaning: Clean the tape heads, capstans, and pinch rollers after every 10-20 hours of use, or if sound quality deteriorates. Use a cotton swab dampened with isopropyl alcohol.
- Demagnetization: Demagnetize the tape heads periodically (e.g., every 50 hours of use) using a tape head demagnetizer to prevent magnetization buildup, which can degrade sound quality.
- Exterior Cleaning: Wipe the exterior of the unit with a soft, dry cloth. Do not use abrasive cleaners or solvents.
Troubleshooting
If you experience problems with your CT-W530R, consult the following table before seeking professional service.
| Problem | Possible Cause | Solution |
|---|---|---|
| No sound from unit. | Incorrect connections; amplifier input not selected; volume too low. | Check audio cables; select correct input on amplifier; increase volume. |
| Tape does not play or record. | Tape inserted incorrectly; tape leader reached; erase-prevention tab broken. | Reinsert tape correctly; fast forward past leader; cover tab with tape. |
| Poor sound quality (muffled, distorted). | Dirty tape heads; magnetized heads; worn tape; incorrect Dolby NR setting. | Clean heads; demagnetize heads; try a different tape; adjust Dolby NR. |
| Tape speed fluctuates. | Dirty pinch rollers/capstans; worn drive belt. | Clean pinch rollers and capstans. If problem persists, professional service may be required for belt replacement. |
Specifications
The following specifications are typical for the PBD Pioneer CT-W530R Stereo Double Cassette Deck:
- Model: CT-W530R
- Type: Stereo Double Cassette Deck
- Noise Reduction: Dolby B, Dolby C
- Tape Compatibility: Type I (Normal), Type II (CrO2), Type IV (Metal)
- Features: Synchro Recording, Auto Tape Selector, Dual Full-Logic Transports
- Dimensions (Approx.): 42.67 cm (W) x 12.45 cm (H) x 28.96 cm (D) (16.8 x 4.9 x 11.4 inches)
- Weight (Approx.): 4.68 kg (10.32 lbs)
- Power Requirements: AC 120V, 60Hz (or as specified for region)
Note: Specifications are subject to change without notice for improvement.
Warranty and Support
For warranty information and technical support, please refer to the warranty card included with your product or contact PBD customer service. Keep your purchase receipt as proof of purchase.
This product was first available on Amazon.com.mx on August 30, 2016. Please note that this product has been discontinued by the manufacturer. Support for discontinued products may be limited.