
1. Introduction
This manual provides essential instructions for the safe and efficient operation, installation, and maintenance of your Hatco GR2AHL-66D3 Designer Infrared High Watt Foodwarmer. Please read this manual thoroughly before installation and use to ensure proper function and to prevent potential hazards.
The Hatco GR2AHL-66D3 is a 69.5-inch wide Glo-Ray Designer Dual Strip Heater with lights, designed for holding food at safe serving temperatures. It features a high-wattage infrared heating system, tubular metal heater rods, and a durable aluminum construction.
2. Important Safety Information
Always follow basic safety precautions when using electrical appliances to reduce the risk of fire, electric shock, or injury.
- Read all instructions before operating the foodwarmer.
- Ensure the unit is properly grounded.
- Do not operate the unit with a damaged cord or plug.
- Keep hands and clothing away from heating elements during operation. Surfaces will be hot.
- Do not immerse the unit in water or other liquids.
- Unplug the unit before cleaning or servicing.
- This appliance is intended for commercial use only.
3. Unpacking and Inspection
Upon receiving your Hatco GR2AHL-66D3 foodwarmer, carefully unpack the unit and inspect it for any shipping damage. If damage is found, contact the carrier immediately and retain all packaging materials for inspection.
Verify that all components are present:
- Hatco GR2AHL-66D3 Foodwarmer unit
- 14-inch high legs (if applicable to your model configuration)
- Instruction Manual (this document)
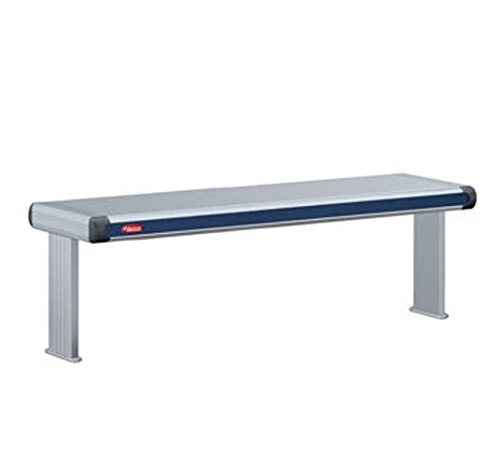
Figure 1: Hatco GR2AHL-66D3 Designer Infrared High Watt Foodwarmer. This image displays the overall structure of the foodwarmer, highlighting its dual strip heating elements and integrated lighting.
4. Setup and Installation
4.1. Location
Place the foodwarmer on a stable, level, non-combustible surface. Ensure adequate clearance around the unit for proper ventilation and safe operation. Avoid placing near flammable materials.
4.2. Leg Installation (if applicable)
If your model includes 14-inch high legs, securely attach them to the designated mounting points on the foodwarmer chassis using the provided hardware. Ensure all legs are tightened firmly before placing the unit on a surface.
4.3. Electrical Connection
The Hatco GR2AHL-66D3 is a high-wattage appliance (3420 watts). It requires a dedicated electrical circuit with the correct voltage and amperage. Consult a qualified electrician to ensure your electrical supply meets the unit's requirements and local electrical codes. Do not use extension cords.
- Verify the voltage rating on the unit's nameplate matches your power supply.
- Plug the power cord directly into a grounded electrical outlet.
5. Operating Instructions
5.1. Powering On/Off
Locate the power switch(es) on the unit. Typically, there will be separate switches for the infrared heating elements and the lights.
- To turn on the heating elements, flip the designated switch to the "ON" position.
- To turn on the lights, flip the designated light switch to the "ON" position.
- To turn off, flip the switches to the "OFF" position.
5.2. Food Holding
The infrared heating system is designed to maintain pre-heated food at safe serving temperatures. Place food in appropriate pans or containers directly under the heating elements. The 3-inch spacing between elements ensures even heat distribution.
Note: This unit is not designed to cook food or reheat cold food. Always ensure food is at the desired serving temperature before placing it in the foodwarmer.
6. Cleaning and Maintenance
Regular cleaning and maintenance will extend the life of your foodwarmer and ensure sanitary operation.
6.1. Daily Cleaning
- ALWAYS UNPLUG THE UNIT AND ALLOW IT TO COOL COMPLETELY BEFORE CLEANING.
- Wipe down all exterior surfaces with a damp cloth and mild, non-abrasive cleaner.
- Clean the heating elements and light fixtures carefully to remove any food debris. Avoid spraying water directly onto electrical components.
- Dry all surfaces thoroughly before plugging the unit back in.
6.2. Light Bulb Replacement
If a light bulb burns out, ensure the unit is unplugged and cool. Carefully remove the old bulb and replace it with a new bulb of the same type and wattage. Refer to the unit's label for specific bulb requirements.
7. Troubleshooting
Before contacting service, review the following common issues and solutions:
| Problem | Possible Cause | Solution |
|---|---|---|
| Unit does not power on. | No power to outlet; power cord unplugged; circuit breaker tripped. | Check power outlet; ensure cord is securely plugged in; reset circuit breaker. |
| Heating elements not working. | Heating element switch off; faulty element. | Ensure heating switch is ON. If still not working, contact qualified service personnel. |
| Lights not working. | Light switch off; burned-out bulb. | Ensure light switch is ON. Replace bulb if necessary (refer to Section 6.2). |
| Food not staying warm. | Food placed cold into unit; unit not preheated; improper pan usage. | Ensure food is preheated. Allow unit to warm up. Use appropriate food pans. |
If problems persist after attempting these solutions, contact Hatco customer service or a qualified service technician.
8. Specifications
- Model: GR2AHL-66D3
- Type: Glo-Ray Designer Dual Strip Heater with Lights
- Width: 69.5 inches (69-1/2")
- Spacing: 3 inches between heating elements
- Heating Technology: Infrared, High Wattage, Tubular Metal Heater Rod
- Construction: Designer Aluminum
- Electrical Rating: 3420 Watts (Voltage dependent on specific configuration, refer to unit's nameplate)
- Leg Height: 14 inches (if equipped)
- Certifications: cULus, UL EPH Classified
- Origin: Made in USA
9. Warranty and Support
Hatco Corporation provides a limited warranty for its products. Specific warranty terms and conditions are available on the official Hatco website or by contacting Hatco customer service. Please retain your proof of purchase for warranty claims.
For technical assistance, parts, or service inquiries, please contact Hatco customer support. Contact information can typically be found on the manufacturer's website or on the product's nameplate.


