
JUKI MO-655
JUKI MO-655 2/3/4/5 Thread Serger Sewing Machine
Instruction Manual
Introduction
This instruction manual provides detailed guidance for the safe and efficient operation, setup, and maintenance of your JUKI MO-655 2/3/4/5 Thread Serger Sewing Machine. Please read this manual thoroughly before using the machine to ensure proper function and to prevent damage or injury. Keep this manual in a safe place for future reference.
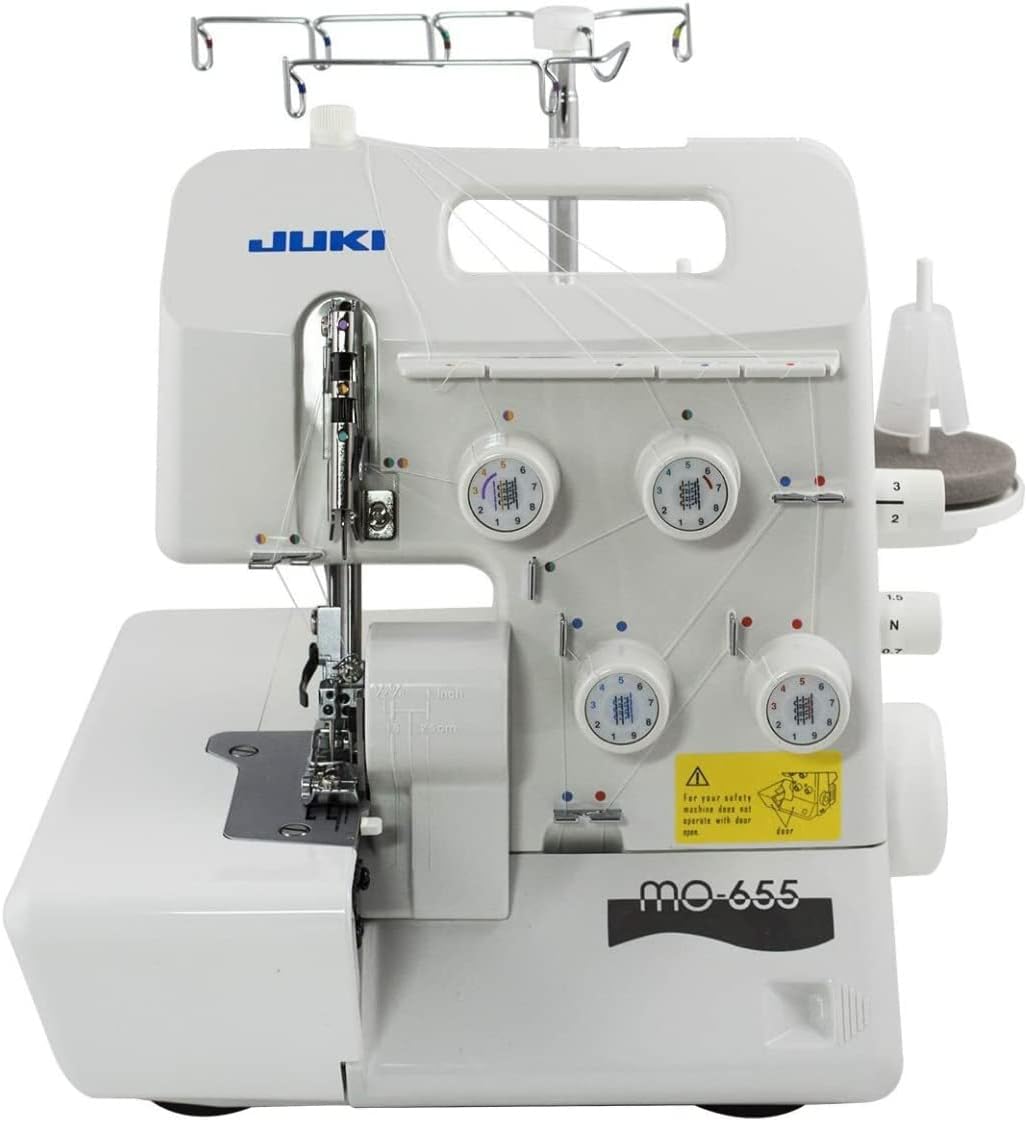
Figure 1: JUKI MO-655 Serger Sewing Machine. This image displays the front view of the JUKI MO-655 serger, showing its compact design, the thread stand, and the pre-installed white threads indicating the threading paths.
Setup and Assembly
1. Unpacking and Initial Inspection
- Carefully remove the machine from its packaging.
- Check all accessories against the packing list.
- Inspect the machine for any signs of damage during transit.
- Place the machine on a stable, flat surface.
2. Attaching the Thread Stand
Insert the metal thread stand pole into the designated hole at the back of the machine. Secure it firmly. Place the thread guides onto the top of the pole.

Figure 2: Rear view of the JUKI MO-655. This image illustrates the back of the serger, highlighting the base where the thread stand pole is inserted and secured.
3. Power Connection
Connect the power cord to the machine's power input and then to a suitable electrical outlet. Ensure the machine's power switch is in the "OFF" position before connecting.

Figure 3: Side view of the JUKI MO-655. This image shows the right side of the serger, where the power cord connects and the main power switch is located.
4. Threading the Machine
The JUKI MO-655 supports 2, 3, 4, and 5-thread operations. Correct threading is crucial for proper stitch formation. The machine often comes pre-threaded from the factory; it is recommended to tie new threads to the existing ones and pull them through the machine to learn the path.
- Raise the presser foot and open the front and side covers.
- Follow the color-coded threading guides for each thread (Upper Looper, Lower Looper, Right Needle, Left Needle, Chain Stitch Looper if applicable).
- Ensure threads pass through all tension discs and guides correctly.
- Close all covers before operating.

Figure 4: Tension dials and threading guides. This close-up shows the four main tension dials, each color-coded, and the initial threading points on the machine's front panel.

Figure 5: Needle area threading. This image provides a detailed view of the needle bar, presser foot, and the final threading points for the needles and loopers.

Figure 6: Open front cover. This view shows the internal mechanism of the serger with the front cover open, revealing the lower looper and its threading path, essential for maintenance and threading.
Operating Instructions
1. Basic Operation
- Power On/Off: Use the main power switch located on the side of the machine.
- Foot Controller: Control the sewing speed with the foot controller.
- Presser Foot Lift: Raise the presser foot using the lever on the right side of the machine. The JUKI MO-655 allows for an extra high lift for thicker fabrics.
2. Stitch Selection and Adjustment
The MO-655 offers versatile stitching options:
- 2-Thread Stitch: Ideal for delicate fabrics or decorative finishes.
- 3-Thread Stitch: Standard overlock for seams and edges.
- 4-Thread Stitch: Strong, durable seam with safety stitch, suitable for knits.
- 5-Thread Stitch: Combines a 3-thread overlock with a 2-thread chain stitch for industrial-strength seams.
Adjust stitch length, cutting width, and differential feed using the dedicated dials on the machine. Refer to the stitch chart in the manual for recommended settings for various fabrics and stitch types.

Figure 7: Serging in action. This image demonstrates the JUKI MO-655 actively serging a piece of pink fabric, showcasing the neat, finished edge produced by the machine.
Maintenance
1. Cleaning
Regular cleaning is essential to maintain machine performance and longevity.
- Lint Removal: Use a small brush to remove lint and thread scraps from the looper area, feed dogs, and knife area after each use.
- Dusting: Wipe down the exterior of the machine with a soft, dry cloth.
- Knife Cleaning: Periodically clean the upper and lower knives to ensure clean cuts.
2. Oiling
Apply a few drops of high-quality sewing machine oil to the designated oiling points as indicated in the machine's internal diagrams (usually found under the front cover). Oil regularly, especially if the machine is used frequently.
3. Needle Replacement
Replace needles regularly (every 8-10 hours of sewing or when they show signs of wear) to prevent skipped stitches and fabric damage. Use only needles specified for serger machines (e.g., ELx705).
- Turn off the machine and unplug it.
- Loosen the needle clamp screw(s).
- Remove the old needle(s).
- Insert the new needle(s) with the flat side facing the back, pushing it up as far as it will go.
- Tighten the needle clamp screw(s) securely.
Troubleshooting
This section addresses common issues you might encounter with your JUKI MO-655 serger. For more detailed troubleshooting, refer to the comprehensive guide in the full manual.
| Problem | Possible Cause | Solution |
|---|---|---|
| Skipped Stitches | Incorrect needle insertion, bent/dull needle, improper threading, incorrect tension. | Re-insert needle correctly, replace needle, re-thread machine, adjust tension. |
| Thread Breakage | Incorrect threading, too much tension, poor quality thread, burrs on thread path. | Re-thread carefully, reduce tension, use quality thread, check for rough spots. |
| Uneven Seams / Wavy Fabric | Incorrect differential feed setting, improper tension, dull knife. | Adjust differential feed, fine-tune tension, replace knife if necessary. |
| Machine Not Starting | Power cord not connected, power switch off, safety cover open. | Check power connections, turn on switch, ensure all covers are closed. |
Specifications
| Feature | Detail |
|---|---|
| Model Number | MO-655 |
| Brand | JUKI |
| Dimensions (D x W x H) | 15.7"D x 14.9"W x 13.8"H (approx. 39.9cm x 37.8cm x 35.1cm) |
| Item Weight | 21.4 pounds (approx. 9.7 kg) |
| Thread Capacity | 2/3/4/5 Threads |
| Color | Silver |
| UPC | 798837987174, 189684000008 |

Figure 8: Product Dimensions. This image provides a visual representation of the JUKI MO-655 serger with its key dimensions (depth, width, height) clearly labeled.
Warranty and Support
For warranty information, please refer to the warranty card included with your machine or visit the official JUKI website. For technical support, parts, or service, please contact JUKI customer service or an authorized JUKI dealer. Keep your purchase receipt as proof of purchase for warranty claims.
JUKI Official Website: www.juki.com
Related documentsMO-655


Ask a question about this manual
Ask about setup, troubleshooting, compatibility, parts, safety, or missing instructions. Manuals+ will review the question and use this page’s manual context to help answer it.