
Important Safety Instructions
When using electrical appliances, basic safety precautions should always be followed, including the following:
- Read all instructions before operating the appliance.
- Do not touch hot surfaces. Use handles or knobs.
- To protect against electrical shock, do not immerse cord, plugs, or the appliance base in water or other liquid.
- Close supervision is necessary when any appliance is used by or near children.
- Unplug from outlet when not in use and before cleaning. Allow to cool before putting on or taking off parts.
- Do not operate any appliance with a damaged cord or plug, or after the appliance malfunctions or has been damaged in any manner.
- The use of accessory attachments not recommended by the appliance manufacturer may cause injuries.
- Do not use outdoors.
- Do not let cord hang over edge of table or counter, or touch hot surfaces.
- Do not place on or near a hot gas or electric burner, or in a heated oven.
- Extreme caution must be used when moving an appliance containing hot oil or other hot liquids.
- Always attach plug to appliance first, then plug cord into the wall outlet. To disconnect, turn any control to "off", then remove plug from wall outlet.
- Do not use appliance for other than intended use.
Product Overview
The Artestia 2-in-1 Raclette Grill is designed for versatile indoor grilling and raclette cooking. It features a large cooking surface with interchangeable plates and individual mini pans for personalized portions.

Image: The Artestia Raclette Grill showcasing its granite stone top, non-stick grill plate, and the eight individual raclette pans with spatulas.
Key components include:
- Main Heating Unit: The base of the grill housing the heating elements and temperature control.
- Granite Stone Plate: Provides even heating and heat retention, ideal for searing and slow cooking.
- Non-Stick Cast Aluminum Plate: Reversible with a ribbed side for grill marks and a flat side for crepes, eggs, or general frying.
- Mini Raclette Pans (8x): Individual non-stick pans for melting cheese, cooking small portions, or keeping food warm.
- Wooden Spatulas (8x): For use with the mini pans to prevent scratching.
- Adjustable Thermostat: Allows precise temperature control for various cooking needs.
Specifications
| Feature | Detail |
|---|---|
| Model Number | AR-89001 |
| Power | 1700 Watts |
| Voltage | 120 Volts (North American Standard) |
| Product Dimensions | 18.11"D x 9.25"W x 5.27"H |
| Grill Plate Dimensions | 18.3" x 9.2" (Non-stick & Granite Stone) |
| Material | Aluminum (plates), Granite Stone |
| Included Components | Grill Plate, Granite Stone, 8 Mini Pans, 8 Spatulas, Brush |
| Weight | 7.47 Kilograms (approx. 16.43 pounds) |
| Certifications | ETL Certified |
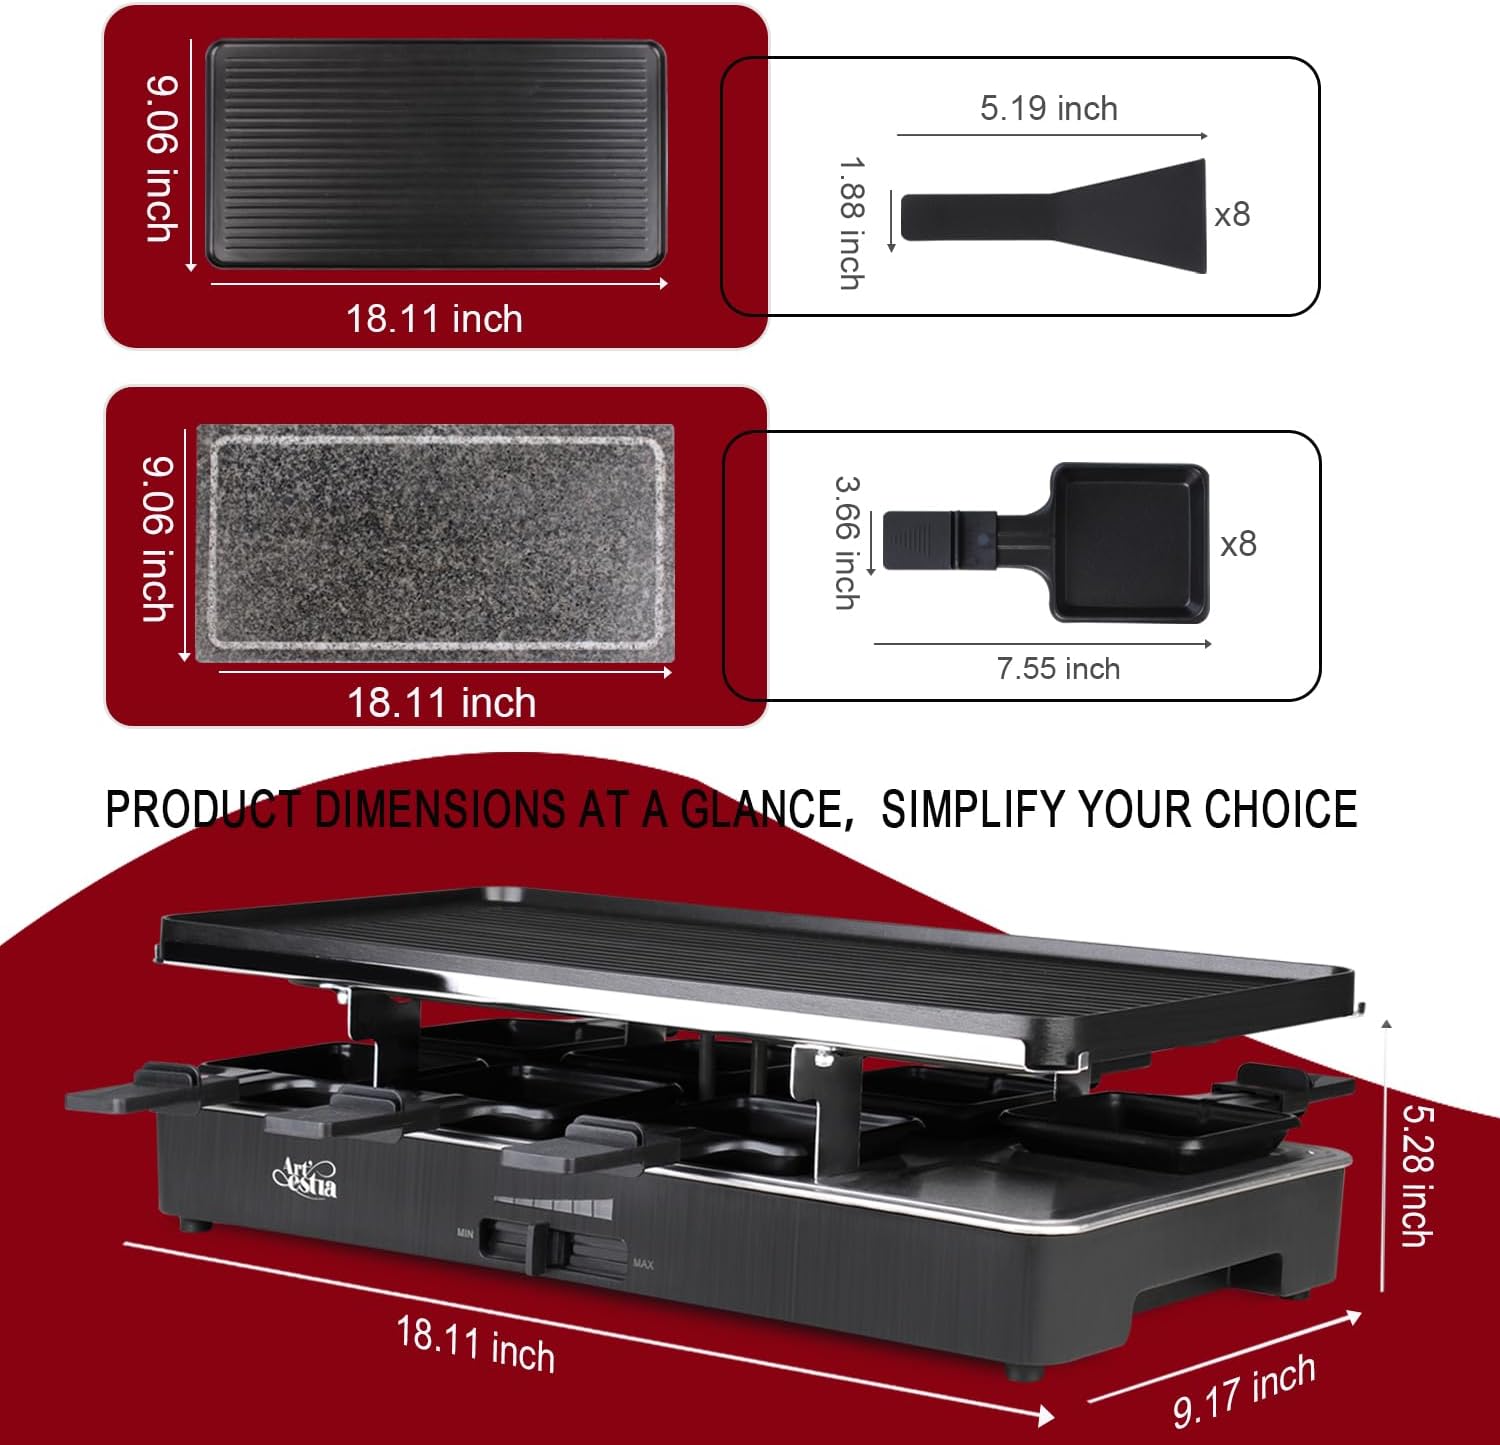
Image: Detailed product dimensions for the grill plates, mini pans, and the overall raclette grill unit.
Setup
- Unpack: Carefully remove all components from the packaging. Retain packaging for future storage or transport.
- Initial Cleaning: Before first use, wipe the heating base with a damp cloth. Wash the granite stone plate, non-stick cast aluminum plate, and mini raclette pans with warm, soapy water. Rinse thoroughly and dry completely.
- Assemble: Place the main heating unit on a stable, heat-resistant, and level surface. Ensure there is adequate ventilation around the unit.
- Place Plates: Choose either the granite stone plate or the non-stick cast aluminum plate and place it securely on top of the heating unit. Ensure it sits flat and is properly aligned.
- Insert Mini Pans: Slide the 8 mini raclette pans into their designated slots beneath the main grill plate.
- Connect Power: Plug the power cord into a standard 120V AC electrical outlet. Ensure the temperature control knob is in the "MIN" position before plugging in.
Operating Instructions
Preheating
After setup, turn the temperature control knob from "MIN" towards "MAX" to begin preheating. The indicator light will illuminate. Allow 10-15 minutes for the grill plates to reach optimal cooking temperature. The granite stone plate may take slightly longer to heat thoroughly.

Image: The adjustable thermostat on the front of the grill, showing the range from minimum to maximum heat settings.
Using the Grill Plates
Both the granite stone and non-stick cast aluminum plates are suitable for grilling various foods. Lightly oil the non-stick plate if desired, though it's designed for cooking without excessive oil. The granite stone plate is excellent for searing meats and vegetables, retaining heat for consistent cooking.

Image: A visual representation of the two interchangeable cooking surfaces: the granite stone and the reversible non-stick aluminum plate.
For the non-stick plate, use the ribbed side for grill marks on meats and vegetables, and the flat side for items like pancakes, eggs, or crepes.

Image: The raclette grill in action, demonstrating its use for grilling skewers, vegetables, and steak on the top plate, with mini pans below.
Using the Mini Raclette Pans
The 8 mini pans are perfect for melting cheese, cooking individual servings of vegetables, eggs, or small pieces of meat. Place desired ingredients into the pan and slide it into the heating area beneath the main grill plate. Use the included wooden spatulas to handle food in the pans to protect the non-stick coating.

Image: A group of friends or family gathered around the raclette grill, highlighting its suitability for social dining and individual cooking with the mini pans.
Temperature Control
Adjust the thermostat knob to achieve the desired cooking temperature. Higher settings are for searing, while lower settings are suitable for keeping food warm or gentle cooking. Monitor food closely to prevent overcooking.
Cleaning and Maintenance
Proper cleaning and maintenance will extend the life of your Artestia Raclette Grill.
- Unplug and Cool: Always unplug the grill from the power outlet and allow all parts to cool completely before cleaning. This is crucial for safety.
- Remove Plates and Pans: Once cool, carefully remove the granite stone plate, non-stick cast aluminum plate, and all mini raclette pans.
- Cleaning Plates and Pans:
- Non-Stick Plate & Mini Pans: Wash with warm, soapy water using a soft sponge or cloth. Avoid abrasive cleaners or metal scouring pads, as these can damage the non-stick coating. These parts are also dishwasher safe.
- Granite Stone Plate: For the stone, ensure it has cooled completely. Wash with hot water and a clean cloth. Do not use detergents on the stone.
- Cleaning the Base Unit: Wipe the main heating unit with a damp cloth. Do not immerse the base unit, cord, or plug in water or any other liquid.
- Drying: Ensure all parts are thoroughly dry before reassembling or storing the appliance.
- Storage: Store the clean and dry grill in a cool, dry place.

Image: Visual guide to cleaning the raclette grill, showing methods like hand washing, wiping the base, and dishwasher compatibility for certain parts.
Troubleshooting
If you encounter issues with your Artestia Raclette Grill, please refer to the following common problems and solutions:
| Problem | Possible Cause | Solution |
|---|---|---|
| Grill does not heat up. | Not plugged in; power outlet issue; temperature knob set to "MIN". | Ensure the grill is securely plugged into a working outlet. Check if the temperature knob is turned past "MIN". |
| Uneven heating. | Insufficient preheating time; food distributed unevenly. | Allow adequate preheating time (10-15 minutes). Distribute food evenly across the cooking surface. |
| Food sticks to non-stick plate. | Plate not properly cleaned; insufficient oil (if desired); damaged coating. | Ensure the plate is clean and dry before use. Apply a thin layer of cooking oil if needed. Avoid using metal utensils that can scratch the coating. |
| Smoke or unusual odor during first use. | Protective coating burning off; residual manufacturing oils. | This is normal for first use. Ensure good ventilation. The odor should dissipate quickly. If it persists, unplug and contact support. |
If the problem persists after attempting these solutions, please contact Artestia customer support.
Warranty and Support
The Artestia 2-in-1 Raclette Grill comes with a Limited Warranty. Please refer to the warranty card included with your product for specific terms and conditions, including coverage duration and what is covered.
For any product inquiries, technical assistance, or warranty claims, please contact Artestia customer support. You can typically find contact information on the product packaging, the official Artestia website, or through your point of purchase.
Artestia is committed to ensuring the quality and efficiency of its products. All products are covered by product liability insurance in the United States.
For further assistance, visit the official Artestia Store: Artestia Store on Amazon