
1. Product Overview
The Suburban SW6DE RV Water Heater is designed to provide reliable hot water for your recreational vehicle or camper. This unit features both electric and LP gas operation with Direct Spark Ignition (DSI) for convenient and efficient heating. It is built with durable materials to ensure long-lasting performance.

Image 1.1: Main view of the Suburban SW6DE RV Water Heater unit.
2. Safety Information
Read and understand all instructions before installing, operating, or performing maintenance on this water heater. Failure to follow these instructions could result in property damage, personal injury, or death.
- Ensure proper ventilation when operating the LP gas system.
- Do not store flammable materials near the water heater.
- Always turn off LP gas supply and disconnect electrical power before servicing.
- Verify all gas and water connections are leak-free after installation or maintenance.
- This appliance must be installed by a qualified service technician.
3. Setup and Installation
3.1 Unpacking and Inspection
Carefully remove the water heater from its packaging. Inspect the unit for any signs of shipping damage. Report any damage immediately to your dealer or carrier. Ensure all components listed in the packing list are present.
3.2 Mounting the Unit
The water heater is designed for exterior mounting with an access door. Ensure the mounting location provides adequate clearance for ventilation, plumbing, and electrical connections. Secure the unit firmly to the RV structure according to manufacturer guidelines.
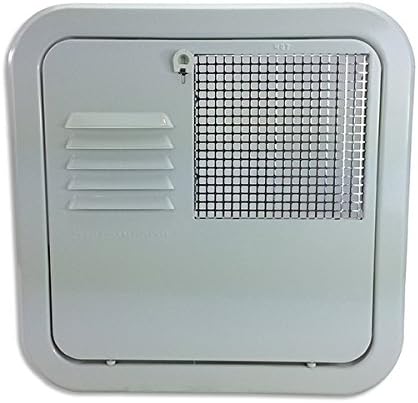
Image 3.1: Exterior door for the Suburban SW6DE RV Water Heater, providing access to components.
3.3 Plumbing Connections
Connect the cold water inlet and hot water outlet to your RV's plumbing system. Use appropriate fittings and ensure all connections are watertight. The water heater tank must be filled with water before operating the unit on either gas or electric power.
- Connect the cold water supply to the fitting marked 'COLD'.
- Connect the hot water line to the fitting marked 'HOT'.
- Open a hot water faucet inside the RV to allow air to escape while the tank fills. Close the faucet once water flows steadily.

Image 3.2: Rear view of the water heater showing the 'HOT' and 'COLD' water connections.
3.4 LP Gas Connection
Connect the RV's LP gas supply line to the gas inlet on the water heater. Use a suitable gas-rated sealant on all threaded connections. After connection, perform a leak test using a non-corrosive leak detection solution.
3.5 Electrical Connection
Connect the 12V DC wiring for the DSI and control board, and the 120V AC wiring for the electric heating element. Ensure all wiring is correctly routed and secured, following the wiring diagram provided with the unit. The 120V AC circuit must be protected by a dedicated circuit breaker.

Image 3.3: Internal view of the water heater showing the control board, wiring, and gas valve assembly.
4. Operating Instructions
Before operating, ensure the water heater tank is full of water and all gas and electrical connections are secure.
4.1 LP Gas Operation (DSI)
- Ensure the RV's main LP gas supply valve is open.
- Turn on the gas switch for the water heater, typically located inside the RV.
- The Direct Spark Ignition system will automatically attempt to light the burner. A red indicator light may illuminate briefly if ignition fails. If it fails, turn the switch off, wait a few minutes, and try again.
- Once ignited, the burner will operate until the water reaches the set temperature, then cycle on and off as needed.
4.2 Electric Operation
- Ensure the RV is connected to a 120V AC power source (shore power or generator).
- Locate the electric heating element switch, often found on the water heater's exterior or inside the RV. Turn it ON.
- The electric element will heat the water. This mode is generally quieter but may take longer than gas heating.
- The electric element will cycle on and off to maintain the water temperature.
Important: Never operate the electric heating element if the water heater tank is empty. This will cause immediate damage to the element.
4.3 Dual Operation (Gas and Electric)
For faster recovery or higher demand, both LP gas and electric heating can be used simultaneously. Activate both the gas and electric switches as described above.
4.4 Winterization and Draining
To prevent freezing damage, the water heater must be drained completely when the RV is stored in freezing temperatures.
- Turn off all power to the water heater (gas and electric).
- Allow the water to cool.
- Open all hot water faucets in the RV.
- Remove the drain plug/anode rod from the bottom of the water heater tank to allow water to drain.
- Open the pressure relief valve (T&P valve) to assist draining.
- Once drained, replace the drain plug/anode rod and close the T&P valve.
5. Maintenance
5.1 Anode Rod Inspection and Replacement
The anode rod protects the tank from corrosion. It should be inspected annually and replaced when it is significantly corroded (reduced to approximately 1/4 inch in diameter).
- Drain the water heater tank as described in Section 4.4.
- Remove the anode rod, which also serves as the drain plug.
- Inspect the rod. If corroded, replace it with a new Suburban anode rod.
- Wrap the threads of the new anode rod with Teflon tape before reinstallation.
5.2 Flushing the Tank
Periodically flush the water heater tank to remove sediment buildup. This can improve efficiency and extend the life of the unit.
- Drain the tank completely.
- Using a flushing wand or a garden hose, direct water into the drain opening to dislodge and flush out sediment.
- Continue flushing until the water runs clear.
- Reinstall the anode rod/drain plug and refill the tank.
5.3 Pressure Relief Valve (T&P Valve)
Test the T&P valve at least once a year by lifting the lever. Water should discharge from the valve. If no water discharges, or if the valve leaks after testing, it must be replaced by a qualified technician.
6. Troubleshooting
Before calling for service, review the following common issues and their solutions.
| Problem | Possible Cause | Solution |
|---|---|---|
| No hot water (Gas) | No LP gas, gas valve closed, DSI failure, thermostat/ECO fault. | Check LP gas supply. Ensure gas switch is ON. Cycle power. If problem persists, contact service. |
| No hot water (Electric) | No 120V AC power, electric switch OFF, heating element failure, thermostat/ECO fault. | Check shore power/generator. Ensure electric switch is ON. Check circuit breaker. If problem persists, contact service. |
| Water too hot or too cold | Thermostat/ECO fault. | Contact service for thermostat/ECO inspection. |
| Water leaks | Loose connections, faulty T&P valve, tank leak. | Tighten connections. Replace T&P valve if faulty. Tank leaks require professional repair or replacement. |
| Burner ignites then goes out | Insufficient gas pressure, dirty burner, faulty igniter/sensor. | Check LP gas supply. Clean burner tube. Contact service for igniter/sensor issues. |
For issues not listed or if troubleshooting steps do not resolve the problem, contact a qualified RV service technician.
7. Specifications
| Feature | Detail |
|---|---|
| Model Number | SW6DE |
| Manufacturer | Suburban |
| Power Source | AC/DC (Electric and LP Gas) |
| Ignition Type | Direct Spark Ignition (DSI) |
| Item Weight | 35 pounds |
| Product Dimensions | 25 x 19 x 18 inches |
| Mounting Type | Door Mount |
| Color | White (Door) |
8. Warranty and Support
This Suburban water heater comes with a manufacturer's warranty. Please refer to the warranty card included with your product for specific terms, conditions, and duration. Keep your proof of purchase for warranty claims.
For technical support, parts, or warranty service, please contact Suburban customer service or your authorized dealer. Contact information can typically be found on the manufacturer's website or in the documentation provided with your unit.

Image 8.1: Operating instructions and warnings located on the inside of the exterior access door.


