
1. Introduction
This manual provides detailed instructions for the installation, operation, maintenance, and troubleshooting of the EZ-FLO 40202 Adjustable Anti-Siphon Toilet Fill Valve. This valve is designed to replace existing toilet fill valves and is compatible with most standard toilets, offering an adjustable height for a precise fit. Please read all instructions carefully before beginning installation.
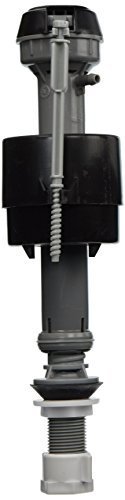
Figure 1: EZ-FLO 40202 Adjustable Anti-Siphon Toilet Fill Valve. This image shows the complete fill valve assembly, including the float, shank, and water inlet connection.
2. Safety Information
- Always turn off the water supply to the toilet before attempting any installation or maintenance.
- Flush the toilet to drain the tank completely before working on the fill valve.
- Wear appropriate personal protective equipment, such as gloves and eye protection, during installation.
- Do not overtighten nuts or connections, as this may cause damage or leaks.
- Ensure all connections are secure to prevent water leaks.
- Keep small parts away from children.
3. Package Contents
Verify that all components are present before beginning installation:
- EZ-FLO 40202 Adjustable Anti-Siphon Toilet Fill Valve (1)
- Shank Washer (1)
- Lock Nut (1)
- Refill Tube (1)
- Refill Clip (1)
4. Setup and Installation
4.1. Preparation
- Turn off the water supply to the toilet at the shut-off valve located on the wall or floor behind the toilet.
- Flush the toilet to empty the tank. Hold the handle down to ensure as much water as possible drains out.
- Use a sponge or towel to remove any remaining water from the tank.
- Disconnect the water supply line from the bottom of the old fill valve. Have a small bucket or towel ready to catch any residual water.
4.2. Removing the Old Fill Valve
- Inside the toilet tank, unscrew the lock nut from the bottom of the old fill valve.
- Remove the old fill valve from the tank.
4.3. Installing the New Fill Valve
- Insert the new EZ-FLO 40202 fill valve into the hole at the bottom of the toilet tank. Ensure the shank washer is properly seated on the outside of the tank, under the valve's threaded shank.
- From underneath the tank, thread the lock nut onto the fill valve shank. Hand-tighten the lock nut securely. Do not overtighten with tools, as this can crack the tank.
- Connect the refill tube to the small port on the side of the fill valve. Attach the refill clip to the other end of the refill tube and clip it to the top edge of the overflow pipe. Ensure the refill tube is positioned above the water level in the tank.
- Reconnect the water supply line to the bottom of the new fill valve. Hand-tighten first, then use a wrench for a final quarter-turn to ensure a leak-free connection. Do not overtighten.
4.4. Adjusting Water Level
- Turn the water supply back on slowly. The tank will begin to fill.
- The EZ-FLO 40202 fill valve is adjustable. To adjust the water level, locate the adjustment rod or collar on the valve body.
- Rotate the adjustment mechanism or slide the float cup up or down to set the desired water level. The water level should be approximately 1 inch below the top of the overflow pipe.
- Flush the toilet several times to verify proper operation and water level. Make further adjustments if necessary.
5. Operating Instructions
Once installed and adjusted, the EZ-FLO 40202 fill valve operates automatically. When the toilet is flushed, the water level in the tank drops, causing the float cup to descend. This opens the fill valve, allowing fresh water to enter the tank and refill tube. The refill tube directs a small amount of water into the toilet bowl to replenish the trap seal. As the water level rises, the float cup lifts, gradually closing the fill valve when the preset water level is reached, stopping the water flow.
6. Maintenance
Regular maintenance can extend the life of your fill valve and prevent common toilet issues.
- Annual Inspection: Periodically inspect the fill valve for signs of wear, such as cracks, mineral buildup, or discoloration.
- Cleaning: If the valve appears to be operating slowly or making unusual noises, mineral deposits may be affecting its performance. Turn off the water supply, remove the valve, and gently clean any visible mineral buildup with a soft brush and white vinegar solution. Rinse thoroughly before reinstallation.
- Float Check: Ensure the float cup moves freely without obstruction.
7. Troubleshooting
| Problem | Possible Cause | Solution |
|---|---|---|
| Toilet runs continuously or cycles on and off. | Water level too high; float obstructed; worn flapper; debris in valve. | Adjust water level down. Check for obstructions around float. Inspect and replace flapper if worn. Turn off water, remove valve, and clean for debris. |
| Toilet fills slowly. | Low water pressure; clogged water supply line; debris in valve. | Check household water pressure. Inspect and clean water supply line filter. Turn off water, remove valve, and clean for debris. |
| Water leaks from tank bottom. | Loose lock nut; damaged shank washer; loose water supply line connection. | Tighten lock nut (hand-tight). Replace shank washer if damaged. Tighten water supply line connection. |
| No water fills the tank. | Water supply turned off; clogged valve; float stuck. | Ensure water supply valve is fully open. Turn off water, remove valve, and clean for debris. Check if float is stuck in the up position. |
8. Specifications
- Model: EZ-FLO 40202
- Part Number: 7576337
- Type: Adjustable Anti-Siphon Toilet Fill Valve
- Compatibility: Most standard toilets
- Manufacturer: EZ-FLO
9. Warranty and Support
EZ-FLO products are manufactured to high-quality standards. For specific warranty information regarding your EZ-FLO 40202 Adjustable Anti-Siphon Toilet Fill Valve, please refer to the packaging or contact EZ-FLO customer support directly. If you require technical assistance or have questions not covered in this manual, please visit the official EZ-FLO website or contact their customer service department for support.