
Introduction
Thank you for choosing the Excelvan Color Weather Station. This device provides accurate indoor and outdoor temperature and humidity readings, along with weather forecasts, time, and date. It features a vibrant LCD display and a wireless outdoor sensor for comprehensive environmental monitoring. Please read this manual carefully before operation to ensure proper use and longevity of your device.
Package Contents
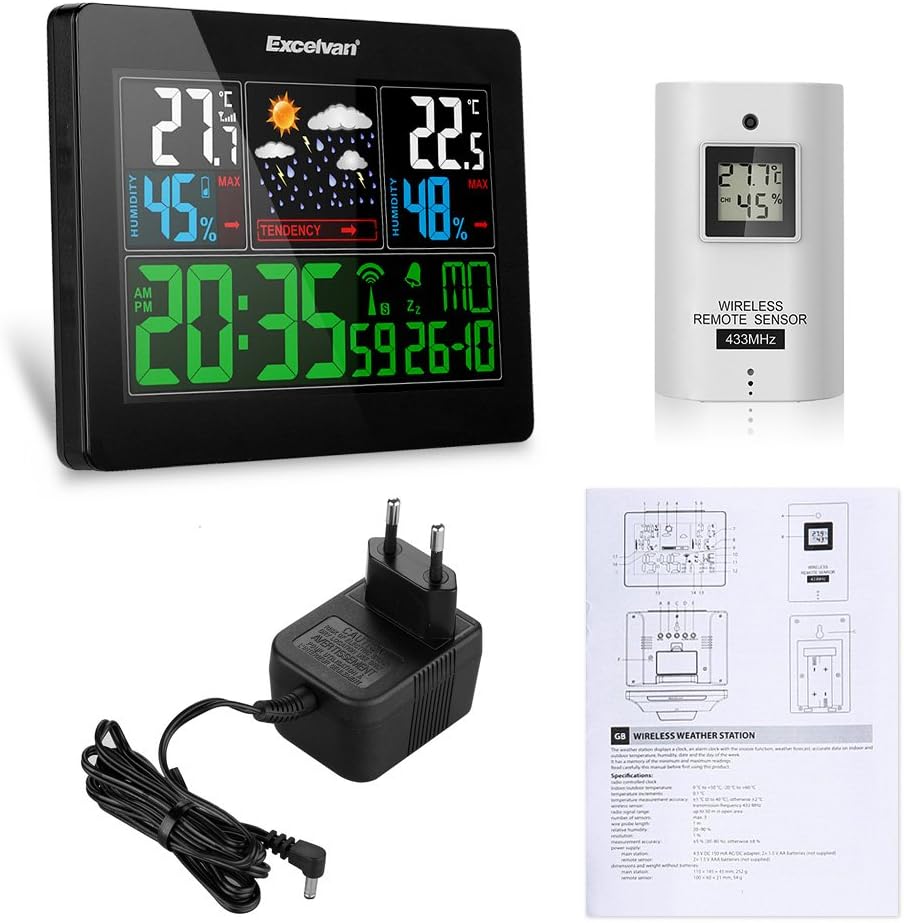
Image: All components included in the package, showing the main weather station unit, the wireless outdoor sensor, the power adapter, and the user manual.
- 1 x Excelvan Color Weather Station (Main Unit)
- 1 x Wireless Outdoor Sensor
- 1 x Power Adapter (DC 4.5V)
- 1 x User Manual
Product Features
- Indoor/Outdoor Temperature & Humidity: Measures and displays temperature (0°C to +50°C indoors; -20°C to +60°C outdoors) and humidity (20-90% RH) with trend indicators.
- Barometric Pressure: Built-in barometer with barometric pressure and history display.
- Wireless Sensor: 433MHz transmission frequency with a range of up to 50 meters in open space. Supports up to 3 external sensors (one included).
- Weather Forecast: Five weather icons (sunny, partially sunny, cloudy, rainy, stormy) indicate future weather conditions.
- Large LCD Display: Simultaneous display of time, indoor/outdoor temperature, humidity, barometric pressure, and calendar (available in 7 languages).
- Backlight: Long-lasting LED backlight when connected to power adapter for colorful background illumination.
- Radio-Controlled Clock: Automatic time synchronization.
Specifications
| Feature | Specification |
|---|---|
| Indoor Temperature Range | 0°C to +50°C |
| Outdoor Temperature Range | -20°C to +60°C |
| Temperature Increment | 0.1°C |
| Temperature Accuracy | ±1°C (0 to 40°C), otherwise ±2°C |
| Humidity Range | 20-90% RH |
| Humidity Resolution | 1% |
| Humidity Accuracy | ±5% (30-80%), otherwise ±8% |
| Wireless Sensor Frequency | 433MHz |
| Wireless Range | Up to 50m (open space) |
| Max Sensors Supported | 3 |
| Probe Cable Length (Sensor) | 1m |
| Main Unit Power | 4.5V DC 150mA AC/DC adapter, 2 x 1.5V AA batteries (not included) |
| Remote Sensor Power | 2 x 1.5V AAA batteries (not included) |
| Main Unit Dimensions | 110 x 145 x 45 mm |
| Main Unit Weight | 252g (without batteries) |
| Remote Sensor Dimensions | 100 x 60 x 21 mm |
| Remote Sensor Weight | 54g (without batteries) |
Setup
1. Powering the Main Unit
- Open the battery compartment cover on the back of the main unit.

Image: Rear view of the weather station showing the open battery compartment, ready for battery insertion.
- Insert 2 x 1.5V AA batteries (not included) into the compartment, observing the correct polarity (+/-).
- Close the battery compartment cover.
- For continuous backlight and optimal performance, connect the provided AC/DC power adapter to the DC 4.5V port on the back of the main unit and plug it into a power outlet.

Image: Rear view of the weather station with the power adapter cable plugged into the DC 4.5V port.
2. Powering the Wireless Outdoor Sensor
- Open the battery compartment cover on the back of the wireless sensor.
- Insert 2 x 1.5V AAA batteries (not included) into the compartment, observing the correct polarity (+/-).
- Close the battery compartment cover.
3. Sensor Placement and Connection
- Place the main unit indoors, preferably on a desktop or table. This unit is designed for indoor use only.
- Position the wireless outdoor sensor outdoors, away from direct sunlight and rain, in a shaded and well-ventilated area. It can be wall-mounted or placed on a desktop.

Image: The main weather station unit displayed on an indoor desk, with an inset showing the wireless outdoor sensor mounted on an exterior wall.
- Ensure the sensor is within the 50-meter effective range of the main unit. Obstacles like thick walls or electronic devices may reduce the range.

Image: The main weather station unit and the wireless remote sensor are shown side-by-side, with text indicating an effective using distance of 50 meters for the sensor.
- The main unit will automatically search for and connect to the wireless sensor. This may take a few minutes. Once connected, outdoor temperature and humidity will be displayed.
Operating Instructions
Display Overview

Image: A detailed view of the weather station's color LCD display, showing indoor and outdoor temperature and humidity, weather forecast icons, time, and date.
The large LCD display is divided into several sections:
- Top Left: Indoor Temperature and Humidity with MAX/MIN records.
- Top Center: Weather Forecast icons (Sunny, Partially Sunny, Cloudy, Rainy, Stormy) and barometric pressure tendency.
- Top Right: Outdoor Temperature and Humidity with MAX/MIN records.
- Bottom: Time (AM/PM), Alarm status, Radio Control signal, and Calendar (Day, Month, Date).
Button Functions
- MODE: Press to cycle through display modes (e.g., time, alarm settings). Press and hold to enter setting mode.
- +: Increase value during setting, or switch between Celsius/Fahrenheit.
- -: Decrease value during setting, or view MIN/MAX temperature/humidity.
- ALARM: Press to view alarm time. Press and hold to set alarm.
- SEARCH: Manually search for the outdoor sensor signal.
- SNOOZE/LIGHT: (Usually on top) Press to activate snooze during alarm, or adjust backlight brightness (when powered by adapter).
Setting Time and Date
- Press and hold the MODE button until the time display flashes.
- Use the + or - buttons to adjust the hour.
- Press MODE again to confirm and move to the next setting (minutes, year, month, day, language for day of week).
- Repeat steps 2 and 3 until all settings are configured.
- Press MODE to exit setting mode.
- The clock is radio-controlled and will attempt to synchronize automatically. Manual setting is for initial setup or if radio signal is unavailable.
Setting Alarm
- Press and hold the ALARM button until the alarm time flashes.
- Use the + or - buttons to adjust the alarm hour.
- Press ALARM again to confirm and move to alarm minutes.
- Repeat steps 2 and 3.
- Press ALARM to exit setting mode.
- Press ALARM briefly to turn the alarm ON/OFF. An alarm icon will appear/disappear on the display.
Temperature Unit Selection (°C/°F)
- Briefly press the + button to switch between Celsius (°C) and Fahrenheit (°F) display for temperature.
Viewing MAX/MIN Records
- Briefly press the - button to cycle through current, maximum (MAX), and minimum (MIN) temperature and humidity readings.
- To clear MAX/MIN records, press and hold the - button while MAX/MIN values are displayed.
Weather Forecast
The weather station predicts weather conditions for the next 12-24 hours based on barometric pressure changes. The icons displayed are:
- ☀ Sunny
- ☁ Partially Sunny
- ☁️ Cloudy
- ☔ Rainy
- ☕ Stormy
Note: Weather forecasts are estimates and may not always be 100% accurate.
Maintenance
- Cleaning: Wipe the unit and sensor with a soft, damp cloth. Do not use abrasive cleaners or solvents.
- Battery Replacement: Replace batteries in both the main unit and sensor when the low battery indicator appears on the display. Ensure correct polarity.
- Storage: If storing the device for an extended period, remove all batteries to prevent leakage.
- Environment: Avoid exposing the main unit to extreme temperatures, direct sunlight, or high humidity. The outdoor sensor is designed for outdoor use but should be protected from direct heavy rain and snow for longevity.
Troubleshooting
| Problem | Possible Cause | Solution |
|---|---|---|
| No display on main unit | Batteries are dead or incorrectly inserted; Power adapter not connected or faulty. | Check battery polarity and replace if necessary. Ensure power adapter is securely connected and functional. |
| Outdoor temperature/humidity not displayed or flashing | Sensor out of range; Sensor batteries dead; Interference; Sensor not paired. | Move sensor closer to the main unit. Replace sensor batteries. Relocate units away from interfering electronics. Press the SEARCH button on the main unit to re-establish connection. |
| Inaccurate readings | Sensor exposed to direct sunlight/rain; Unit placed near heat/cold sources. | Relocate the outdoor sensor to a shaded, protected area. Ensure main unit is not near vents, windows, or appliances that affect temperature. |
| Time not synchronizing (Radio-Controlled Clock) | Weak radio signal; Interference; Unit too far from signal source. | Place the main unit near a window or in an open area, away from electronic devices that may cause interference. Allow up to 24 hours for initial synchronization. |
| Backlight not working (when on batteries) | Backlight is designed to be continuous only when powered by the AC adapter. | Connect the power adapter for continuous backlight. On battery power, the backlight is typically momentary to conserve energy. |
Warranty and Support
Excelvan products are manufactured to high-quality standards. For any issues or questions regarding your weather station, please refer to the contact information provided with your purchase or visit the official Excelvan website for support.
Please retain your proof of purchase for warranty claims.