
Introduction
This manual provides essential information for the safe and efficient operation, installation, and maintenance of your Alfresco ALXE-56BFGC-NG 56-inch Natural Gas Grill. Please read all instructions thoroughly before assembly or operation to ensure proper use and to prevent potential hazards. Keep this manual for future reference.
Safety Information
WARNING: For Outdoor Use Only.
WARNING: Improper installation, adjustment, alteration, service, or maintenance can cause injury or property damage. Read the installation, operating, and maintenance instructions thoroughly before installing or servicing this equipment.
- Always ensure adequate ventilation when operating the grill.
- Keep children and pets away from the grill during operation.
- Do not store or use gasoline or other flammable vapors and liquids in the vicinity of this or any other appliance.
- Always check for gas leaks before each use, especially after connecting or reconnecting the gas supply.
- Maintain proper clearances from combustible materials as specified in the setup section.
- Never attempt to repair or alter the grill's gas components yourself. Contact a qualified service technician.
Setup
1. Unpacking and Inspection
Carefully remove all packaging materials. Inspect the grill for any shipping damage. If damage is found, do not attempt to assemble or operate the grill. Contact your dealer immediately.
2. Placement and Clearances
The grill must be placed on a level, non-combustible surface. Ensure sufficient clearance from combustible materials:
- Rear: Minimum 12 inches (30.5 cm)
- Sides: Minimum 12 inches (30.5 cm)
- Above: Minimum 48 inches (122 cm)
Do not install the grill under unprotected combustible overhead constructions.
3. Gas Connection (Natural Gas)
This grill is designed for use with Natural Gas only. Connection must be performed by a qualified gas technician in accordance with local codes and ordinances. Ensure the gas supply line is properly sized for the grill's BTU requirements.
- The grill requires a 1/2 inch NPT supply line.
- Install a manual shut-off valve in an accessible location upstream of the grill.
- Perform a leak test using a soap and water solution on all connections before initial use. Never use an open flame to check for leaks.
4. Electrical Connection
The grill requires a 120V AC electrical supply for the rotisserie motor, ignition system, and internal lighting. Ensure the outlet is a properly grounded, dedicated circuit.
- Connect the grill's power cord to a grounded 3-prong outlet.
- Do not use extension cords.
5. Component Identification
Familiarize yourself with the grill's components.

Image: The Alfresco ALXE-56BFGC-NG 56-inch Natural Gas Grill on its cart, showing overall dimensions of 56 inches width, 28.25 inches depth, and 51.12 inches height. This image provides a full view of the grill's exterior and its freestanding configuration.

Image: A close-up view of the stainless steel grill grates with refractive ceramic briquettes visible underneath. These briquettes ensure even heat distribution across the cooking surface.
Operating Instructions
1. Pre-Operation Checks
- Ensure the gas supply valve is open.
- Check that the electrical cord is plugged in.
- Clean cooking grates if necessary.
2. Ignition Procedures

Image: A close-up of the grill's control panel, showing three push-button controls: one for ignition (lightning bolt symbol), one for internal lights (light bulb symbol), and one for the rotisserie motor (circular arrow symbol).

Image: Two stainless steel control knobs on the grill's front panel, illuminated by internal lights, indicating they are in use or ready for operation. The 'A' logo of Alfresco is visible on each knob.
Main Burners:
- Open the grill hood.
- Push and turn a main burner control knob to the HIGH position.
- Immediately press and hold the ignition button (lightning bolt symbol) until the burner ignites. You should hear a clicking sound.
- Once ignited, release the ignition button. If the burner does not light within 5 seconds, turn the knob to OFF, wait 5 minutes for gas to dissipate, and repeat the process.
- Adjust the flame to the desired cooking temperature.
Sear Zone Burner:

Image: A close-up view of the infrared sear zone burner, glowing intensely red, indicating high heat output for searing food.
- Open the grill hood.
- Push and turn the Sear Zone control knob to the HIGH position.
- Press and hold the ignition button until the burner ignites. The ceramic surface will begin to glow red.
- Allow 5-10 minutes for the Sear Zone to reach optimal temperature.
Rotisserie Burner:

Image: The interior of the grill showing the rotisserie spit assembly in place, positioned in front of the infrared rotisserie burner at the rear of the cooking chamber.
- Open the grill hood.
- Push and turn the Rotisserie burner control knob to the ON position.
- Press and hold the ignition button until the burner ignites.
- Once ignited, release the ignition button.
3. Using the Rotisserie System
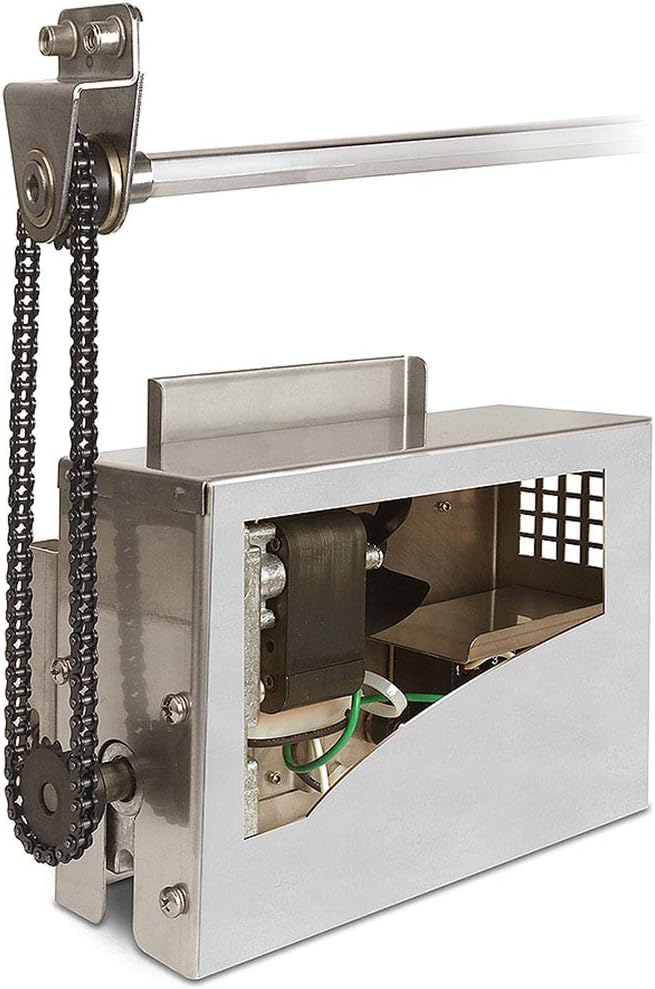
Image: A detailed view of the rotisserie motor assembly, featuring a chain drive mechanism that rotates the rotisserie spit for even cooking.
- Securely attach food to the rotisserie spit forks.
- Insert the spit into the rotisserie motor drive and support bracket.
- Ignite the rotisserie burner as described above.
- Press the rotisserie motor button (circular arrow symbol) to start rotation.
- Close the grill hood for optimal cooking.
4. Using the Integrated Wood Smoker and Herb Infusion System

Image: A pull-out drawer, part of the integrated wood smoker and herb infusion system, filled with wood chips, rosemary, and other herbs, ready for smoking.

Image: A close-up of two control knobs on the grill's front panel, with the label 'SMOKER' visible below one of the knobs, indicating its function for the integrated smoker system.
- Pull out the smoker drawer.
- Fill the drawer with desired wood chips (soaked in water for 30 minutes, then drained) or herbs. Do not overfill.
- Push the drawer back into its position.
- Push and turn the SMOKER control knob to the ON position.
- Press and hold the ignition button until the smoker burner ignites.
- Close the grill hood to allow smoke to infuse the food.
5. Shutting Down the Grill
- Turn all burner control knobs to the OFF position.
- Turn off the gas supply at the main shut-off valve.
- Unplug the electrical cord from the outlet.
- Allow the grill to cool completely before covering or cleaning.
Maintenance
1. Cleaning
Cooking Grates:
After each use, once the grill has cooled, brush off food residue with a stiff wire brush. For stubborn residue, remove grates and wash with warm, soapy water.
Burners:
Periodically inspect burner ports for blockages (e.g., food debris, insect nests). Use a wire brush or a paper clip to clear any obstructions. Ensure gas ports are clear for even flame distribution.
Exterior:
Clean stainless steel surfaces with a soft cloth and a stainless steel cleaner. Always wipe in the direction of the grain to prevent scratching. Avoid abrasive cleaners.
Smoker Box:
Empty and clean the smoker box after each use to prevent residue buildup and ensure proper airflow for future smoking sessions.
2. Storage and Winterization
If storing the grill for an extended period or during winter months:
- Thoroughly clean all components.
- Disconnect the gas supply and electrical power.
- Cover the grill with a weather-resistant cover.
- Store in a dry, protected area if possible.
Troubleshooting
| Problem | Possible Cause | Solution |
|---|---|---|
| Burner will not light | No gas supply Blocked burner port Faulty igniter electrode | Check gas supply valve Clean burner ports Contact service technician |
| Uneven heat | Blocked burner ports Improper briquette placement | Clean burner ports Ensure briquettes are evenly distributed |
| Rotisserie motor not turning | Not plugged in Motor overload Faulty motor | Check electrical connection Reduce food weight Contact service technician |
| Smoker not producing smoke | No wood chips Smoker burner not lit Drawer not fully closed | Add wood chips Re-ignite smoker burner Ensure drawer is fully seated |
Specifications
- Model Number: ALXE-56BFGC-NG
- Fuel Type: Natural Gas
- Total BTU Output: 82,500 BTU
- Total Cooking Area: 998 sq. in.
- Main Burner Count: 3
- Special Features: Sear Zone, Rotisserie System, Integrated Wood Smoker and Herb Infusion System
- Material: Stainless Steel
- Dimensions (W x D x H): 56" x 28.25" x 51.13"
- Item Weight: 547 Pounds
- Installation Type: Free Standing
Warranty and Support
For warranty information, please refer to the separate warranty document included with your purchase or visit the official Alfresco website. For technical support, parts, or service inquiries, please contact your authorized Alfresco dealer or the manufacturer's customer service department.
It is recommended to have your model number (ALXE-56BFGC-NG) and serial number available when contacting support.


