
1. Introduction
This manual provides essential instructions for the safe and effective operation of your Brookstone Wireless Mobile Projector MP130. Please read this manual thoroughly before using the device and retain it for future reference. Proper use and maintenance will ensure optimal performance and longevity of your projector.
2. Product Overview
2.1 Package Contents
Verify that all items listed below are included in your package:
- Brookstone Wireless Mobile Projector MP130
- HDMI Cable
- Power Adapter
- Mini Tripod
- Remote Control
- User Manual (this document)

Image 2.1: Package contents including the projector, HDMI cable, power adapter, tripod, remote control, and user manual.
2.2 Projector Components
Front View

Image 2.2: Front view of the projector, showing the projection lens and ventilation grille.
The front of the projector features the main projection lens and a ventilation grille for heat dissipation.
Top View and Touch Panel

Image 2.3: Top view of the projector, highlighting the integrated touch panel.

Image 2.4: Close-up of the touch panel, indicating control functions.
The top surface of the projector integrates a touch panel for navigation and control. Key functions include:
- Volume + / Volume -: Adjusts audio output level.
- Menu: Accesses the projector's settings menu.
- Home: Returns to the main interface.
- Back: Navigates to the previous screen or option.
- Touch Panel Area: Used for navigation and selection (light touch to confirm).
Side View and Ports

Image 2.5: Side view of the projector, detailing the connectivity ports.
The side of the projector houses various ports for connectivity:
- Power Input: Connects to the power adapter for charging and operation.
- HDMI: High-Definition Multimedia Interface for connecting to external video sources.
- 3.5mm Audio Output: For connecting external speakers or headphones.
- USB 2.0 Port: For connecting USB storage devices.
- USB 3.0 Port: For connecting USB storage devices, offering faster data transfer.
3. Setup
3.1 Charging the Projector
- Connect the provided power adapter to the Power Input port on the projector.
- Plug the power adapter into a standard electrical outlet.
- The charging indicator will illuminate. A full charge typically takes several hours. The projector can be used while charging.
The projector is equipped with a rechargeable 3800mAh battery, providing portable operation.
3.2 Powering On/Off
- To Power On: Press and hold the power button located on the projector until the indicator light illuminates and the projector starts.
- To Power Off: Press and hold the power button until the projector shuts down.
3.3 Focus Adjustment
To achieve a clear image, adjust the focus wheel located near the projection lens. Rotate the wheel until the projected image appears sharp and clear on the screen or surface.
3.4 Positioning the Projector
The projector can project an image up to 80 inches diagonally. The size of the projected image is determined by the distance between the projector and the projection surface. To adjust the screen size, physically move the projector closer or further away from the surface.
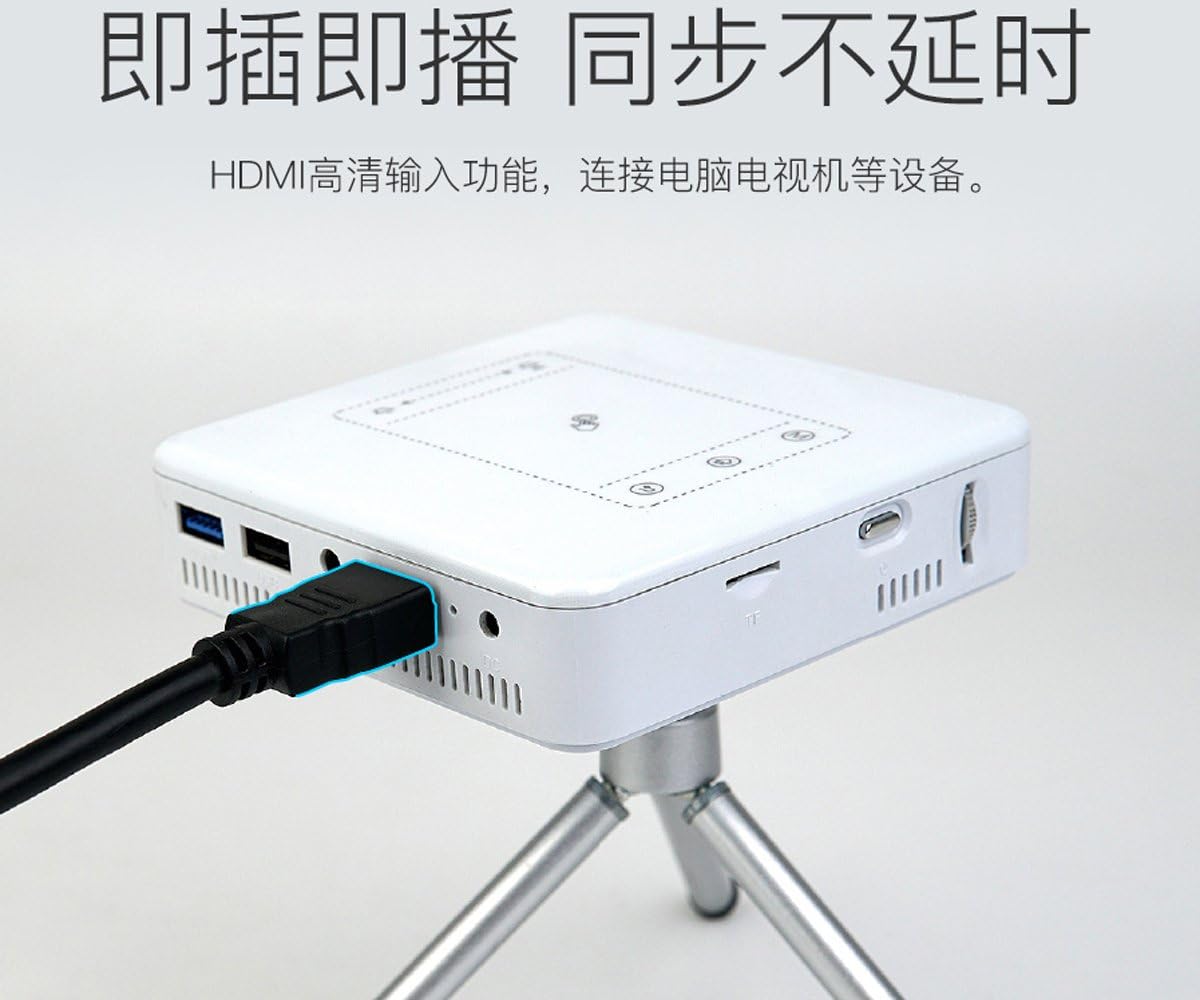
Image 3.1: Projector positioned on a tripod, ready for use.
Use the included mini tripod for stable positioning on flat surfaces. Ensure the projector is placed on a stable, level surface to prevent accidental falls.
4. Operating Instructions
4.1 Wireless Connectivity
The projector supports wireless connection to compatible smartphones and tablets.
Connecting to Smartphones/Tablets
- Ensure your smartphone or tablet's Wi-Fi is enabled.
- On the projector, navigate to the wireless connection settings.
- Select the appropriate mirroring or casting option (e.g., Miracast for Android, AirPlay for iOS).
- For Apple devices, an application may be required to facilitate the connection. Refer to the projector's on-screen instructions for specific app recommendations.
- Select the projector's network name from your device's Wi-Fi or screen mirroring options.
Note: Wireless connectivity to laptops is generally not supported by this model. For laptop connections, use an HDMI cable.
4.2 Wired Connectivity
HDMI Connection
Use the HDMI port to connect to devices such as laptops, gaming consoles, or media players.
- Connect one end of the HDMI cable to the HDMI port on the projector.
- Connect the other end of the HDMI cable to the HDMI output port on your source device.
- On the projector, select HDMI as the input source.
Image 4.1: Projector connected to a source device using an HDMI cable.
USB Media Playback
The USB 2.0 and USB 3.0 ports allow you to play media directly from USB storage devices.
- Insert a USB flash drive into either the USB 2.0 or USB 3.0 port.
- Navigate to the media player application on the projector's interface.
- Select the desired media file (videos, photos, documents) to play.

Image 4.2: Projector displaying content, indicating support for H.265 video decoding for high-definition playback.
4.3 Audio Output
The projector features dual built-in speakers for audio playback. For enhanced audio, you can connect external speakers or headphones.
- Built-in Speakers: Audio will play automatically through the projector's internal speakers. Adjust volume using the touch panel or remote control.
- External Audio: Connect headphones or external speakers to the 3.5mm Audio Output jack.
Note: The projector does not directly connect to Bluetooth speakers. If you wish to use Bluetooth speakers, connect your source device (e.g., smartphone) directly to the Bluetooth speaker.
4.4 Navigating the Interface
You can navigate the projector's interface using either the integrated touch panel on the top of the device or the included remote control. The touch panel allows for intuitive gesture-based control, while the remote offers traditional button navigation.
5. Maintenance
5.1 Cleaning
- Lens: Use a soft, lint-free cloth specifically designed for optical lenses. Do not use abrasive cleaners or cloths that may scratch the lens.
- Projector Body: Wipe the exterior with a soft, dry cloth. For stubborn marks, a slightly damp cloth can be used, followed by a dry cloth. Avoid using harsh chemicals or solvents.
- Ventilation Grilles: Periodically check and gently clean the ventilation grilles to ensure proper airflow and prevent overheating. Use a soft brush or compressed air.
5.2 Storage
When not in use for extended periods, store the projector in a cool, dry place, away from direct sunlight and extreme temperatures. It is recommended to use the original packaging or a protective case to prevent dust accumulation and physical damage.
6. Troubleshooting
If you encounter issues with your projector, refer to the following common problems and solutions:
| Problem | Possible Cause | Solution |
|---|---|---|
| No image projected | Projector not powered on; incorrect input source; loose cable connection. | Ensure projector is powered on. Select the correct input source (e.g., HDMI, Wireless). Check all cable connections. |
| Image is blurry | Focus not adjusted; projector too close/far from screen. | Adjust the focus wheel until the image is clear. Reposition the projector to optimize image size and clarity. |
| No audio | Volume too low; external speakers not connected properly; audio source issue. | Increase volume using the touch panel or remote. Ensure external speakers/headphones are securely connected to the 3.5mm jack. Check audio settings on your source device. |
| Wireless connection fails or disconnects | Interference; incorrect pairing; app issues (iOS). | Ensure no strong interference sources are nearby. Re-attempt the pairing process. For iOS, ensure the required app is installed and updated. Restart both the projector and the source device. |
| Image has unusual colors (e.g., all yellow) | Hardware malfunction. | This may indicate a hardware issue. Please contact customer support for assistance. |
7. Specifications
7.1 Technical Data
| Feature | Specification |
|---|---|
| Model Number | MP130 |
| Product Dimensions | 5 x 5.1 x 3.4 inches |
| Item Weight | 1.2 pounds |
| Brightness | 100 Lumens (LED lamp) |
| Native Display Resolution | 854 x 480 pixels |
| Maximum Display Resolution | 1920 x 1080 pixels (supported) |
| Battery | Rechargeable 3800mAh |
| Connectivity Technology | Wireless (Smartphone & Tablet), HDMI, USB 2.0, USB 3.0, 3.5mm Audio Out |
| Speakers | Dual built-in speakers |
| Special Feature | Speakers, Focus Control |
8. Warranty and Support
8.1 Warranty Information
This Brookstone Wireless Mobile Projector MP130 is covered by the manufacturer's limited warranty. Please refer to the warranty card included in your product packaging or visit the official Brookstone website for detailed warranty terms and conditions.
8.2 Customer Support
For technical assistance, troubleshooting beyond this manual, or warranty claims, please contact Brookstone customer support. Contact information can typically be found on the official Brookstone website or on your product packaging.


