Introduction
This manual provides comprehensive instructions for the Mesqool Projection Alarm Clock with FM Radio. Designed for convenience and reliability, this device features a large LED display, adjustable time projection, dual alarms, FM radio with presets, a sleep timer, and a built-in USB charging port. Please read this manual thoroughly to ensure proper operation and to fully utilize all features.

Figure 1: Mesqool Projection Alarm Clock with a phone connected for charging.
Setup
1. Power Connection
Connect the provided power adapter to the DC input port on the back of the alarm clock and plug it into a standard wall outlet. The clock will power on automatically.
2. Battery Backup Installation (Optional but Recommended)
For retaining time and alarm settings during power outages, install two 1.5V AAA batteries (not included) into the battery compartment on the back of the unit. Ensure correct polarity (+/-) as indicated inside the compartment.

Figure 2: Rear view of the alarm clock showing the battery compartment for backup power.
Operating Instructions
1. Setting the Time
- Press the SET TIME button once. The hour digits will flash.
- Use the HOUR button to adjust the hour.
- Use the MIN button to adjust the minutes.
- Press SET TIME again to confirm and exit time setting mode.
- To switch between 12-hour and 24-hour format, press the TU+ button during normal time display.
- To adjust for Daylight Saving Time (DST), press the DST button.

Figure 3: The clock supports 24-hour, 12-hour, and DST time formats.
2. Setting Alarms
The clock supports two independent alarms (Alarm 1 and Alarm 2).
- Press the ALARM1 or ALARM2 button. The alarm time will flash.
- Use the HOUR and MIN buttons to set the desired alarm time.
- Press the ALARM1 or ALARM2 button again to select the alarm sound: Buzzer or FM Radio.
- Press the respective alarm button one more time to confirm and activate the alarm. An alarm icon will appear on the display.
- To turn off an active alarm, press the corresponding ALARM OFF button.
Adjusting Alarm Volume
The alarm volume can be adjusted from Level 1 to 5. Level 5 provides a loud 106dB sound, suitable for heavy sleepers. Use the volume buttons on the side of the unit to adjust the alarm volume.

Figure 4: Visual representation of adjustable alarm volume levels.
Snooze Function
When the alarm sounds, press the large OK/SNOOZE/SLEEP button to activate the 9-minute snooze function. The alarm will sound again after 9 minutes.

Figure 5: The large button for activating the snooze function.
3. FM Radio Operation
The FM radio operates within the 87.5–108 MHz frequency range and can store up to 20 preset stations.
- Press the RADIO button to turn on the FM radio.
- Use the HOUR or MIN buttons to tune into the desired radio channel.
- To save a preset station, press and hold the MEM/M+ button.
- Press the OK/SNOOZE/SLEEP button to confirm storing the channel.
- To turn off the radio, press the RADIO OFF button.
Sleep Timer
While the radio is on, press the OK/SNOOZE/SLEEP button repeatedly to set the sleep timer (10-90 minutes). The radio will automatically turn off after the set time.

Figure 6: Step-by-step guide for FM radio operation and setting presets.
4. Projection Feature
The 180° adjustable projector allows you to display the time onto a wall or ceiling.
- To activate or deactivate the projection, use the PROJECTION ON/FLIP/OFF switch.
- Rotate the projector lens to adjust the projection angle.
- Adjust the focus ring on the projector to achieve a clear image.
- The projected image can be flipped 180° for optimal viewing.
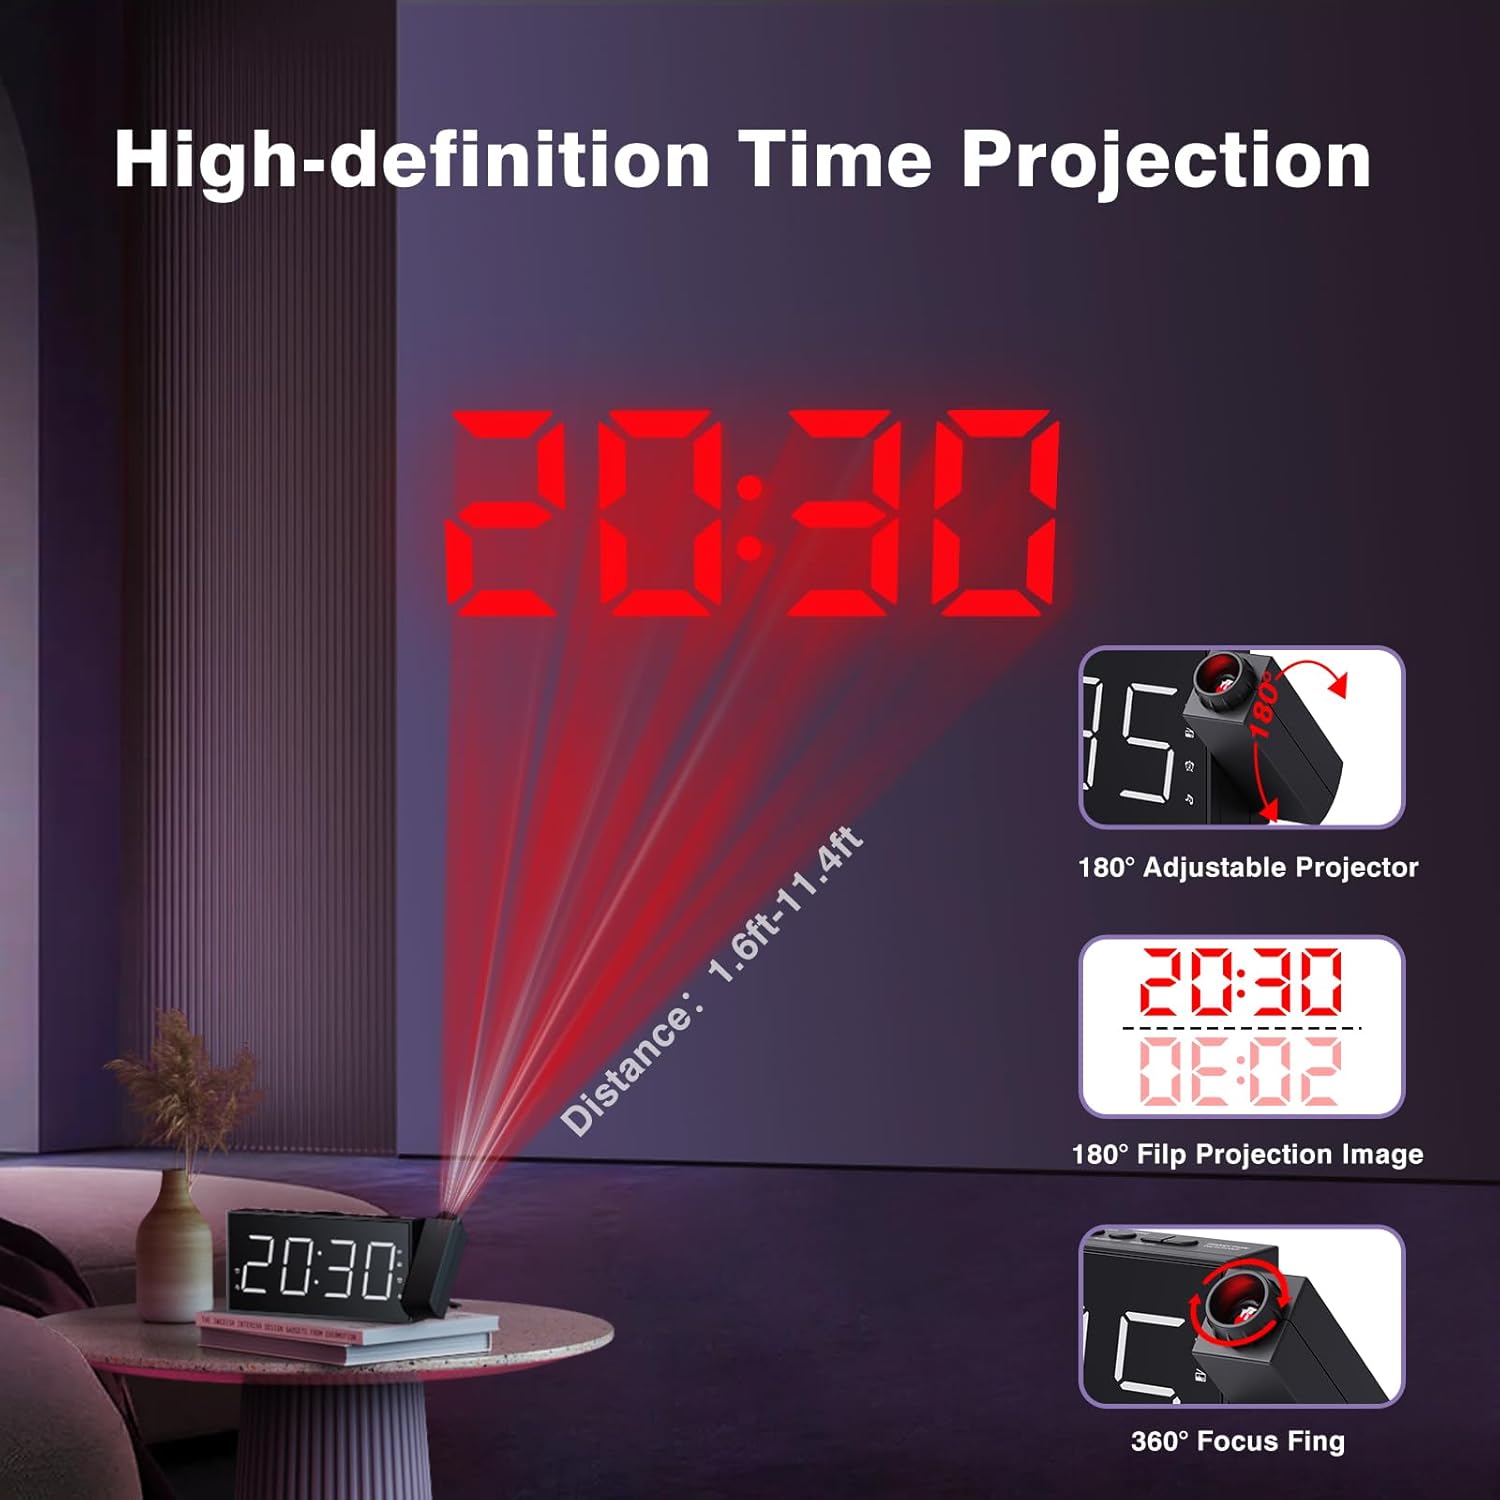
Figure 7: Time projected onto a wall from the alarm clock.

Figure 8: Demonstrating the 180-degree adjustable projection angle.
5. Display Brightness Adjustment
The 7-inch LED display offers 5 dimming levels to suit your preference for day or night viewing. Press the DIMMER button repeatedly to cycle through the brightness levels.

Figure 9: The clock display showing different brightness levels from 20% to 100%.
6. USB Charging Port
A built-in USB charging port is located on the back of the unit, allowing you to charge your mobile devices. Simply connect your device's USB charging cable to the port.

Figure 10: Rear view of the clock highlighting the USB output and DC input ports.
Maintenance
To maintain your Mesqool Projection Alarm Clock, regularly wipe the unit with a soft, dry cloth. Avoid using abrasive cleaners or solvents, as these may damage the surface. Ensure the projector lens is clean for optimal clarity.
Troubleshooting
| Problem | Possible Cause | Solution |
|---|---|---|
| Clock display is blank. | No power or power outage. | Check power adapter connection. Ensure battery backup is installed and functional during outages. |
| Alarm does not sound. | Alarm not set, volume too low, or alarm deactivated. | Verify alarm settings, increase alarm volume, and ensure alarm is activated (icon visible). |
| Projection is blurry or unclear. | Focus not adjusted, or projection surface too far/bright. | Adjust the focus ring on the projector. Ensure the projection surface is within optimal distance (1.6ft-11.4ft) and sufficiently dark. |
| FM Radio static or poor reception. | Weak signal or antenna not extended. | Adjust the position of the clock or extend the antenna for better reception. |
| USB charging not working. | Cable issue or device not compatible. | Try a different USB cable. Ensure the device is compatible with standard USB charging. |
Specifications
- Brand: Mesqool
- Model: FBA_MQL-AC-01
- Display Type: Digital LED
- Product Dimensions: 7.99"W x 3.58"H x 1.18"D
- Power Source: AC Powered (with Battery Backup)
- Battery Backup: 2 x AAA batteries (not included)
- FM Radio Frequency: 87.5-108 MHz (20 preset stations)
- Projection: 180° adjustable, focusable
- Display Brightness: 5 levels adjustable
- Alarm Volume: 5 levels adjustable (up to 106dB)
- USB Output: For charging mobile devices
- Material: Acrylonitrile Butadiene Styrene (ABS)
Warranty and Support
Mesqool provides a one-year warranty for this product, along with a 30-day free return policy. For technical support or warranty claims, please refer to the contact information provided in the original product packaging or visit the official Mesqool website.
An official User Guide (PDF) is also available for download: Download User Guide


