1. Introduction
Thank you for choosing the TOOLPORT 5x10 m Reception Tent. This manual provides essential information for the safe and correct assembly, operation, and maintenance of your tent. Please read these instructions carefully before setup and retain them for future reference.
This tent is designed to create a pleasant space for receptions and events. It features high-quality PVC tarpaulins and a galvanized steel frame for stability and durability.

Image 1.1: Fully assembled TOOLPORT 5x10 m Reception Tent (grey-white color variant).
2. Safety Information
- Always ensure the tent is securely anchored to the ground using the provided pegs and guy ropes.
- Do not assemble the tent in strong winds or adverse weather conditions. Disassemble the tent if severe weather is expected.
- Keep all flame and heat sources away from the tent fabric. The tent is not fireproof.
- Ensure adequate ventilation if using heating appliances inside the tent, and never leave them unattended.
- Regularly check all connections and anchoring points for security and tightness.
- Do not hang heavy objects from the tent frame.
- Children should be supervised around the tent.
3. Package Contents
Before beginning assembly, verify that all components are present. The package includes:
- Galvanized steel frame construction (tubes and connectors).
- Roof tarpaulin (one single element, high-quality PVC 700 N).
- Side tarpaulins with wind deflectors.
- Gable ends, including an entrance gable with a zipper door.
- Tension straps/bungees.
- Ground pegs/stakes and guy ropes.
- Assembly instructions and necessary assembly tools (e.g., wing screws, hex key).

Image 3.1: Diagram showing various components of the tent structure and tarpaulins.
4. Setup Instructions
Assembly typically requires 2-3 people and can take approximately 2.5 to 3 hours for a 5x10m tent. Follow the numbered tubes and the clear assembly instructions provided in the package.
4.1. Site Selection
Choose a level, clear area free from sharp objects, overhead power lines, and potential water accumulation. Ensure sufficient space for anchoring the tent.
4.2. Frame Assembly
- Unpack all steel tubes and connectors. Organize them according to their numbering.
- Begin by assembling the base frame on the ground. Connect the galvanized steel tubes (approx. 38mm diameter) using the corresponding connectors (approx. 42mm diameter). Secure connections with wing screws.
- Attach the vertical support poles to the base frame.
- Assemble the roof structure on the ground, connecting the roof tubes and ridge poles.
- Carefully lift the roof structure and connect it to the vertical support poles. This step often requires multiple people.
- Ensure all bolted connections are tightened securely.

Image 4.1: Detail of the galvanized steel frame connection with wing screws.
4.3. Tarpaulin Installation
- Drape the single-piece roof tarpaulin over the assembled frame. Ensure it is centered and evenly distributed.
- Attach the roof tarpaulin to the frame using the provided tension straps or bungees. Ensure it is taut to prevent water pooling.
- Install the gable ends and side tarpaulins. The side panels are modular and can be installed/removed every two meters.
- Secure all tarpaulins to the frame and to each other using the elastic fixings. The side tarpaulins feature wind deflectors for improved protection.
- Ensure the entrance gable with the zipper door is correctly positioned and functional.

Image 4.2: Interior view of the tent showing the roof and side panels with windows.
4.4. Anchoring
Secure the tent firmly to the ground using the provided ground pegs/stakes and guy ropes. Proper anchoring is crucial for stability, especially in windy conditions. For soft ground, additional anchoring might be necessary.
5. Operating Instructions
5.1. Usage
This tent is suitable for various events such as parties, receptions, and temporary shelters. The high-quality PVC tarpaulins provide protection against weather elements.
5.2. Weather Considerations
- Wind: The tent is designed to withstand moderate wind conditions when properly anchored. In strong winds, consider disassembling the tent to prevent damage.
- Rain: The PVC tarpaulins are 100% waterproof with heat-sealed seams, ensuring a dry interior. Ensure the roof is taut to prevent water accumulation.
- Snow: This tent is not designed for heavy snow loads. Remove snow accumulation promptly to prevent structural damage. Disassemble the tent if heavy snowfall is expected.
- Temperature: The tent material is resistant to temperatures between -20 and +50 °C.
5.3. Ventilation
The side panels are equipped with wind deflectors and allow for optimal air circulation and temperature regulation. Utilize the zipper door and removable side panels to adjust ventilation as needed.
6. Maintenance
- Cleaning: Clean the PVC tarpaulins with mild soap and water. Do not use harsh chemicals or abrasive cleaners, as these can damage the material. Allow tarpaulins to dry completely before storage.
- Frame Inspection: Periodically inspect the steel frame for any signs of rust, bending, or damage. Ensure all bolts and connections remain tight.
- Storage: When not in use, disassemble the tent and store all components in a dry, cool place, away from direct sunlight and pests. Ensure tarpaulins are clean and dry to prevent mold and mildew.
- Repairs: Small tears in the PVC tarpaulin can often be repaired with a suitable PVC repair kit. Damaged frame components should be replaced.
7. Troubleshooting
| Problem | Possible Cause | Solution |
|---|---|---|
| Tent unstable or swaying | Insufficient anchoring; loose frame connections; strong winds. | Ensure all pegs and guy ropes are securely fastened. Tighten all frame bolts. Disassemble in very strong winds. |
| Water pooling on roof | Roof tarpaulin not taut enough; improper assembly of roof structure. | Re-tension the roof tarpaulin. Verify roof frame assembly is correct and fully extended. |
| Zipper on door sticks or breaks | Dirt in zipper; excessive force; manufacturing defect. | Clean zipper with a brush. Apply zipper lubricant. Avoid excessive force. Contact support if broken. |
| Difficulty assembling frame | Incorrect part identification; insufficient manpower. | Refer to the numbered parts in the instruction manual. Ensure 2-3 people are available for assembly. |
8. Specifications
- Product Dimensions (L x W x H): 1000 x 500 x 200 cm (10 x 5 x 2 meters)
- Weight: 143 kg
- Model Number: 6173
- Brand: TOOLPORT
- Material: Metal frame / PVC tarpaulins
- Color: Grey-white
- Frame Material: Galvanized alloy steel
- Pole Material Type: Alloy steel
- Water Resistance Level: Waterproof
- UV Protection: True (UV 50+)
- Recommended Uses: Marquee, party tent
- Floor Area: 50 square meters
- Temperature Resistance: -20 to +50 °C
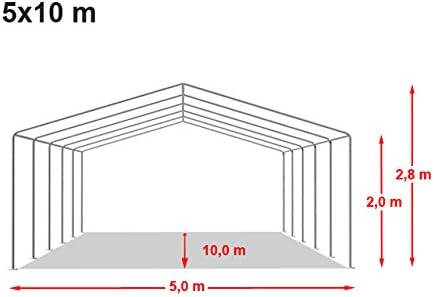
Image 8.1: Dimensional diagram of the 5x10m tent, indicating width, length, and height measurements.
9. Warranty and Support
For warranty information, please refer to the documentation included with your purchase or contact TOOLPORT customer service directly. Spare parts availability information is currently unavailable through standard channels, but inquiries can be made to the manufacturer.
For further assistance or to report issues, please contact TOOLPORT customer support via their official website or the retailer where the product was purchased.
Note: Information regarding spare parts availability is subject to change.


