
1. Introduction
This manual provides comprehensive instructions for the installation, operation, and maintenance of your Emerson UP310 Premium 7 Day Programmable Thermostat. Designed for precise temperature control, this thermostat offers 7-day programming capabilities to optimize your home's heating and cooling schedule for comfort and energy efficiency. Please read this manual thoroughly before installation and use.

Figure 1: Front view of the Emerson UP310 Premium 7 Day Programmable Thermostat, showing its large digital display and control buttons.
2. Safety Information
Always observe the following safety precautions to prevent personal injury or damage to the thermostat and connected equipment:
- Power Disconnection: Always disconnect power to the heating/cooling system at the main fuse or circuit breaker panel before installing or servicing the thermostat.
- Electrical Hazard: This thermostat operates on low voltage. However, improper wiring can cause damage to the thermostat or the HVAC system. If you are unsure about wiring, consult a qualified HVAC technician.
- Battery Safety: Use only recommended battery types (2 AA alkaline batteries). Do not mix old and new batteries, or different types of batteries. Dispose of used batteries properly.
- Location: Install the thermostat away from direct sunlight, drafts, and heat sources (e.g., lamps, fireplaces) to ensure accurate temperature readings.
- Cleaning: Use a soft, damp cloth for cleaning. Do not use abrasive cleaners or solvents.
3. What's in the Box
Verify that all components are present before beginning installation:
- Emerson UP310 Premium 7 Day Programmable Thermostat Unit
- Wall Plate / Mounting Hardware (screws and wall anchors)
- Installation Guide / User Manual
- 2 AA Alkaline Batteries

Figure 2: Included components: thermostat, batteries, mounting hardware, and documentation.
4. Setup and Installation
Follow these steps carefully to install your new thermostat. If you are replacing an existing thermostat, take a picture of the old wiring before disconnecting any wires.
- Turn Off Power: Locate the circuit breaker or fuse box that controls your heating and cooling system and turn off the power. Verify power is off by attempting to turn on your system.
- Remove Old Thermostat (if applicable): Carefully remove the old thermostat cover. Disconnect wires one by one, labeling each wire with the terminal it was connected to (e.g., R, W, Y, G, C). Take a photo of the wiring for reference.
- Remove Old Wall Plate: Unscrew and remove the old wall plate.
- Mount New Wall Plate: Thread the wires through the opening in the new Emerson wall plate. Secure the wall plate to the wall using the provided screws and wall anchors. Ensure it is level.
- Connect Wiring: Refer to your labeled wires and the wiring diagram on the back of the thermostat or in the installation guide. Connect each wire to the corresponding terminal on the new wall plate. The UP310 supports systems with or without a 'C' (common) wire, as it can be battery-powered.
- Install Batteries: Insert the two AA alkaline batteries into the battery compartment on the back of the thermostat unit.
- Mount Thermostat: Align the thermostat unit with the wall plate and gently push it onto the plate until it clicks securely into place.
- Restore Power: Turn the power back on at the circuit breaker or fuse box.
- Initial Setup: The thermostat display should illuminate. Follow the on-screen prompts for initial setup, which may include setting the current time and date. Access the installer menu (often by holding the 'Menu' button for 8 seconds) for advanced system configuration if necessary.

Figure 3: The Emerson UP310 thermostat installed on a wall, demonstrating its sleek design.
5. Operating Instructions
5.1. Display and Buttons
The large, backlit display shows current room temperature, set temperature, time, and system status. Control buttons are located below and to the right of the display.
- System Button: Cycles through system modes: OFF, HEAT, COOL, AUTO.
- Hold/Run Button: Toggles between programmed schedule (RUN) and temporary/permanent hold (HOLD).
- Fan Button: Cycles through fan modes: AUTO (fan runs only when heating/cooling) and ON (fan runs continuously).
- Up/Down Arrows: Adjusts set temperature, navigates menus, and changes settings.
- Menu Button: Accesses programming and advanced settings.
5.2. Setting the Time and Day
To set the current time and day:
- Press the Menu button.
- Navigate to "Set Time" or "Set Day" using the Up/Down arrows.
- Press Menu to select.
- Adjust the time/day using the Up/Down arrows.
- Press Menu to confirm and exit.
5.3. Programming a 7-Day Schedule
The UP310 allows for a unique program for each day of the week, with four time periods per day (Morning, Day, Evening, Night). To program:
- Press the Menu button.
- Navigate to "Program Schedule" using the Up/Down arrows and press Menu.
- Select the day you wish to program (e.g., "Monday") and press Menu.
- For each period (Morning, Day, Evening, Night):
- Adjust the start time using the Up/Down arrows and press Menu.
- Adjust the desired HEAT temperature using the Up/Down arrows and press Menu.
- Adjust the desired COOL temperature using the Up/Down arrows and press Menu.
- Repeat for all four periods.
- Navigate to the next day or press Menu to exit programming.
Tip: The "Cycles Per Hour" setting in the installer menu can be adjusted (Fast, Medium, Slow) to control how frequently your system cycles on and off, impacting comfort and humidity levels.
5.4. Temporary and Permanent Hold
To temporarily override the schedule, simply adjust the temperature using the Up/Down arrows. The thermostat will hold this temperature until the next programmed period begins. To set a permanent hold:
- Adjust the temperature to your desired setting.
- Press the Hold/Run button. "HOLD" will appear on the display, indicating a permanent hold.
To cancel a hold and resume the schedule, press the Hold/Run button again.
6. Maintenance
6.1. Battery Replacement
The thermostat will display a low battery indicator when the batteries need to be replaced. Replace batteries promptly to ensure continuous operation.
- Gently pull the thermostat unit straight off the wall plate.
- Remove the old AA alkaline batteries from the compartment.
- Insert two new AA alkaline batteries, ensuring correct polarity (+/-).
- Snap the thermostat unit back onto the wall plate.
Note: Your programmed settings are typically saved during battery replacement for a short period.
6.2. Cleaning
To clean the thermostat, wipe the exterior with a soft, slightly damp cloth. Do not use abrasive cleaners, solvents, or spray cleaners directly onto the thermostat.
7. Troubleshooting
If you experience issues with your Emerson UP310 thermostat, refer to the following common problems and solutions:
| Problem | Possible Cause | Solution |
|---|---|---|
| Display is blank or dim. | Low or dead batteries. | Replace the two AA alkaline batteries. |
| System not responding (no heating/cooling). | Power to HVAC system is off; incorrect wiring; thermostat in OFF mode. | Check circuit breaker. Verify wiring connections. Ensure thermostat is in HEAT or COOL mode. |
| Temperature reading seems inaccurate. | Thermostat exposed to direct sunlight, drafts, or heat sources. | Relocate thermostat if possible. Ensure no external factors are influencing the sensor. |
| Thermostat cycles too frequently or not enough. | "Cycles Per Hour" setting needs adjustment. | Access the installer menu and adjust the "Cycles Per Hour" setting (Fast, Medium, Slow) for heating and cooling. |
| Cannot program schedule. | Thermostat is in HOLD mode. | Press the Hold/Run button to switch to RUN mode. |
8. Specifications
Technical details for the Emerson UP310 Premium 7 Day Programmable Thermostat:
- Model Number: UP310
- Product Dimensions: 5.63 inches (W) x 3.44 inches (H) x 1.03 inches (D)
- Weight: Approximately 10.56 ounces
- Power Source: 2 AA Alkaline Batteries (required) or 24V AC (C-wire)
- Compatibility: Works with heating, cooling, and heat pump systems.
- Programmability: 7-day programmable, 4 periods per day.
- Temperature Control: Precise control of +/- 1°F.
- Display: Large, backlit digital display.
- Features: Auto change from heat to cool, adjustable cycles per hour.
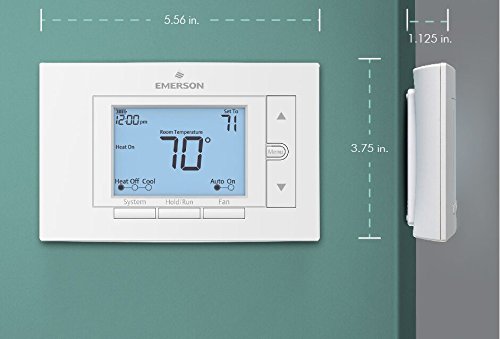
Figure 4: Dimensional view of the Emerson UP310 thermostat. Note: Dimensions provided in image are slightly different from product specifications, using product specifications for text.
9. Warranty and Support
For warranty information and technical support, please refer to the official Emerson website or contact Emerson Customer Service. Keep your purchase receipt as proof of purchase for warranty claims.
Manufacturer: Emerson Climate Technologies
Website: www.emerson.com
For further assistance, consult a qualified HVAC professional.


