
Introduction
This manual provides essential instructions for the safe and effective use of your Axus Digital AXP25 Portable Keyboard. Please read this manual thoroughly before operating the instrument and retain it for future reference. The AXP25 is a 61-key touch-sensitive portable keyboard designed for beginners and enthusiasts, featuring a variety of voices, styles, and a built-in learning system.

Figure 1: Axus Digital AXP25 Portable Keyboard.
Important Safety Information
- Power Supply: Use only the specified AC adapter. Ensure the voltage matches the requirements of your region. Disconnect the power cord during lightning storms or when not in use for extended periods.
- Location: Do not expose the instrument to direct sunlight, high temperatures, excessive humidity, dust, or strong vibrations. Place it on a stable, flat surface.
- Water and Moisture: Do not use the instrument near water or expose it to rain or moisture. Do not place objects containing liquids on the instrument.
- Foreign Objects: Do not insert foreign objects into the instrument's openings.
- Cleaning: Clean the instrument with a soft, dry cloth. Do not use abrasive cleaners, waxes, or solvents.
- Servicing: Do not attempt to service the instrument yourself. Refer all servicing to qualified personnel.
Package Contents
Please check that all the following items are included in your package:
- Axus Digital AXP25 Portable Keyboard
- AC Power Adapter
- Music Rest
- User Manual (this document)

Figure 2: The power adapter is typically located within the polystyrene packaging that supports the keyboard.

Figure 3: The included AC power adapter.
Setup
1. Connecting the Power Adapter
- Locate the DC IN jack on the rear panel of the keyboard.
- Connect the included AC power adapter to the DC IN jack.
- Plug the other end of the adapter into a standard electrical outlet.
2. Attaching the Music Rest
Insert the tabs of the music rest into the slots provided on the top panel of the keyboard, behind the control panel.
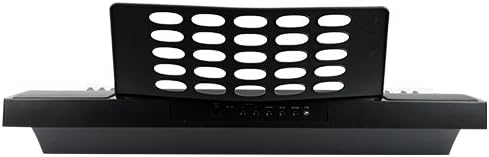
Figure 4: Rear panel connections and music rest slots.
3. Powering On/Off
Press the POWER button located on the control panel to turn the keyboard on or off.
Operating the Keyboard
Control Panel Overview

Figure 5: Detailed view of the control panel and LCD display.
The control panel features an LCD display, various buttons for selecting voices, styles, and functions, and a master volume knob.
1. Master Volume
Use the VOLUME knob to adjust the overall output level of the keyboard.
2. Selecting Voices (Tones)
The AXP25 includes 300 high-quality voices. To select a voice:
- Press the VOICE button.
- Use the number pad or the +/- buttons to enter the desired voice number. The selected voice will be displayed on the LCD screen.
Example voices include: Grand Piano, Electric Piano, Organ, Strings, Guitar, Bass, Synth, Drum Kits.
3. Selecting Styles (Accompaniment)
The keyboard offers 200 backing styles. To select a style:
- Press the STYLE button.
- Use the number pad or the +/- buttons to enter the desired style number.
- Press START/STOP to begin the accompaniment.
- Use INTRO/ENDING for an introduction or ending phrase.
- Press FILL A or FILL B for a short rhythmic variation during playback.
4. Adjusting Tempo
Use the TEMPO +/- buttons to increase or decrease the speed of the selected style or lesson song.
5. Touch Sensitivity
The AXP25 features touch-sensitive keys, meaning the volume and tone of a note change based on how hard you press the key. This allows for expressive playing dynamics.
6. Lesson System
The built-in interactive 'learn to play' teaching system includes 100 songs. To use the lesson function:
- Press the LESSON button.
- Select a lesson song using the number pad or +/- buttons.
- Follow the instructions on the LCD display and play along. The system provides feedback on your performance.
7. Song Record Function
The keyboard allows you to record your performances.
- Press the RECORD button to enter record standby mode.
- Begin playing. The recording will start automatically.
- Press RECORD again or START/STOP to stop recording.
- Press the PLAY button to listen to your recorded performance.
8. USB B MIDI Connection
The USB B port on the rear panel allows you to connect the keyboard to a computer for MIDI communication. This enables the keyboard to function as a MIDI controller for software instruments or to receive MIDI data from a computer.
- Connect a USB B cable (not included) from the keyboard's USB B port to a USB port on your computer.
- No special drivers are typically required for basic MIDI functionality on most modern operating systems.
Maintenance
Cleaning
- Wipe the keyboard's surface with a soft, dry cloth.
- For stubborn dirt, slightly dampen the cloth with water and a mild detergent, then wipe dry immediately.
- Avoid using abrasive cleaners, solvents, or alcohol, as these can damage the finish.
Storage
- When not in use for extended periods, disconnect the power adapter.
- Store the keyboard in a cool, dry place, away from direct sunlight and extreme temperatures.
- Cover the keyboard with a dust cover (not included) to prevent dust accumulation.
Troubleshooting
| Problem | Possible Cause | Solution |
|---|---|---|
| No sound |
|
|
| Keys not responding or inconsistent volume |
|
|
| Accompaniment not starting |
|
|
| MIDI connection issues |
|
|
Specifications
| Model | AXP25 |
| Keys | 61 Full Size, Touch Sensitive |
| Voices | 300 High Quality Voices |
| Styles | 200 Backing Styles |
| Lesson System | Built-in interactive 'learn to play' with 100 songs |
| Record Function | Yes |
| Connectivity | USB B MIDI, Sustain Connection (port only, pedal not included) |
| Power Source | AC Power Adapter (included) |
| Speakers | 2 Speakers, 5 Watts Output |
| Dimensions (approx.) | 99.6 x 42.6 x 17.4 cm |
| Weight (approx.) | 0.02 Kilograms (20 g) (Note: This weight appears to be for a component or packaging, not the full keyboard.) |
| UPC | 700153953283 |
Warranty and Support
For information regarding warranty coverage, technical support, or service inquiries, please refer to the warranty card included with your product or contact your retailer or the manufacturer directly. Keep your proof of purchase for warranty claims.


