
1. Introduction
This manual provides essential information for the installation, operation, and maintenance of your Messingschlager MUD MAX FLEX 28" Bicycle Mudguard Kit. This kit is designed to protect you and your bicycle from water and debris during rides, featuring a flexible plastic construction and integrated electrical contact strips for potential lighting connections. Please read this manual thoroughly before installation and retain it for future reference.
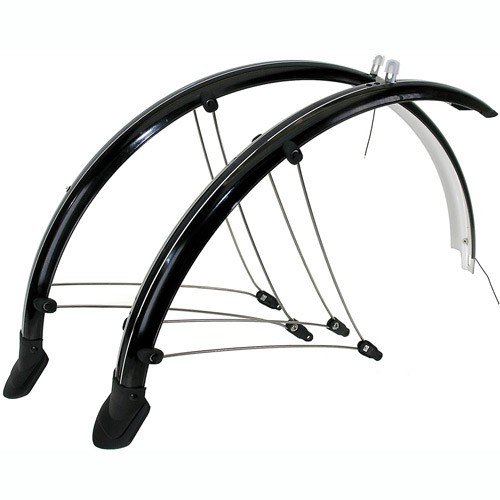
Image 1: Messingschlager MUD MAX FLEX 28" Bicycle Mudguard Kit. This image shows the black plastic mudguards, designed for 28-inch wheels, with a width of 56mm.
2. Safety Information
- Always ensure all components are securely fastened before riding. Loose mudguards can interfere with wheel rotation or braking.
- Regularly inspect mudguards for damage, cracks, or loose fittings. Replace damaged parts immediately.
- Ensure mudguards do not rub against tires or spokes. Adjust clearance as necessary to prevent wear and potential accidents.
- If connecting to a lighting system, ensure proper electrical insulation and consult a qualified technician if unsure.
- Keep small parts out of reach of children.
3. Package Contents
The Messingschlager MUD MAX FLEX Mudguard Kit typically includes the following components:
- Front Mudguard (flexible plastic, black)
- Rear Mudguard (flexible plastic, black)
- Stainless Steel Stays (with 2 cm length adjustment range)
- Mounting Hardware (bolts, nuts, washers, brackets)
- Integrated Electrical Contact Strips (2 per mudguard)
- Connection Cables for Lights (2 cables)
4. Setup and Installation
Before beginning installation, ensure you have the necessary tools: typically a set of hex keys, a screwdriver, and possibly a wrench.
4.1 Front Mudguard Installation
- Attach to Fork Crown: Locate the mounting hole on the underside of your bicycle's fork crown. Secure the front mudguard's main bracket to this hole using the provided bolt and nut. Do not fully tighten yet.
- Attach Stays to Fork Eyelets: Connect the stainless steel stays to the eyelets located near the front axle on your fork. Use the provided bolts and nuts. The stays feature a 2 cm adjustment range; use this to position the mudguard correctly.
- Adjust Position: Adjust the mudguard's position to ensure even clearance between the mudguard and the tire. The mudguard should be centered over the tire and have sufficient clearance to prevent rubbing.
- Tighten All Fasteners: Once the mudguard is correctly positioned, securely tighten all bolts and nuts.
4.2 Rear Mudguard Installation
- Attach to Seat Stay Bridge: Locate the mounting hole on the seat stay bridge (the crossbar between the seat stays). Secure the rear mudguard's main bracket to this hole using the provided bolt and nut. Do not fully tighten yet.
- Attach Stays to Rear Dropouts: Connect the stainless steel stays to the eyelets located near the rear axle on your frame's dropouts. Use the provided bolts and nuts. Adjust the stay length for proper mudguard positioning.
- Adjust Position: Adjust the mudguard's position to ensure even clearance between the mudguard and the tire. The mudguard should be centered over the tire and have sufficient clearance.
- Tighten All Fasteners: Once the mudguard is correctly positioned, securely tighten all bolts and nuts.
4.3 Electrical Connection (Optional)
The MUD MAX FLEX mudguards feature two integrated electrical contact strips and connection cables. These are designed for integration with compatible bicycle lighting systems. If you intend to use this feature:
- Consult the instructions for your specific bicycle lighting system.
- Connect the provided cables to the integrated contact strips on the mudguards and to your lighting system's input.
- Ensure all connections are secure and properly insulated to prevent short circuits or damage.
5. Operating and Adjustment
Once installed, the MUD MAX FLEX mudguards generally require minimal operation. Their primary function is passive protection. However, minor adjustments may be necessary:
- Clearance Adjustment: If you notice the mudguard rubbing against the tire, loosen the stay bolts slightly, reposition the mudguard for better clearance, and then re-tighten. The 2 cm adjustment range on the stays allows for fine-tuning.
- Angle Adjustment: Ensure the mudguard covers the tire adequately to catch spray. The flexible nature of the mudguard allows for some minor shaping, but avoid excessive bending that could cause damage.
6. Maintenance
Regular maintenance will prolong the life of your mudguards and ensure optimal performance.
- Cleaning: Clean the mudguards regularly with mild soap and water to remove dirt, mud, and road grime. Avoid abrasive cleaners or solvents that could damage the plastic.
- Inspection: Periodically check all mounting bolts and nuts for tightness. Vibrations from riding can cause fasteners to loosen over time.
- Damage Check: Inspect the mudguards for any cracks, bends, or other damage. Check the stays for corrosion or deformation. Replace any damaged components promptly.
- Electrical Contacts: If using the electrical connection, ensure the contact strips and cables are clean and free from corrosion.
7. Troubleshooting
| Problem | Possible Cause | Solution |
|---|---|---|
| Mudguard rubs against tire. | Incorrect positioning; loose fasteners; bent stay. | Loosen mounting bolts, adjust mudguard position for adequate clearance, then re-tighten. Check stays for damage. |
| Mudguard is loose or rattles. | Loose mounting bolts or nuts. | Inspect all fasteners and tighten them securely. |
| Poor water/debris protection. | Mudguard not angled correctly; insufficient coverage. | Adjust the mudguard's angle and position to maximize coverage over the tire. Ensure it is centered. |
| Electrical connection for lights not working. | Loose cable connection; corroded contacts; incompatible lighting system. | Check cable connections at both the mudguard and the lighting system. Clean contact strips if corroded. Verify compatibility with your lighting system. |
8. Specifications
| Feature | Detail |
|---|---|
| Brand | Messingschlager |
| Model Number | 386115 |
| Material | Flexible Plastic |
| Color | Black |
| Wheel Size Compatibility | 28 inches |
| Mudguard Width | 56 mm |
| Maximum Tire Compatibility | 28 x 2.15" / 55-622 |
| Stays | Stainless Steel with 2 cm length adjustment |
| Special Features | 2 Integrated Electrical Contact Strips, 2 Connection Cables for Lights |
| Approximate Weight | 552 grams (total kit) |
| Package Dimensions | 60 x 40 x 10 cm |
9. Warranty and Support
For warranty information or technical support regarding your Messingschlager MUD MAX FLEX Mudguard Kit, please refer to the retailer where the product was purchased or visit the official Messingschlager website. Keep your proof of purchase for any warranty claims.