1. Introduction
Thank you for choosing the HOFSTEIN Novara Round Ceiling Light. This manual provides essential information for the safe installation, operation, and maintenance of your new lighting fixture. Please read these instructions carefully before beginning installation and retain them for future reference.
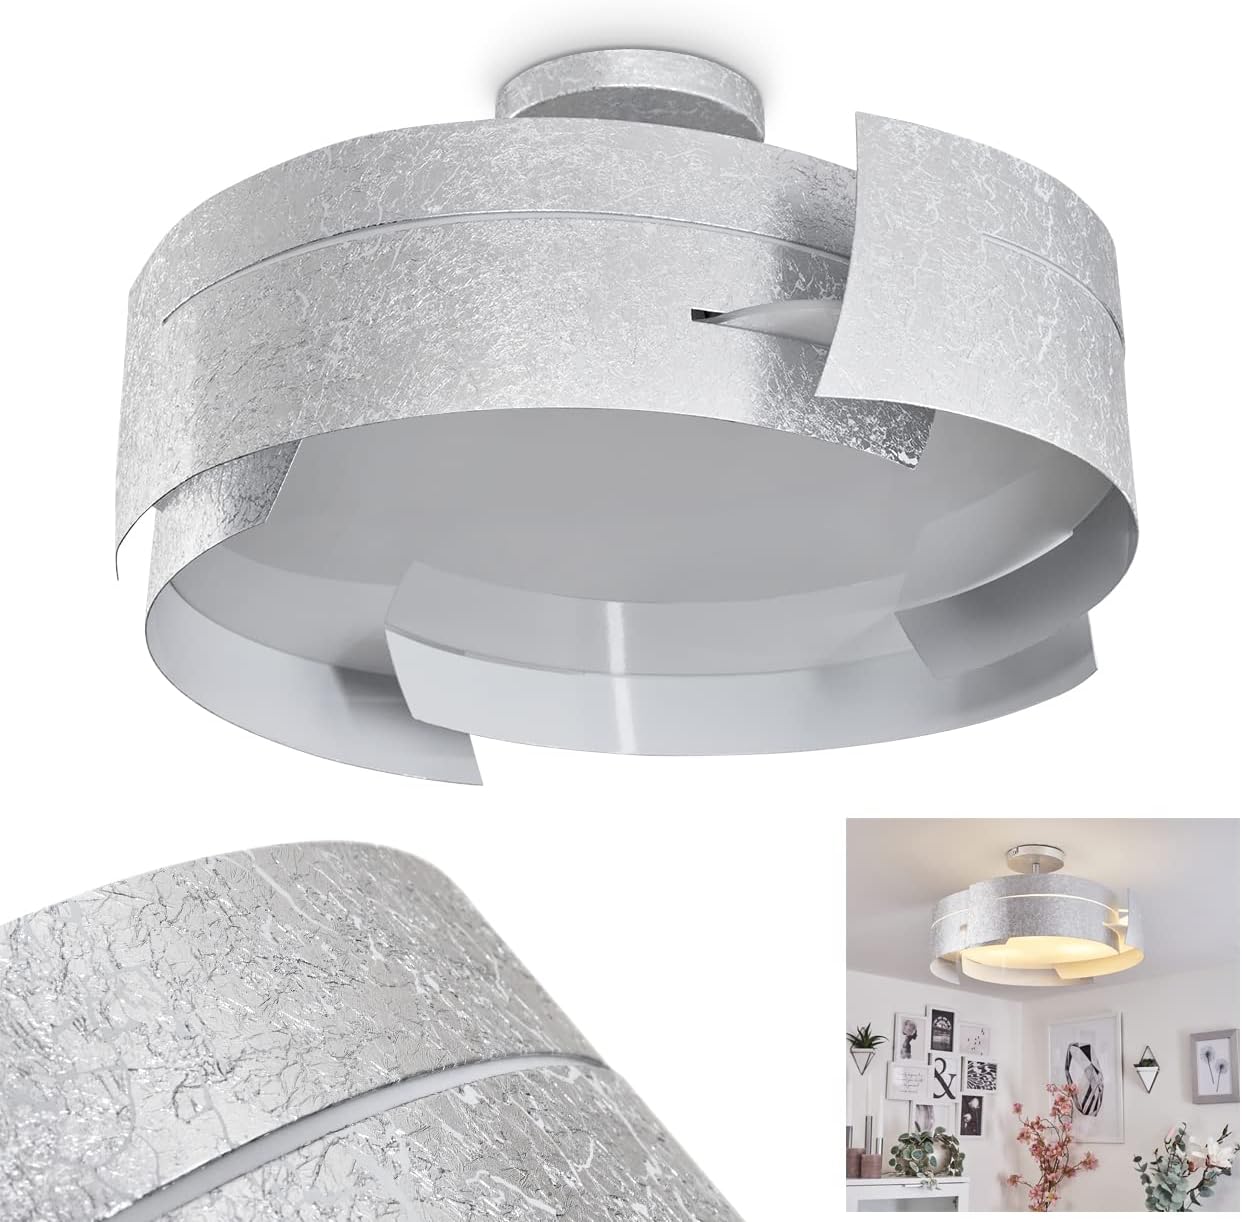
Image 1.1: The HOFSTEIN Novara Round Ceiling Light, showcasing its silver/white finish and modern design.
2. Safety Instructions
WARNING: Electrical installation should only be performed by a qualified electrician. Always disconnect power at the main circuit breaker before installation, maintenance, or bulb replacement.
- Ensure the power supply is switched off before handling the fixture.
- This product is designed for indoor use only (IP20 rating). Do not expose to moisture or direct water.
- Use only E27 bulbs with a maximum wattage of 60 Watts per socket.
- Do not exceed the specified voltage (230 Volt).
- Handle glass components with care to prevent breakage.
- Ensure the fixture is securely mounted to a stable ceiling structure.
3. Package Contents
Please verify that all components are present and undamaged before proceeding with installation:
- HOFSTEIN Novara Ceiling Light Fixture (Metal frame with integrated wiring)
- Glass Diffuser Plate
- Mounting Bracket and Hardware (screws, wall plugs)
- Instruction Manual
Bulbs are not included and must be purchased separately.
4. Setup and Installation
Follow these steps carefully for proper installation. It is recommended to have a second person assist during installation due to the fixture's size and weight.
- Prepare for Installation:
a. Disconnect power to the installation area at the main circuit breaker.
b. Unpack all components and inspect for any damage. - Mount the Bracket:
a. Position the mounting bracket (approximately 9cm in length) on the ceiling where the fixture will be installed. Mark the drilling points.
b. Drill holes and insert appropriate wall plugs (if necessary).
c. Secure the mounting bracket to the ceiling using the provided screws.
Image 4.1: Internal view of the fixture showing the mounting bracket and wiring.
- Electrical Connection:
a. Connect the household electrical wires to the corresponding terminals on the fixture's wiring. Ensure correct polarity (Live, Neutral, Earth).
b. Secure all connections firmly. - Attach the Fixture Body:
a. Carefully lift the fixture body and align it with the mounting bracket.
b. Secure the fixture body to the bracket using the designated screws. Ensure it is stable and flush against the ceiling. - Install the Glass Diffuser Plate:
a. This step requires careful attention. The glass diffuser plate is inserted into the bottom of the fixture.
b. You may need to temporarily loosen or remove one of the side metal panels of the fixture to create enough space to slide the glass plate into its designated grooves. Refer to Image 4.2 for the general area of insertion.
c. Once the glass plate is securely seated, re-tighten or re-attach any loosened panels.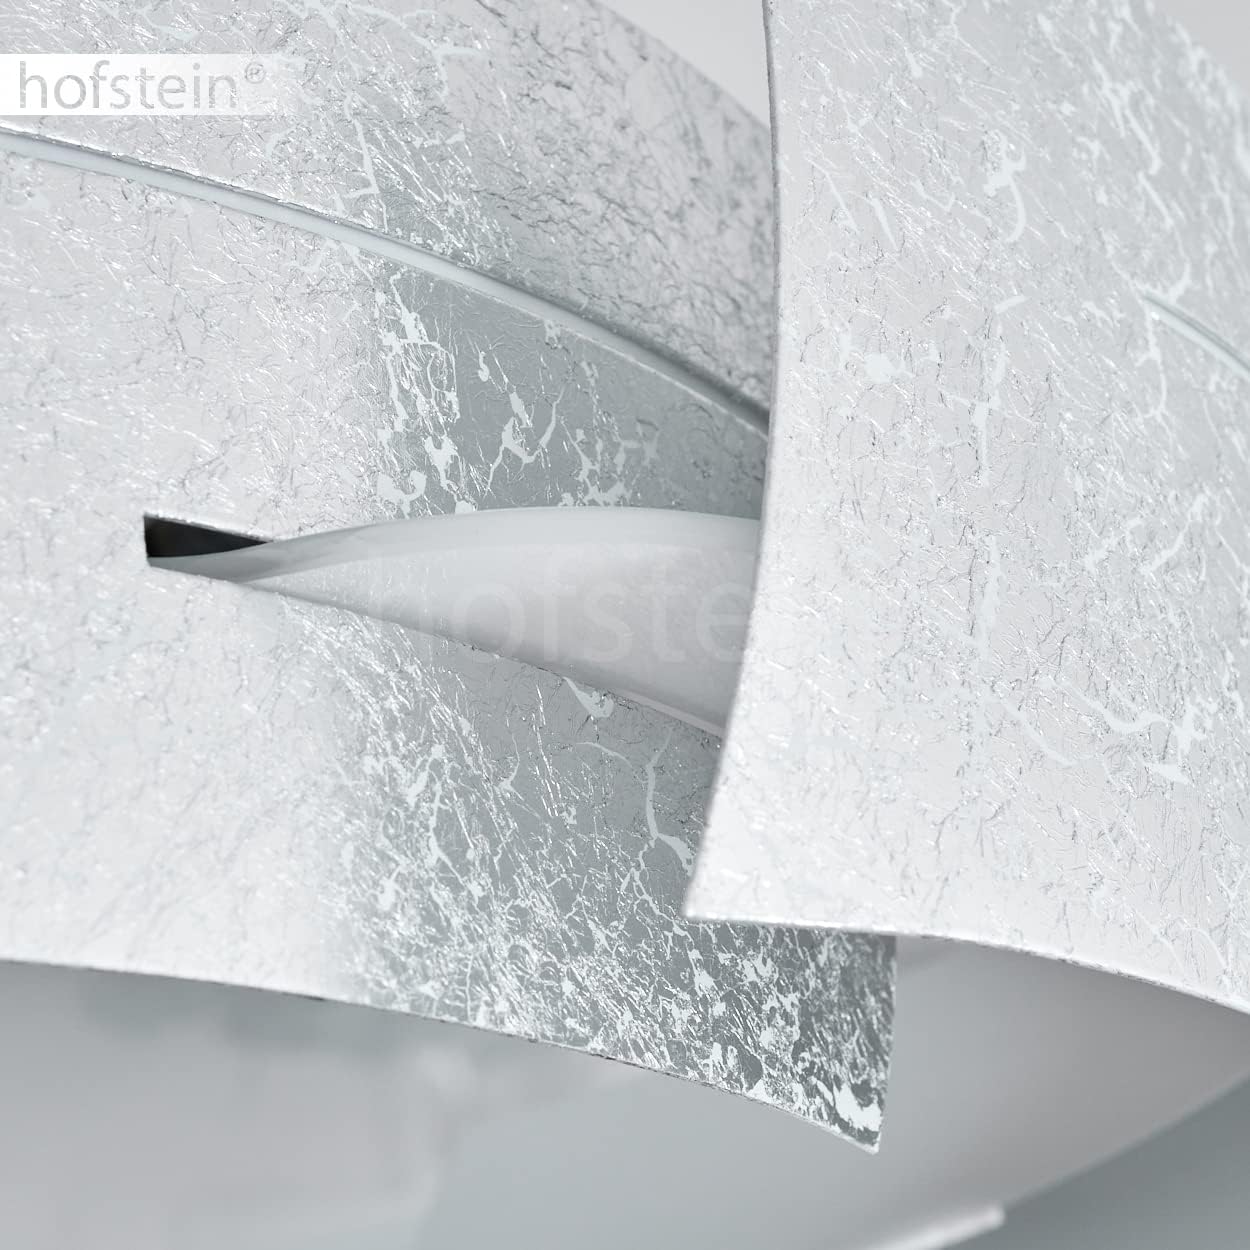
Image 4.2: Close-up showing the detail of the fixture's design and the area where the glass diffuser plate is inserted.
- Install Bulbs:
a. Screw three E27 bulbs (not included) into the sockets. Do not overtighten.
b. Ensure bulbs do not exceed 60 Watts each. - Restore Power:
a. Once installation is complete and all components are secure, restore power at the main circuit breaker.
b. Test the light fixture.
5. Operating Instructions
The HOFSTEIN Novara Ceiling Light operates like a standard ceiling fixture. It is controlled by your room's wall switch. There are no additional controls on the fixture itself.
- Flip the wall switch to the 'ON' position to illuminate the light.
- Flip the wall switch to the 'OFF' position to turn off the light.
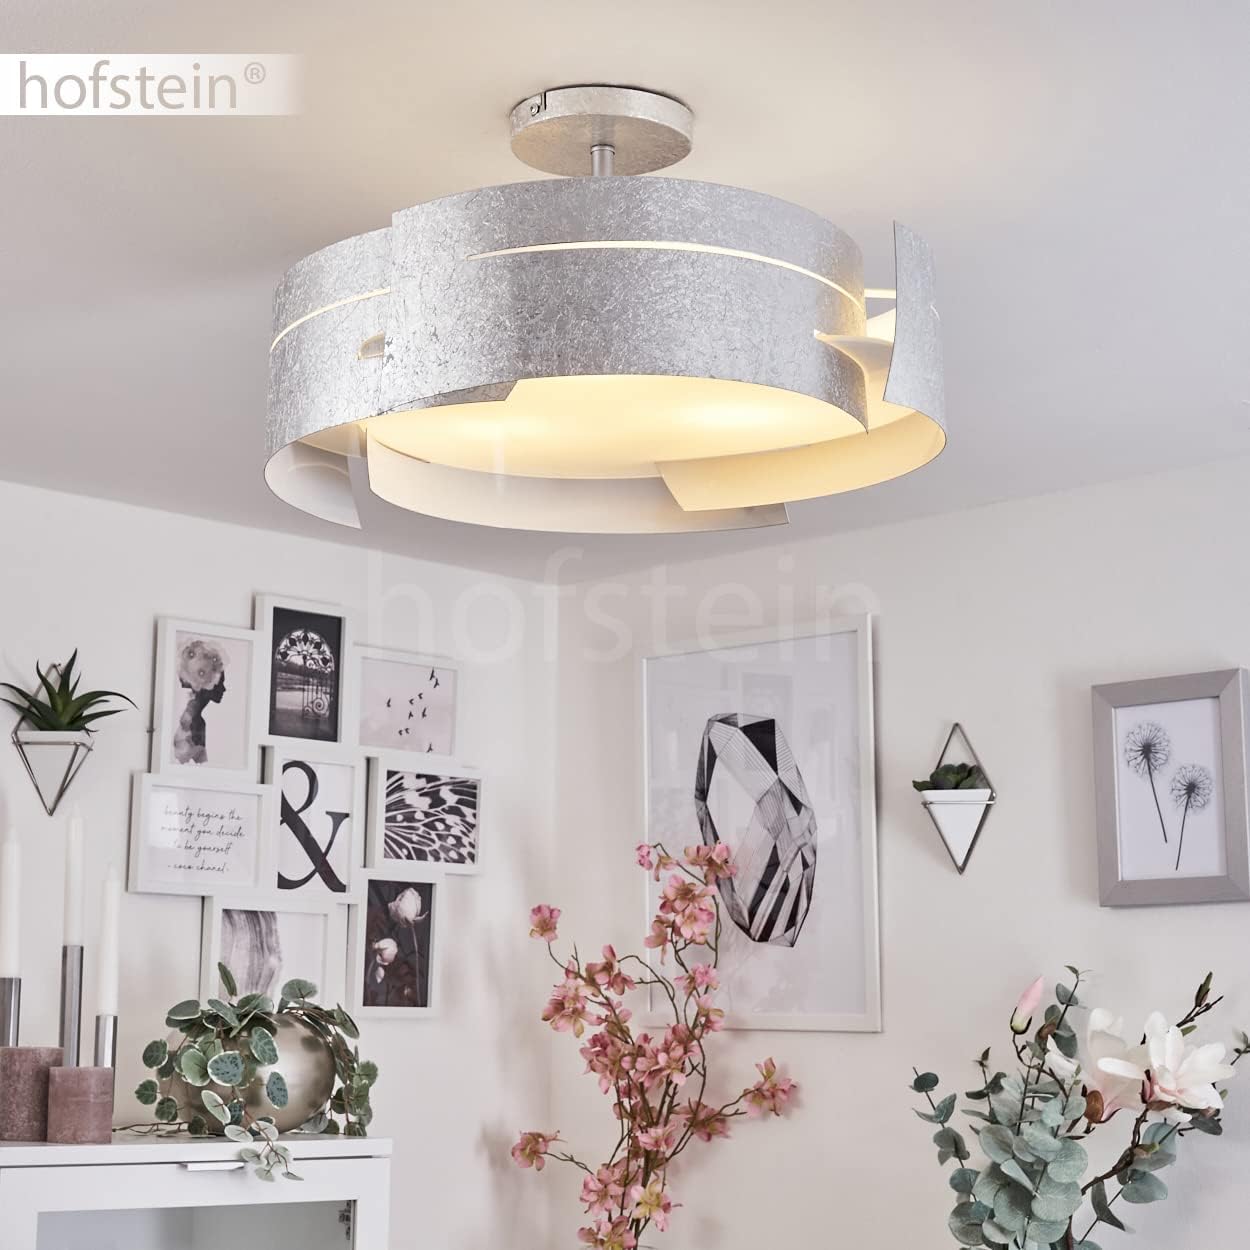
Image 5.1: The ceiling light illuminated in a room setting.
6. Maintenance
Regular maintenance ensures the longevity and optimal performance of your ceiling light.
- Cleaning: Disconnect power before cleaning. Use a soft, dry cloth to wipe the metal and glass surfaces. Do not use abrasive cleaners or solvents, as these can damage the finish.
- Bulb Replacement:
a. Disconnect power at the main circuit breaker.
b. Allow bulbs to cool completely before touching.
c. Carefully remove the glass diffuser plate as described in Section 4, Step 5.
d. Unscrew the old E27 bulb(s) and screw in new ones. Ensure new bulbs do not exceed 60 Watts.
e. Reinstall the glass diffuser plate and restore power.
7. Troubleshooting
| Problem | Possible Cause | Solution |
|---|---|---|
| Light does not turn on | No power to the fixture; Loose wiring; Faulty bulb; Faulty wall switch | Check circuit breaker; Verify wiring connections (power off); Replace bulb; Test wall switch |
| Light flickers | Loose bulb; Incompatible bulb type; Loose wiring | Tighten bulb; Ensure E27 bulbs are used; Check wiring connections (power off) |
| Glass diffuser difficult to install/remove | Incorrect alignment; Side panel obstruction | Ensure proper alignment with grooves; Temporarily loosen/remove a side metal panel as described in Section 4, Step 5 |
8. Specifications
- Brand: hofstein
- Model: H166216
- Type: Ceiling Light
- Dimensions (L x W x H): 47 x 47 x 25 cm (Diameter: 47 cm, Height: 25 cm)
- Weight: 7.84 kg
- Fixture Material: Metal
- Shade Material: Glass
- Fixture Color: Silver
- Shade Color: White
- Number of Lights: 3
- Socket Type: E27
- Max Wattage per Bulb: 60 Watts
- Voltage: 230 Volt
- Protection Rating: IP20 (Indoor use only)
- Protection Class: II
- Installation Type: Ceiling Mount / Semi-flush mount
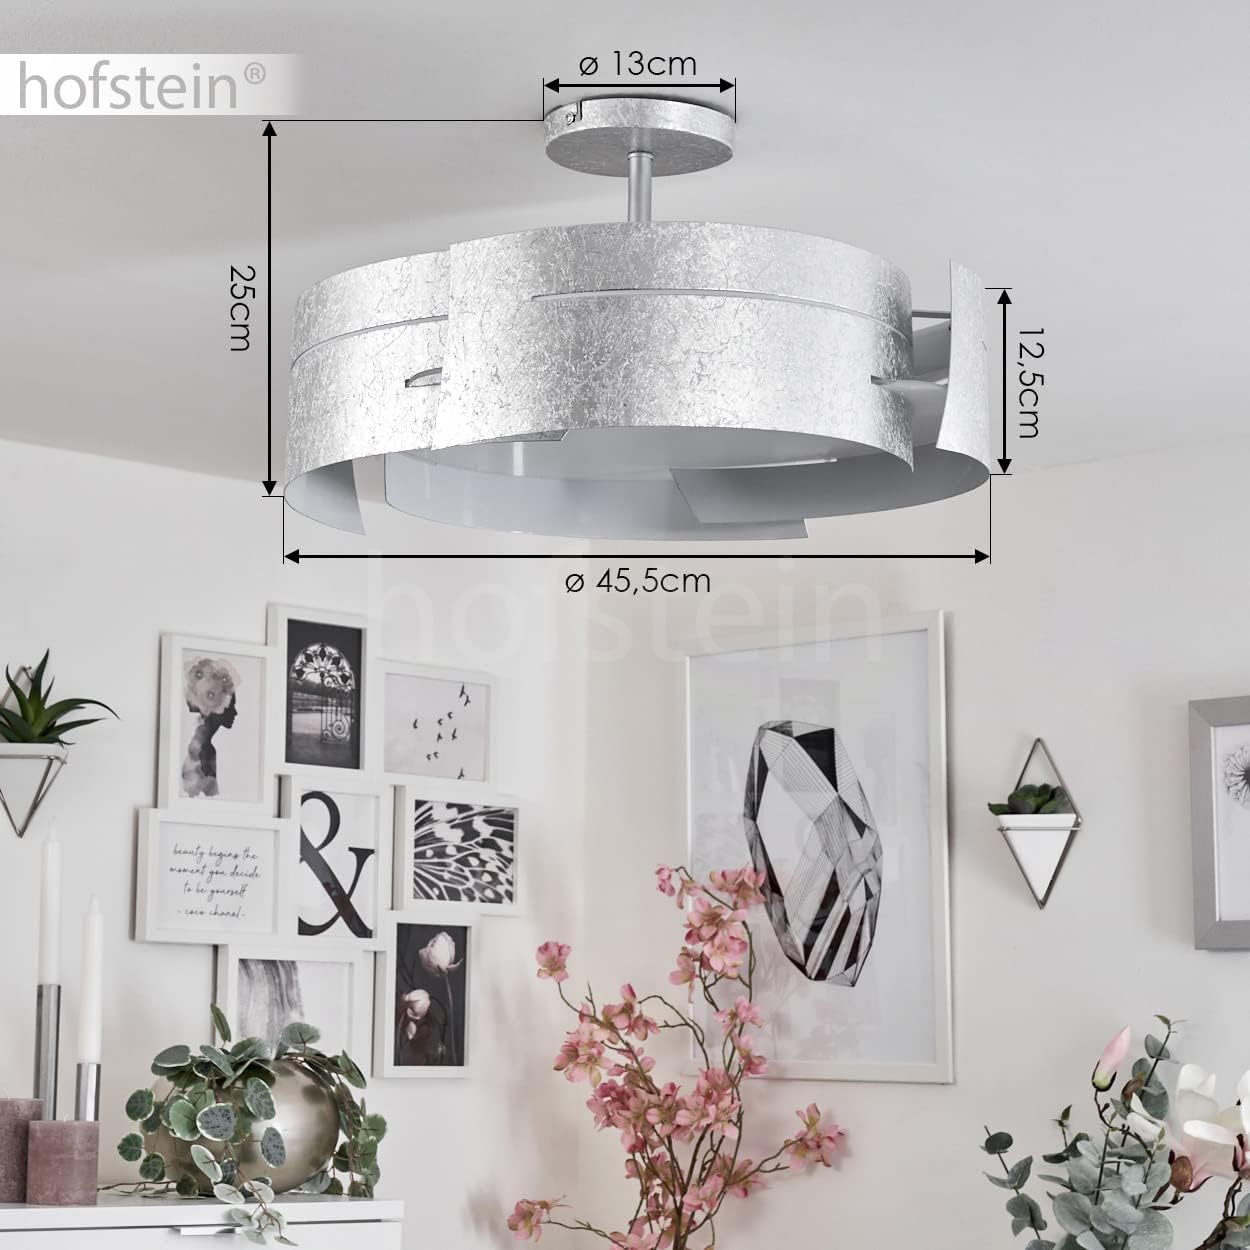
Image 8.1: Dimensional diagram of the ceiling light.
9. Warranty and Support
For warranty information or technical support, please contact HOFSTEIN customer service. Details can typically be found on the product packaging or the official HOFSTEIN website. Please have your model number (H166216) and purchase date available when contacting support.
Visit the official HOFSTEIN store for more products and information: HOFSTEIN Store