
1. Introduction
The Surecom SR-112 is a multi-function device designed to operate as both a voice recorder and a simplex repeater controller for various handheld, base, and mobile radios. It enhances radio communication range and provides voice message storage capabilities. This manual provides instructions for proper setup, operation, and maintenance of your SR-112 unit.
2. Product Features
- High Voice Clarity: Features a 19.2 KHz sample rate for clear audio recording and playback.
- Flexible Power Options: Operates from an internal 14500 3.7V Li-ion battery or an external 5-24V DC power supply.
- Extended Battery Life: Built-in rechargeable Lithium-ion battery supports up to 72 hours of operation.
- Voice Mail Function: Functions as a telephone answering machine, allowing users to record and retrieve messages. Supports up to 3 incoming messages with a total recording time of up to 180 seconds.
- Simplex Repeater Function: Records incoming transmissions and retransmits them on the same frequency, effectively extending radio range.
- DTMF Remote Control: Allows users to remotely change the DTMF control password and toggle the repeater's operation (On/Off) using DTMF tones.
- Adjustable Audio Output: Audio output level can be adjusted both via hardware and remote command.
- Audio Input Level Display: Provides a visual indication of the audio input level for optimal sound adjustment.
- Battery Level Display: Automatic display of battery charge level (20%~100%).
- Signal Roger Beep Setting: Configurable signal roger beep.
- DTMF Signal Display: Visual display of DTMF signals.
- Auto Message Send System: Configurable automatic message transmission at 15, 30, or 45-minute intervals.
3. Package Contents
Please verify that all items are present in your package:
- Surecom SR-112 Simplex Repeater Controller Unit
- Power Adapter (US plug will be provided)
- K-Plug 46-K Cable for Radio Connection

Image 3.1: Surecom SR-112 unit, power adapter, and K-plug cable. This image displays the main components included in the package.

Image 3.2: Close-up view of the K-plug 46-K cable, used for connecting the SR-112 to compatible radios.
4. Device Overview
Familiarize yourself with the ports and indicators on the SR-112 unit:
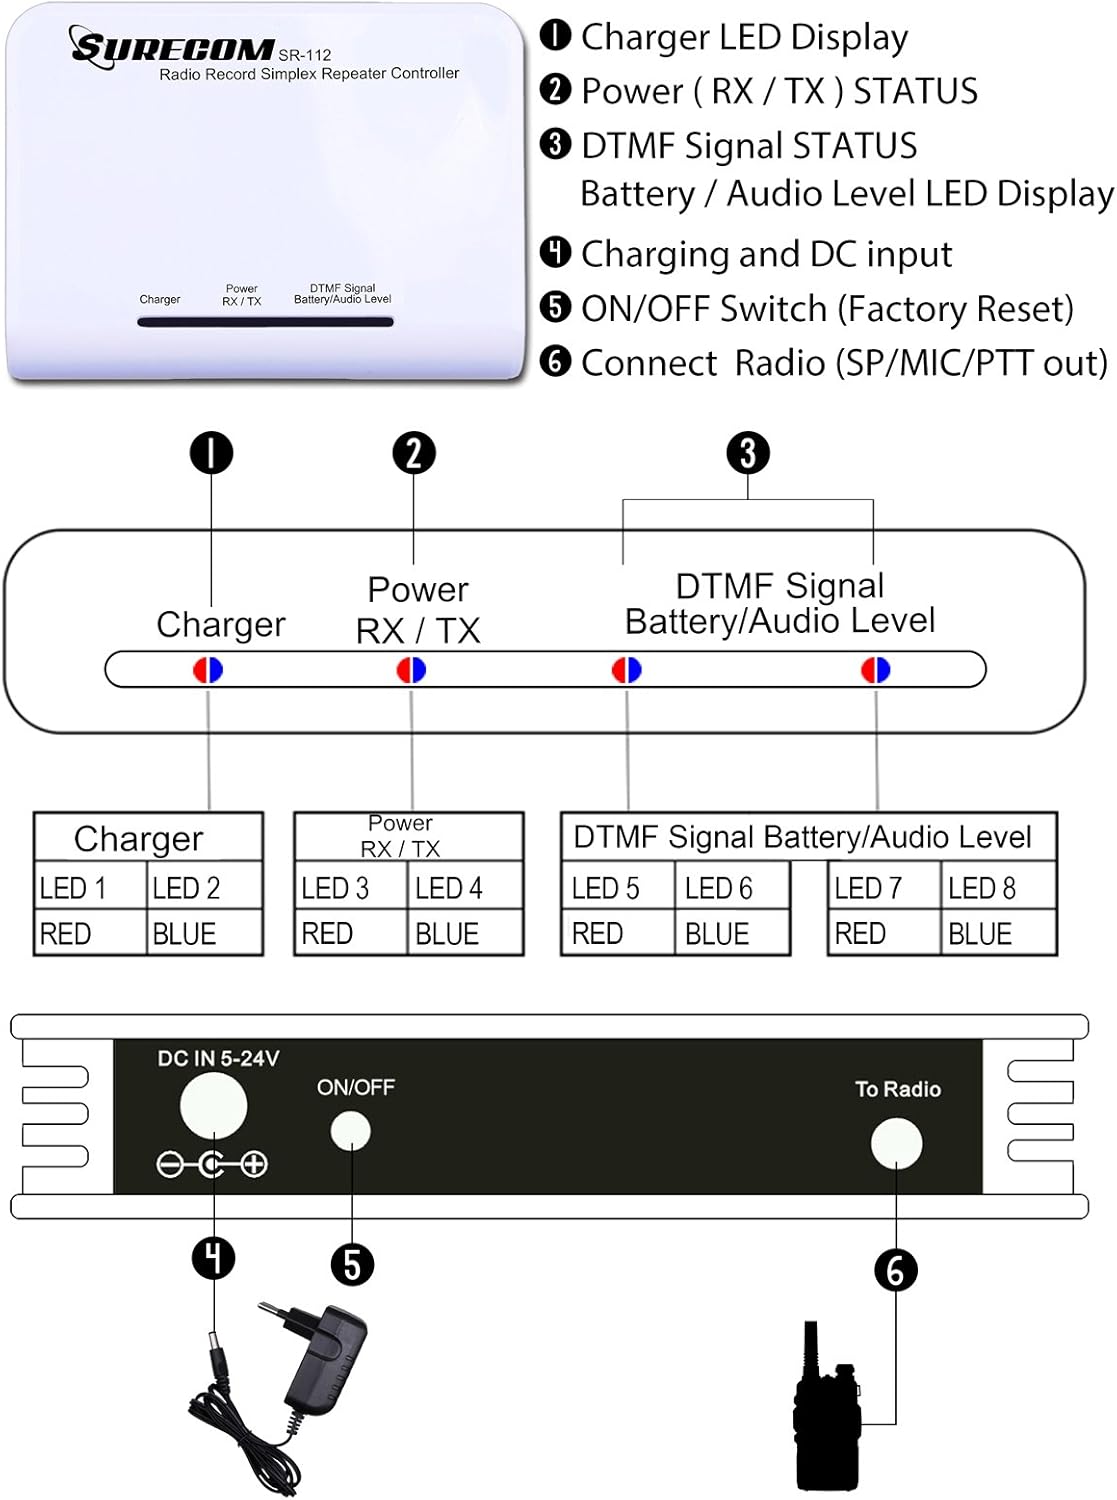
Image 4.1: Diagram illustrating the SR-112's ports and LED indicators. Key components include the Charger LED Display (1), Power (RX/TX) Status (2), DTMF Signal/Battery/Audio Level Display (3), Charging and DC input port (4), ON/OFF Switch (5), and Radio Connection Port (6).
- Charger LED Display: Indicates charging status.
- Power (RX/TX) Status: Indicates power and receive/transmit activity.
- DTMF Signal / Battery / Audio Level Display: Shows DTMF signal detection, current battery level, and audio input level.
- DC 5-24V Input: Port for connecting the external power adapter.
- ON/OFF Switch: Powers the unit on or off. This also functions as a factory reset if held during power-on.
- To Radio Port: Connects to your radio's speaker/microphone/PTT output using the K-plug cable.
5. Setup
Follow these steps to set up your Surecom SR-112:
- Charge the Unit: Connect the provided power adapter to the DC 5-24V input port (4) on the SR-112 and plug it into a wall outlet. The Charger LED Display (1) will indicate charging status. Ensure the unit is fully charged before initial use for optimal battery performance.
- Connect to Radio: Connect one end of the K-plug 46-K cable to the 'To Radio' port (6) on the SR-112. Connect the other end of the K-plug cable to the speaker/microphone/PTT port on your compatible radio. Ensure the plug is firmly seated.

Image 5.1: The SR-112 connected to a handheld radio via the K-plug cable, demonstrating a typical setup.
- Power On: Slide the ON/OFF switch (5) to the 'ON' position. The Power (RX/TX) Status LEDs (2) will illuminate.
- Adjust Radio Volume: Set your connected radio's volume to a moderate level. The SR-112's audio input level display will help in fine-tuning for the best sound.
6. Operating Instructions
6.1 Simplex Repeater Function
The SR-112 operates as a simplex repeater by receiving a transmission and then retransmitting it on the same frequency. This extends the effective range of your radio communications.
- When a signal is received by the connected radio, the SR-112 records the audio.
- After the incoming transmission ends, the SR-112 automatically retransmits the recorded audio.
- The Power (RX/TX) Status LEDs (2) will indicate receive (RX) and transmit (TX) activity.

Image 6.1: Conceptual diagrams illustrating how the simplex repeater extends radio range in urban, mountainous, and construction environments, and the auto message send system.
6.2 Voice Mail Function
The SR-112 includes a voice mail feature, allowing users to record and store messages.
- The unit supports up to 3 message boxes for recording.
- A total of 180 seconds of recording time is available across all message boxes.
- Messages can be retrieved for playback. Refer to the detailed product documentation or manufacturer's website for specific DTMF commands for voice mail operation.
6.3 DTMF Remote Control
The SR-112 can be controlled remotely using DTMF tones from a compatible radio.
- Change Password: Users can change the DTMF remote control password via radio commands.
- Repeater On/Off: The repeater function can be activated or deactivated remotely using DTMF tones.
- DTMF Signal Display: The DTMF Signal Display LEDs (3) will show when DTMF tones are being received.
6.4 Audio Level and Battery Indicators
The SR-112 provides visual feedback on audio input levels and battery status.

Image 6.2: Tables detailing the LED indications for Battery Level (Table 1) and Audio In Level (Table 2).
- Battery Level Display (Table 1): The DTMF Signal / Battery / Audio Level Display (3) indicates the battery voltage. Red and Blue LEDs combine to show charge levels from >4.0V down to <3.0V (blinking red).
- Audio In Level Display (Table 2): The same display (3) indicates the audio input level from the radio. Optimal audio level is typically around >0.8 Vrms.
6.5 Auto Message Send System
The SR-112 can be configured to automatically send messages at set intervals.
- Messages can be set to transmit automatically every 15, 30, or 45 minutes. This feature is useful for station identification or periodic announcements.
7. Maintenance
- Cleaning: Use a soft, dry cloth to clean the unit. Avoid using harsh chemicals or abrasive cleaners.
- Battery Care: For optimal battery life, fully charge the unit before long periods of storage. Avoid completely draining the battery frequently.
- Storage: Store the SR-112 in a cool, dry place away from direct sunlight and extreme temperatures.
8. Troubleshooting
- Unit Does Not Power On: Ensure the unit is charged or connected to an external power supply. Check the ON/OFF switch position.
- No Audio or Poor Audio Quality:
- Verify the K-plug cable is securely connected to both the SR-112 and the radio.
- Adjust the radio's volume and the SR-112's audio output level. Refer to the Audio In Level Display (Table 2) for optimal input.
- Ensure the K-plug cable is not damaged.
- Transmission Cut-off or Interruption:
- Ensure the unit is fully charged and not actively charging during operation, as this can sometimes affect stability.
- If using an automated station identification message, try disabling it temporarily to see if it resolves the issue.
- DTMF Commands Not Responding:
- Ensure your radio is capable of transmitting DTMF tones.
- Transmit DTMF tones clearly and for sufficient duration.
- Check the DTMF Signal Display LEDs (3) on the SR-112 to confirm it is receiving the tones.
9. Specifications
| Feature | Specification |
|---|---|
| Brand | Wishring |
| Model | SR-112 |
| Wireless Communication Standard | Radio Frequency |
| Data Transfer Rate | 19200 Bits Per Second |
| Special Feature | Portable |
| Color | Black, White |
| Frequency Bands Supported | VHF, UHF |
| Built-In Media | Cable |
| Power Supply | Internal 14500 3.7V Li-ion battery or external 5-24V DC |
| Battery Operation Time | Up to 72 hours |
| Voice Recording Sample Rate | 19.2 KHz |
| Total Voice Mail Recording Time | Up to 180 seconds (3 message boxes) |
10. Compatible Radios (K-Plug)
The SR-112 is compatible with most popular CB, FRS, PMR, and Amateur radios that use a K-plug connector. Below is a list of commonly compatible models:
- BAOFENG: BF-490, BF-568, BF-758S, BF-777S, BF-888S, BFF8-PLUS, BF-F9, BFK5, BF-V6, BF-V85, BJUV-6, C150, UV-3R PLUS, UV-5R, UV-5RA, UV-5RA-UU, UV-5RA-plus, UV-5RB, UV5RC, UV5RD, UV-5RE, UV-5RG, UV-5RQ, UV-5RT, UV-5S, UV-5RU, UV-B5, UV-B6
- BAOJIE: BJ-UV88, BJ-UV99
- HYT: TC-268, TC-268S, TC-270, TC-270S
- Kenwood: TK-240, TK-250, TK-255, TK-260, TK-260G, TK-270, TK-270G, TK-272G, TK-278, TK-278G, TK-340, TK-349, TK-350, TK-353, TK-360, TK-360G, TK-370, TK-370G, TK-373G, TK-378, TK-378G, TK-430, TK-431, TK-715, TK-2100, TK-2102, TK-2107, TK-2118, TK-2160, TK-31
- Linton: LT-2188, LT-2268, LT-2288, LT-3188, LT-3260, LT-3268, LT-3288, LT-5288, LT-6000, LT-6100, LT-6100plus, LT-6188, LT-6288, LT-6600, LT-9000, LT-9800
- PUXING: PX-325, PX-328, PX-333, PX-358, PX-555, PX-666, PX-728, PX-729, PX-777, PX-888, PX-888K, PX-V6
- WOUXUN: KG-659, KG-669, KG-679, KG-689, KG-699, KG-801, KG-816, KG-818, KG-819, KG-833, KG-889, KG-UV6D, KG-UVD1P
- QUANSHENG: TG-2AT, TG-22
11. Warranty Information
The Surecom SR-112 unit comes with a 1-year warranty on the complete unit and a 5-year warranty on the flash memory component. Please retain your proof of purchase for warranty claims. For warranty service or further inquiries, please contact your retailer or the manufacturer.