
1. Important Safety Instructions
Read all instructions carefully before using the appliance. Keep this manual for future reference.
- Do not attempt to operate this oven with the door open as this can result in harmful exposure to microwave energy.
- Do not place any object between the oven front face and the door or allow soil or cleaner residue to accumulate on sealing surfaces.
- Do not operate the oven if it is damaged. It is particularly important that the oven door closes properly and that there is no damage to the: (1) door (bent), (2) hinges and latches (broken or loosened), (3) door seals and sealing surfaces.
- The oven should not be adjusted or repaired by anyone except properly qualified service personnel.
- Ensure proper ventilation around the microwave. Do not block air vents.
- Do not heat liquids or other foods in sealed containers since they are liable to explode.
- Always use microwave-safe cookware. Metal containers or foil can cause arcing.
- Supervise children closely when the microwave is in use.
2. Product Overview
The Daewoo KOR-1N2HW is a 31-liter countertop microwave oven with 1000 watts of cooking power, designed for convenient and efficient food preparation. It features a user-friendly button control panel and a rotating turntable for even cooking.
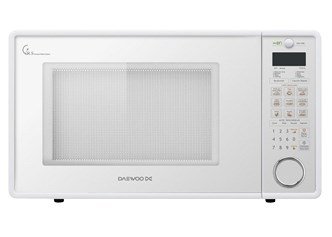
Image: Front view of the Daewoo KOR-1N2HW countertop microwave oven. It shows a white appliance with a dark glass door, a control panel with buttons on the right side, and a handle for opening the door.
3. Setup
3.1 Unpacking
- Remove all packaging materials from inside and outside the microwave oven.
- Check the oven for any damage, such as a misaligned or bent door, damaged door seals and sealing surface, broken or loose door hinges and latches, or dents inside the cavity or on the door. If any damage is present, do not operate the oven and contact your dealer.
3.2 Placement
- Place the oven on a flat, stable surface that can support its weight and the heaviest food likely to be cooked in the oven.
- Ensure there is adequate ventilation. Allow a minimum of 20 cm (8 inches) of space above the oven, 10 cm (4 inches) at the rear, and 5 cm (2 inches) on both sides for proper airflow.
- Keep the oven away from heat sources, steam, or splashing liquids.
3.3 Electrical Connection
- Plug the power cord into a standard grounded electrical outlet. Ensure the voltage matches the rating label on the back of the oven.
- Do not use extension cords or adapters.
4. Operating Instructions
4.1 Basic Operation
- Place food in a microwave-safe container on the glass turntable.
- Close the oven door securely.
- Press the desired function button (e.g., Microwave, Defrost).
- Use the time setting buttons to adjust the cooking duration.
- Press the 'Start' button to begin cooking.
4.2 Power Levels
This microwave offers various power levels to suit different cooking needs. Refer to the control panel for specific power level buttons or settings. Typically, higher power levels are used for quick heating, while lower levels are suitable for simmering or defrosting.
4.3 Timer Function
The timer function allows you to set a specific cooking duration. Once the time expires, the oven will automatically stop and emit an audible signal.
4.4 Stopping Operation
To stop cooking at any time, open the oven door or press the 'Stop/Cancel' button. To resume, close the door and press 'Start'.
5. Maintenance and Cleaning
Regular cleaning helps maintain the performance and longevity of your microwave oven.
5.1 Exterior Cleaning
- Wipe the exterior with a soft, damp cloth and mild detergent.
- Avoid abrasive cleaners or scouring pads.
5.2 Interior Cleaning
- Clean the oven cavity after each use to prevent food buildup.
- For stubborn stains, place a bowl of water with lemon slices inside and microwave for 5-10 minutes. The steam will loosen food particles, making them easier to wipe away.
- Wipe the interior with a soft, damp cloth.
5.3 Turntable and Roller Ring
- Remove the glass turntable and roller ring. Wash them in warm, soapy water or in the dishwasher.
- Ensure they are completely dry before placing them back in the oven.
5.4 Door Seals
- Wipe the door seals and adjacent parts with a damp cloth to remove any spills or splatters.
- Do not use harsh cleaners on door seals.
6. Troubleshooting
If you encounter issues with your microwave, refer to the following common problems and solutions before contacting service.
| Problem | Possible Cause | Solution |
|---|---|---|
| Oven will not start | Power cord not plugged in; Door not closed properly; Fuse blown or circuit breaker tripped | Plug into outlet; Close door securely; Replace fuse or reset circuit breaker |
| Food not heating | Door not closed properly; Cooking time not set; Power level too low | Close door securely; Set appropriate cooking time; Increase power level |
| Light not working | Bulb is faulty | Contact qualified service personnel for bulb replacement |
| Turntable not rotating | Turntable not properly seated; Roller ring dirty or damaged | Ensure turntable is correctly placed; Clean or replace roller ring |
7. Specifications
- Model Number: KOR1N2HW
- Capacity: 31 Liters
- Wattage: 1000 watts
- Product Dimensions: 52.5 x 37.5 x 30.4 cm (approximately 20.7 x 14.8 x 12 inches)
- Product Weight: 13.1 kg (approximately 28.88 lbs)
- Color: White
- Material: Stainless Steel
- Control Type: Button
- Installation Type: Countertop
8. Warranty and Support
For warranty information, please refer to the warranty card included with your purchase or contact your retailer. Keep your proof of purchase for any warranty claims.
For technical support or service inquiries, please contact Daewoo customer service or your authorized service center. Contact details can typically be found on the manufacturer's website or in your purchase documentation.