
1. Introduction
This manual provides essential instructions for the installation, operation, and maintenance of your EdgeStar BR2001BL Ultra Low Temp Refrigerator. This unit is designed for use as a standalone refrigerator or for conversion into a kegerator. Please read these instructions thoroughly before use to ensure proper function and safety.

Figure 1: Front view of the EdgeStar BR2001BL Refrigerator.
2. Safety Information
WARNING: To reduce the risk of fire, electrical shock, or injury, follow these basic precautions:
- Read all instructions before using the appliance.
- Connect only to properly grounded outlets.
- Do not remove the grounding prong, use an adapter, or use an extension cord.
- It is recommended that a separate circuit, serving only your appliance, be provided.
- Never clean appliance parts with flammable fluids. The fumes can create a fire hazard or explosion.
- Do not store or use gasoline or other flammable vapors and liquids in the vicinity of this or any other appliance.
- Before proceeding with cleaning and maintenance operations, make sure the power line of the unit is disconnected.
- Do not connect or disconnect the electric plug when your hands are wet.
- Do not attempt to repair or replace any part of your appliance unless specifically recommended in this manual. All other servicing should be referred to a qualified technician.
- This appliance is designed for freestanding installation only.
- Allow the unit to stand upright for at least 24 hours after transport before connecting it to power. This allows the refrigerant to settle.
3. Setup and Installation
3.1 Unpacking
Carefully remove all packaging materials. Ensure all components are present and undamaged. Keep packaging materials for future transport if needed.
3.2 Caster Installation
The unit includes casters for easy mobility. To install, carefully tilt the unit onto its side (after ensuring it has been unplugged for at least 24 hours to allow refrigerant to settle). Attach the casters to the designated points on the bottom of the unit using the provided hardware. Ensure they are securely fastened.

Figure 2: Example of caster wheel installation.
3.3 Placement
This unit is designed for freestanding use only. Do not install it in an enclosed cabinet or built-in application. Ensure adequate ventilation around the unit. After moving the unit, allow it to stand upright for at least 24 hours before plugging it in to allow the compressor oils and refrigerant to settle.
3.4 Door Reversal
The door on this refrigerator is reversible, allowing it to open from either the left or right side. Refer to the detailed instructions in the separate door reversal guide (if provided) or consult EdgeStar customer support for assistance with this procedure.
3.5 Kegerator Conversion (Optional)
This refrigerator is suitable for kegerator conversion. It features pre-drilled holes for tower installation and a gas line. You will need to supply your own kegerator hardware (tower, lines, CO2 tank, regulator, etc.).
- Tower Installation: The top of the unit has pre-drilled holes for securing a draft tower. Ensure your tower's mounting plate aligns with these holes. If not, custom adaptation may be required.
- CO2 Line Routing: A pre-drilled hole is located at the back of the unit for routing the CO2 gas line. This hole may be narrow; if your gas line is pre-attached to a fitting, you might need to temporarily remove a plastic gasket/lining for clearance or route the line before attaching the fitting.

Figure 3: Pre-drilled hole for draft tower installation.
4. Operation
4.1 Temperature Control
The refrigerator features a manual temperature control dial located inside the unit. Settings range from "Warmer" (1) to "Colder" (6), with an "OFF" position. The unit is designed to maintain temperatures from the low 30s to the mid 40s Fahrenheit. Adjust the dial to achieve your desired temperature. Allow several hours for the temperature to stabilize after adjustment.

Figure 4: Internal temperature control dial.
4.2 Keg Capacity
The BR2001BL can accommodate various keg sizes:
- One (1) full-sized half shell Sankey standard keg (1/2 barrel, 124 pints)
- One (1) pony keg (1/4 barrel, 62 pints)
- One (1) slim quarter keg (1/4 barrel, 62 pints)
- Up to two (2) sixth barrel kegs (42 pints each)
- Up to two (2) Cornelius homebrew kegs (40 pints each)
Important Note: This unit will not support the use of Coors or Miller rubberized kegs or other oversized kegs. If using Cornelius kegs, the internal shelving may need to be removed due to height constraints.

Figure 5: Keg compatibility chart.
4.3 Refrigerator Only Use
The unit can be used as a standard refrigerator by installing the included tower hole cap and utilizing the internal wire shelves. This allows for general beverage storage.

Figure 6: Interior view showing wire shelves for refrigerator use.
5. Maintenance
5.1 Cleaning the Interior
Always unplug the unit before cleaning. Wash the interior surfaces with a solution of warm water and baking soda (2 tablespoons of baking soda to 1 quart of water). Rinse thoroughly and wipe dry. Do not use abrasive cleaners or harsh chemicals.
5.2 Cleaning the Exterior
Clean the exterior with a mild detergent and warm water. Wipe dry with a soft cloth. For the black finish, avoid abrasive materials that could scratch the surface.
5.3 Defrosting
The unit features a frost-free defrost system, minimizing the need for manual defrosting. However, if excessive ice buildup occurs, unplug the unit and allow the ice to melt naturally. Do not use sharp objects to remove ice.
6. Troubleshooting
Review this section before contacting customer support. It may save you time and expense.
| Problem | Possible Cause | Solution |
|---|---|---|
| Unit does not operate. | Not plugged in; circuit breaker tripped; temperature control set to "OFF". | Ensure plug is secure; check circuit breaker; set temperature control to a numerical setting. |
| Temperature is not cold enough. | Temperature control set too warm; door opened too frequently; poor ventilation; unit recently installed. | Adjust control to a colder setting; minimize door openings; ensure adequate clearance around unit; allow 24 hours for stabilization after installation. |
| Unit is making unusual noises. | Normal operating sounds (compressor cycling, refrigerant flow); unit not level. | These sounds are normal. Ensure unit is on a level surface. |
| Door does not close properly. | Unit not level; gasket dirty or damaged; items obstructing door. | Level the unit; clean or replace gasket; rearrange contents. |
| Manufacturing defect (e.g., unthreaded holes). | Production error. | Contact EdgeStar customer support for assistance or replacement parts. |
7. Specifications
| Feature | Detail |
|---|---|
| Model Number | BR2001BL |
| Product Dimensions (D x W x H) | 25-11/16" x 20-3/16" x 35-1/16" (with casters) |
| Item Weight | 81.6 pounds (98 pounds shipping) |
| Capacity | 4.9 Cubic Feet |
| Voltage / Frequency | 115 Volts / 60 Hertz |
| Wattage | 105 Watts |
| Amperage | 1.5 Amps |
| Temperature Range | Low 30s to Mid 40s Fahrenheit |
| Installation Type | Freestanding |
| Defrost System | Frost Free |
| Reversible Door | Yes |
| UL Listed | Yes |
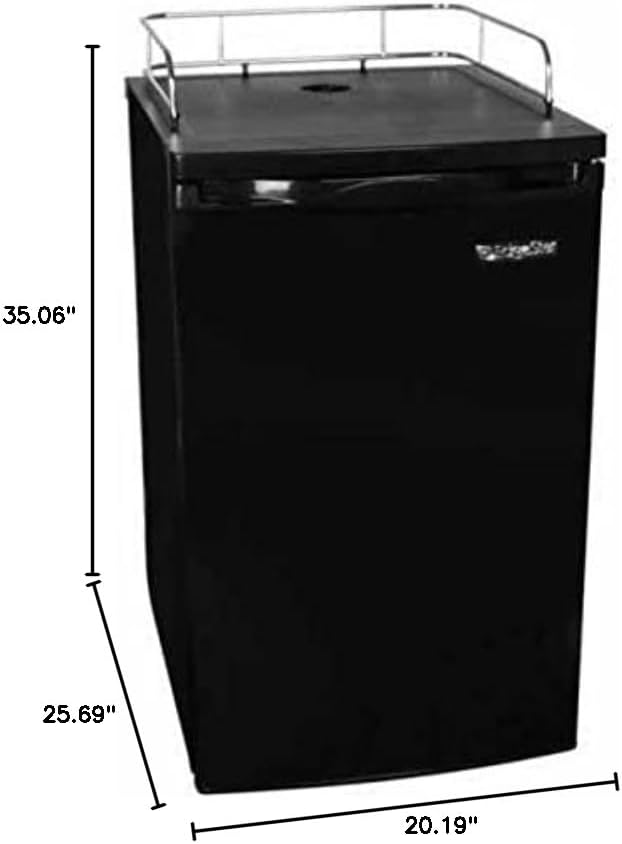
Figure 7: Product dimensions.
8. Warranty and Customer Support
For warranty information or technical assistance, please contact EdgeStar customer support. Keep your purchase receipt and model number (BR2001BL) readily available when contacting support.
You can visit the official EdgeStar store for more information: EdgeStar Store


