1. Introduction
Welcome to the user manual for your Laney CDPA2PA PA System. This comprehensive package is designed to provide a complete and easy-to-use sound reinforcement solution, ideal for various applications. This manual will guide you through the setup, operation, and maintenance of your system to ensure optimal performance and longevity.
2. Product Overview
The Laney CDPA2PA system is an all-in-one PA solution, offering everything required for immediate use. The package includes the CD200 mixer head, two dual-purpose speaker cabinets, and two dynamic microphones with their necessary cables.
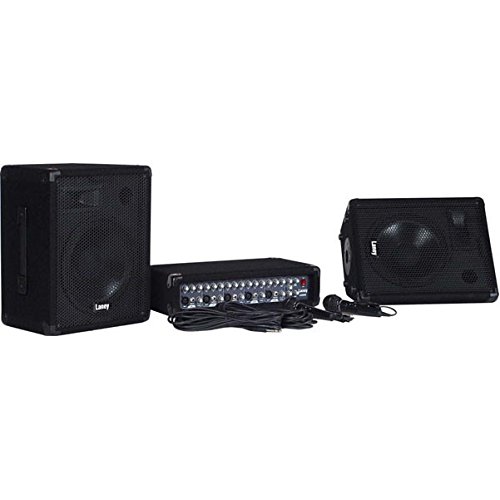
Figure 2.1: Laney CDPA2PA PA System Components. This image displays the complete Laney CDPA2PA PA system. It includes the compact CD200 mixer head, two dual-purpose speaker cabinets with 10-inch woofers, and two dynamic microphones with their respective cables. The system is designed for quick and easy setup.
Key Components:
- CD200 Mixer Head: A 5-channel mixer with 2x 80W power output.
- Speaker Cabs: Two dual-purpose (wedge/PA) speaker cabinets, each featuring 10-inch woofers and horn tweeters. Rated at 8 Ohm / 150W, constructed from composite wood with black carpet finish, steel corner protectors, and steel front grilles. Includes 35mm pole mount sockets.
- Microphones: Two dynamic microphones with on/off switches and connecting leads.
- Cables: Two 10m professional speaker cables for connecting the mixer to the speakers.
3. Setup Instructions
Follow these steps to set up your Laney CDPA2PA PA system:
- Placement: Position the speaker cabinets in your desired location. They can be used as traditional PA speakers or as floor wedges. Ensure stable placement.
- Mixer Connection: Place the CD200 mixer head on a stable surface.
- Speaker Connection: Connect each speaker cabinet to the CD200 mixer head using the provided 10m professional speaker cables. Use the speaker connections (4x Jack) on the mixer. Ensure a minimum impedance of 4 Ohms per side.
- Microphone Connection: Plug the dynamic microphones into the XLR or unbalanced Hi-Z Jack inputs on channels 1-5 of the mixer.
- Power Connection: Ensure all connections are secure before connecting the mixer's power cable to a suitable power outlet.
- Initial Settings: Before powering on, ensure all channel level controls, master volume, and FX levels are set to their minimum positions.
4. Operating Instructions
Once your system is set up, follow these guidelines for operation:
- Power On: Turn on the power switch on the CD200 mixer.
- Channel Controls: For each active channel (1-5), adjust the Level knob to control the input volume.
- Equalization: Use the Hi and Low controls per channel to adjust the treble and bass frequencies for individual inputs.
- Effects: The mixer includes a built-in delay effect. Adjust the Time and Level controls in the effects section to apply and mix the delay.
- CD Input: Connect external audio sources (e.g., CD player) to the Phono (RCA) CD Input and use its dedicated level control.
- Master Volume: Gradually increase the Master Volume knob to achieve the desired overall output level.
- Record Out: The Phono (RCA) Record Out allows you to connect to a recording device.
- Aux Level: Adjust the Aux Level in the Master Section for auxiliary input control.
- Power Off: Before powering off, reduce all volume levels to minimum to prevent sudden loud noises.
5. Maintenance
Proper maintenance ensures the longevity and optimal performance of your PA system:
- Cleaning: Use a soft, dry cloth to clean the surfaces of the mixer and speakers. Avoid abrasive cleaners or solvents.
- Storage: When not in use, store the system in a dry, dust-free environment.
- Cable Care: Handle cables carefully. Avoid sharp bends or kinks that can damage internal wiring.
- Ventilation: Ensure the mixer head has adequate ventilation to prevent overheating. Do not block ventilation openings.
- Transportation: When transporting, ensure components are securely packed to prevent physical damage. The speaker cabs feature steel corner protectors for added durability.
6. Troubleshooting
If you encounter issues with your Laney CDPA2PA system, refer to the following common troubleshooting steps:
| Problem | Possible Cause | Solution |
|---|---|---|
| No power to mixer | Power cable not connected; Power outlet faulty; Mixer power switch off. | Check power cable connection; Test power outlet; Ensure mixer power switch is ON. |
| No sound from speakers | Speaker cables disconnected; Master volume too low; Channel level too low; Microphone/input device faulty. | Verify speaker cable connections; Increase Master Volume; Increase relevant Channel Level; Test microphone/input device. |
| Distorted sound | Input signal too high (clipping); Speaker impedance mismatch; Damaged speaker. | Reduce input level on channel; Ensure speaker impedance is 4 Ohms minimum; Inspect speakers for damage. |
| Microphone not working | Microphone switch off; Cable faulty; Incorrect input selected. | Ensure microphone switch is ON; Test with another cable; Verify microphone is plugged into an active channel. |
7. Specifications
| Feature | Detail |
|---|---|
| Model Number | CDPA2PA |
| Power Output | 2x 80 Watts |
| Power Handling (Speakers) | 150W |
| Channels | 5 |
| Inputs | Ch 1-5 Balanced Lo-Z XLR/Unbalanced Hi-Z Jack, CD Input (Phono) |
| Channel Controls | Level, Hi, Low, FX |
| Equalisation | Hi & Low controls per channel |
| Effects | Delay with time and Level controls |
| Record Out | Yes (Phono) |
| Speaker Connections | 4x Jack |
| Impedance | Minimum 4 Ohms per side |
| Drivers (Speakers) | 2x Dual purpose (wedge/PA) speaker cabs with 10" woofers and horn tweeters |
| Weight (Mixer) | 7.5 kg |
| Master Section | Main Level, Aux Level |
| Master Volume | Yes |
| Dimensions (Mixer) | H130 x W470 x D261 mm |
8. Warranty and Support
For warranty information and technical support, please refer to the documentation provided with your purchase or visit the official Laney website. Keep your proof of purchase for any warranty claims.
Manufacturer: Laney


