
VDO TR711U-BU
VDO TR711U-BU Car Radio User Manual
Model: TR711U-BU | Brand: VDO
Introduction
This manual provides detailed instructions for the installation, operation, and maintenance of your VDO TR711U-BU Car Radio. Please read this manual thoroughly before using the product to ensure proper functionality and safety.
Safety Information
Always observe the following safety precautions:
- Do not operate the device if it is damaged.
- Ensure proper ventilation around the unit.
- Installation should be performed by a qualified professional to avoid damage to the vehicle's electrical system.
- Do not disassemble the unit. Refer all servicing to qualified personnel.
- Keep the volume at a safe level to remain aware of traffic conditions.
Package Contents
Upon unpacking, verify that all items are present:
- VDO TR711U-BU Car Radio Unit
- User Manual (this document)
- 2 Mounting Hooks
- Mounting Frame
- Front Frame
- ISO Antenna Adapter
- DIN-ISO Connector
Setup and Installation
The VDO TR711U-BU is designed for easy installation with its low mounting depth. Professional installation is recommended.
Wiring Diagram
The unit uses a standard DIN-ISO connector for power and speaker connections. Ensure correct polarity and secure connections to prevent damage.
| Pin | Function | Color (Typical) |
|---|---|---|
| A4 | +12V Constant (Battery) | Yellow |
| A7 | +12V Switched (Ignition) | Red |
| A8 | Ground | Black |
| B1 | Rear Right Speaker (+) | Purple |
| B2 | Rear Right Speaker (-) | Purple/Black |
| B3 | Front Right Speaker (+) | Grey |
| B4 | Front Right Speaker (-) | Grey/Black |
| B5 | Front Left Speaker (+) | White |
| B6 | Front Left Speaker (-) | White/Black |
| B7 | Rear Left Speaker (+) | Green |
| B8 | Rear Left Speaker (-) | Green/Black |
Note: Always refer to your vehicle's specific wiring diagram for accurate connections.
Mounting the Unit
- Insert the mounting frame into the vehicle's DIN slot until it clicks into place.
- Connect the wiring harness and antenna cable to the rear of the radio.
- Slide the radio unit into the mounting frame until it locks securely.
- Attach the front frame for a finished look.

Operating Instructions
Basic Controls
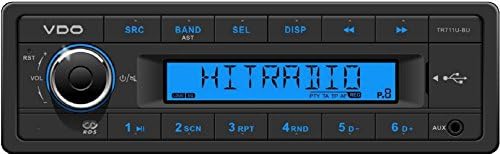
- Power On/Off: Press the VOL/ knob to turn the unit on or off.
- Volume Control: Rotate the VOL/ knob to adjust the volume.
- Source Selection (SRC): Press the SRC button to cycle through available sources: Radio, USB, AUX.
- Mute Function: Briefly press the VOL/ knob to mute/unmute the audio.
Radio Operation
- Band Selection (BAND/AST): Press BAND/AST to switch between FM1, FM2, FM3, MW, and LW bands.
- Automatic Store (AST): Press and hold BAND/AST to automatically scan and store strong stations.
- Manual Tuning: Use the ◀◀ and ▶▶ buttons for manual frequency adjustment.
- Seek Tuning: Press and hold ◀◀ or ▶▶ to automatically seek the next strong station.
- Preset Stations: Use buttons 1 to 6 to select stored stations. To store a station, tune to the desired frequency, then press and hold a preset button until you hear a beep.
- RDS Functions: The unit supports RDS (Radio Data System) features like AF (Alternative Frequencies), TA (Traffic Announcement), EON (Enhanced Other Networks), and PTY (Program Type). These functions operate automatically when available.
USB/MP3/WMA Playback
Insert a USB storage device (up to 8 GB) into the front USB port. The unit will automatically switch to USB mode and begin playback.
- Play/Pause: Press the 1/▶▶ button.
- Next/Previous Track: Press ▶▶ or ◀◀ buttons.
- Repeat (RPT): Press 3/RPT to cycle through repeat modes (e.g., repeat track, repeat folder).
- Random (RND): Press 4/RND to enable/disable random playback.
- Folder Navigation: Use 5D- and 6D+ to navigate between folders on the USB device.
AUX Input
Connect an external audio device (e.g., smartphone, MP3 player) to the 3.5mm AUX input jack on the front panel. Select AUX as the source using the SRC button.
Audio Settings
- Sound Presets: Press the SEL button repeatedly to cycle through audio settings (Bass, Treble, Balance, Fader, Loudness, EQ). Rotate the VOL/ knob to adjust the selected setting.
- Loudness: Activates a bass and treble boost at low volumes.
- EQ Presets: The unit includes 4 sound presets: Classic, Pop, Rock, Jazz. Select these via the SEL button.
Maintenance
- Cleaning: Use a soft, dry cloth to clean the unit's front panel. Do not use abrasive cleaners or solvents.
- USB Port: Keep the USB port free of dust and debris.
- Permanent Memory: The unit features permanent storage of settings, meaning your radio presets and audio settings will be retained even if the car battery is disconnected.
Troubleshooting
| Problem | Possible Cause | Solution |
|---|---|---|
| No power | Incorrect wiring; Blown fuse; Loose connection. | Check wiring connections (constant 12V, switched 12V, ground). Check vehicle's fuse box and the unit's fuse. Ensure connections are secure. |
| No sound | Volume too low; Mute function active; Incorrect speaker wiring; Speakers damaged. | Increase volume. Press VOL/ to deactivate mute. Check speaker wiring. Test with different speakers if possible. |
| Poor radio reception | Antenna not connected; Damaged antenna; Weak signal area. | Ensure antenna is securely connected to the ISO antenna adapter. Check antenna for damage. Try tuning to stronger stations. |
| USB device not recognized or slow playback | Unsupported format; USB device too large (>8GB); Corrupted files; USB device not properly inserted. | Ensure files are MP3/WMA. Use a USB device up to 8GB. Reformat USB device or try a different one. Reinsert USB device firmly. |
| Unit freezes or malfunctions | Temporary software glitch. | Press the RST (Reset) button (usually a small pinhole, refer to diagram if available). This will reset the unit to factory defaults. |
Specifications
| Feature | Detail |
|---|---|
| Model | TR711U-BU |
| Brand | VDO (Continental) |
| Operating Voltage | 12 V (10.8 V – 16 V) |
| Max. Music Power | 4 x 41 Watt |
| RMS Power | 4 x 25 Watt |
| Tuner | Worldwide FM RDS-tuner / AF / TA / EON / PTY, LW, MW, FM with AST |
| USB Host | Front USB port (2.0), supports USB 1.1/USB 2.0, supports MP3/WMA, supports storage media up to 8 GB |
| AUX Input | Front AUX input |
| Display | LCD display, Blue illumination |
| Sound Presets | 4 (Classic, Pop, Rock, Jazz) |
| Dimensions (WxHxD) | 188 x 58.5 x 114.7 mm |
| Permanent Memory | Yes (settings retained) |
| CD Player | No |
Warranty Information
Specific warranty terms and conditions for the VDO TR711U-BU are provided by the manufacturer, Continental, or your point of purchase. Please retain your proof of purchase for any warranty claims. Warranty typically covers defects in materials and workmanship under normal use.
Support and Contact
For technical support, service, or further inquiries regarding your VDO TR711U-BU car radio, please contact your authorized VDO dealer or the manufacturer, Continental. You may also refer to the official VDO or Continental automotive electronics website for updated support information.
A datasheet for this product is available at: http://bbg-automotive.de/shop/out/media/datasheet VDO_TR711U_BU.pdf
Related documentsTR711U-BU


Ask a question about this manual
Ask about setup, troubleshooting, compatibility, parts, safety, or missing instructions. Manuals+ will review the question and use this page’s manual context to help answer it.