
Brocade ICX7250-24-2X10G
Brocade ICX 7250-24-2X10G Layer 3 Managed Switch User Manual
Model: ICX7250-24-2X10G
Introduction
This user manual provides comprehensive instructions for the installation, configuration, operation, and maintenance of the Brocade ICX 7250-24-2X10G Layer 3 Managed Switch. This device is designed for enterprise Gigabit Ethernet access deployment, offering advanced features and scalability for small to medium-sized enterprises, branch offices, and distributed campuses.
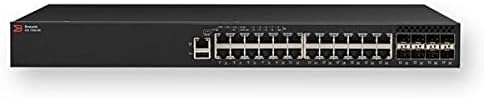
Figure 1: Front view of the Brocade ICX 7250-24-2X10G Switch, showing 24 Gigabit Ethernet ports and SFP+ uplink ports.
Package Contents
Verify that all items are present in the package:
- Brocade ICX 7250-24-2X10G Switch unit
- Power cord
- Two-post rack mounting brackets
- USB serial console cable
- Documentation (this manual)
If any items are missing or damaged, contact your vendor immediately.
Setup
1. Site Preparation
- Ensure the installation site is clean, dry, and well-ventilated.
- Maintain appropriate operating temperature and humidity levels as specified in the technical specifications.
- Provide adequate clearance for airflow (side-to-back airflow).
- Ensure a stable power source is available.
2. Rack Mounting
The Brocade ICX 7250-24-2X10G switch is designed for rack-mounting. Use the provided two-post rack mounting brackets.
- Attach the mounting brackets to the sides of the switch using the supplied screws.
- Secure the switch to the rack posts using appropriate rack screws.
- Ensure the switch is level and securely fastened.
3. Connecting Power
Connect the provided power cord to the power inlet on the rear of the switch and then to a grounded AC power outlet. The switch supports an external power supply for failover resiliency (sold separately).
4. Initial Network Connections
- Ethernet Ports: Connect network devices (computers, servers, other switches) to the 24x 10/100/1000 Mbps Ethernet ports using standard RJ-45 cables.
- SFP/SFP+ Ports: For uplink or stacking, insert compatible SFP or SFP+ transceivers into the 6x 1 Gigabit Ethernet SFP ports or the 2x 10 Gigabit SFP+ ports. Connect fiber optic cables as required.
- Console Port: For initial configuration, connect a computer to the console port using the USB serial console cable. Refer to the Brocade documentation for console access procedures.
Operating Instructions
1. Powering On
Once all connections are secure, plug the power cord into the AC outlet. The switch will automatically power on and begin its boot sequence. Observe the system status LEDs for boot progress.
2. Initial Configuration
Access the switch's command-line interface (CLI) via the console port or through a network connection (if pre-configured). Use the CLI to set up basic network parameters, IP addresses, VLANs, and other essential configurations. Refer to the Brocade ICX 7250 Software Configuration Guide for detailed CLI commands.
3. Stacking (Optional)
The ICX 7250 series supports stacking up to 12 switches. Use the 10 Gigabit SFP+ ports for stacking connections. Ensure proper cabling and configuration as per the stacking guide to achieve aggregated stacking bandwidth of up to 480 Gbps.
4. Layer 3 Routing
The switch supports Base IPv4/IPv6 Layer 3 routing, including static routing and RIP. Configure routing protocols as needed for inter-VLAN routing and network segmentation.
Maintenance
1. Firmware Updates
Regularly check the Brocade support website for the latest firmware updates. Applying updates ensures optimal performance, security, and access to new features. Follow the provided instructions carefully during the update process.
2. Cleaning
Keep the switch and its ventilation openings clean and free of dust. Use a soft, dry cloth for external cleaning. Do not use liquid or aerosol cleaners directly on the unit.
3. Environmental Monitoring
Monitor the operating environment to ensure it remains within specified temperature and humidity ranges. Excessive heat or humidity can affect switch performance and longevity.
Troubleshooting
- No Power:
- Verify the power cord is securely connected to both the switch and the power outlet.
- Check the power outlet with another device.
- Ensure the power supply unit (if external) is functioning correctly.
- Port Link/Activity LED Off:
- Check the network cable connection at both ends.
- Ensure the connected device is powered on and functioning.
- Verify the port configuration (speed, duplex) matches the connected device.
- Network Connectivity Issues:
- Check IP address configuration, subnet mask, and gateway settings.
- Verify VLAN assignments if applicable.
- Test connectivity using ping or traceroute commands from the switch CLI.
- Switch Overheating:
- Ensure adequate ventilation around the switch.
- Clear any obstructions from the air vents.
- Verify ambient room temperature is within operating limits.
For advanced troubleshooting, consult the Brocade ICX 7250 Series Hardware Installation Guide or contact Brocade technical support.
Specifications
| Feature | Description |
|---|---|
| Model Number | ICX7250-24-2X10G |
| Brand | Brocade |
| Ports | 24 x 10/100/1000 Mbps Ethernet, 6 x 1 Gigabit Ethernet SFP, 2 x 10 Gigabit SFP+ (upgradable to 8x 10 GbE SFP+ with license) |
| Switching Capacity | 208 Gbps (full duplex) |
| Forwarding Capacity | 154 Mpps (full duplex) |
| Stacking Density | Up to 12 switches per stack |
| Aggregated Stacking Bandwidth | 480 Gbps |
| Maximum Stacking Distance | 10 km |
| Layer 3 Features | Base IPv4/IPv6 routing (static routing, RIP) |
| Airflow | Side-to-back |
| UPC | 680392657169 |
Warranty and Support
For information regarding product warranty, technical support, and additional resources, please refer to the official Brocade website or contact your authorized Brocade reseller. Keep your purchase receipt and product serial number for warranty claims.
Online Resources: Brocade ICX 7250 Series Product Page
Related documentsICX7250-24-2X10G


Ask a question about this manual
Ask about setup, troubleshooting, compatibility, parts, safety, or missing instructions. Manuals+ will review the question and use this page’s manual context to help answer it.