
K-RAIN 3606-P
K-RAIN 3604 RPS 469 Controller User Manual
Model: 3606-P
1. Introduction
This manual provides detailed instructions for the installation, operation, and maintenance of your K-RAIN 3604 RPS 469 Controller. This advanced irrigation controller is designed to manage up to 6 stations, ensuring efficient and reliable watering for your landscape. Please read this manual thoroughly before installation and operation to ensure proper use and to maximize the lifespan of your controller.
2. Package Contents
Upon opening the package, verify that all components are present and undamaged:
- K-RAIN 3604 RPS 469 Controller Unit
- 110V Transformer with Plug
- Mounting Hardware (screws, anchors)
- User Manual (this document)
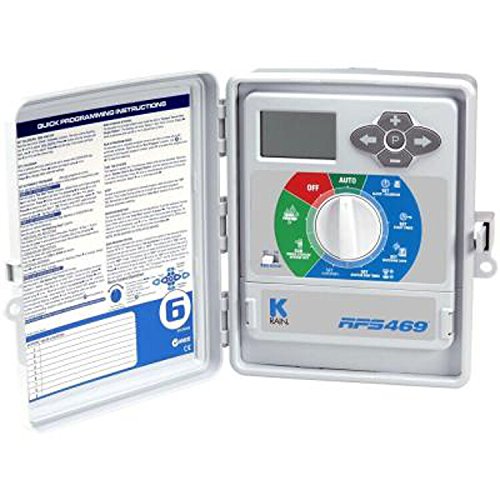
Figure 1: K-RAIN 3604 RPS 469 Controller. This image displays the controller unit with its front door open, revealing the quick programming instructions printed on the inside of the door and the main control panel with its display, dial, and buttons.
3. Setup and Installation
Follow these steps for proper installation of your K-RAIN controller:
- Choose a Location: Select a cool, dry location, protected from direct sunlight and extreme temperatures. The controller is designed for indoor use or outdoor use with appropriate weather protection. Ensure the location is near a 110V power outlet.
- Mounting:
- Open the controller door.
- Use the provided mounting template (if available) or hold the controller against the wall and mark the two top mounting holes.
- Drill pilot holes and insert the provided wall anchors if mounting into drywall.
- Insert screws into the top holes, leaving about 1/8 inch exposed.
- Hang the controller on the top screws.
- Mark the bottom mounting hole, remove the controller, drill the pilot hole, insert anchor, and then re-hang the controller. Secure the bottom screw.
- Wiring the Valves:
- Turn off power to the controller before wiring.
- Connect one wire from each solenoid valve to a numbered terminal (1-6) on the controller.
- Connect the common wire from all solenoid valves to the "COMMON" terminal (C).
- If using a master valve or pump start relay, connect it to the "MV" terminal.
- Connecting the Transformer:
- Plug the 110V transformer into a standard electrical outlet.
- Connect the low-voltage wires from the transformer to the "AC" terminals on the controller. Ensure a secure connection.
- Initial Power-Up: Once all wiring is complete, plug the transformer into the wall outlet. The controller display should illuminate.
4. Operating Instructions
The K-RAIN RPS 469 controller features a user-friendly interface with a large LCD display, a rotary dial, and push buttons for navigation and programming.
4.1. Control Panel Overview
- LCD Display: Shows current time, program information, and settings.
- Rotary Dial: Used to select programming modes (e.g., Set Clock, Set Start Times, Set Run Times, Auto, Off).
- Arrow Buttons (← ↑ ↓ →): Navigate through options and adjust values.
- "P" Button: Program button, typically used to confirm selections or move to the next step in programming.
4.2. Setting the Current Time and Date
- Turn the rotary dial to "SET CLOCK".
- Use the arrow buttons to adjust the hour, minute, AM/PM, day, month, and year.
- Press the "P" button to confirm each setting and move to the next.
4.3. Programming Watering Start Times
The controller allows for multiple start times per program.
- Turn the rotary dial to "SET START TIMES".
- Use the arrow buttons to set the desired start time for Program A (e.g., 6:00 AM).
- Press "P" to save and move to the next start time or program.
- Repeat for additional start times or programs as needed.
4.4. Setting Station Run Times
Define how long each station will water.
- Turn the rotary dial to "SET RUN TIMES".
- The display will show Station 1. Use the arrow buttons to set the desired watering duration (e.g., 15 minutes).
- Press "P" to save and move to the next station.
- Repeat for all active stations (1-6).
4.5. Setting Watering Days
Choose which days of the week the programs will run.
- Turn the rotary dial to "SET WATERING DAYS".
- Use the arrow buttons to select specific days (e.g., Mon, Wed, Fri) or choose odd/even day watering.
- Press "P" to confirm your selection.
4.6. Automatic Operation
Once programming is complete, turn the rotary dial to "AUTO" for automatic operation. The controller will execute the programmed watering schedules.
4.7. Manual Operation
To manually run a station or program:
- Turn the rotary dial to "MANUAL".
- Use the arrow buttons to select the desired station or program.
- Press "P" to start the manual watering cycle.
- To stop, turn the dial to "OFF" or "AUTO".
4.8. Turning Off the Controller
To stop all watering, turn the rotary dial to "OFF". The display will show "OFF".
5. Maintenance
The K-RAIN RPS 469 Controller requires minimal maintenance to ensure long-term performance.
- Cleaning: Wipe the controller's exterior with a soft, damp cloth. Do not use abrasive cleaners or solvents.
- Battery Backup (if applicable): Some models may include a battery for retaining program memory during power outages. Check the battery compartment periodically and replace batteries as needed (typically 9V alkaline).
- Winterization: In regions with freezing temperatures, disconnect the controller from power and drain all water from the irrigation system to prevent damage. Store the controller indoors if possible.
- Wiring Inspection: Periodically inspect all wiring connections for corrosion or loose terminals. Ensure all connections are secure.
6. Troubleshooting
Refer to the table below for common issues and their solutions.
| Problem | Possible Cause | Solution |
|---|---|---|
| Controller display is blank. | No power to the controller; faulty transformer; tripped circuit breaker. | Check power outlet; ensure transformer is securely plugged in; check circuit breaker; test transformer output. |
| Stations not watering. | Controller in "OFF" mode; low water pressure; faulty solenoid valve; broken wire; rain sensor active. | Turn dial to "AUTO"; check water supply; inspect valve wiring; bypass or check rain sensor. |
| Station continuously waters. | Stuck solenoid valve; debris in valve; faulty wiring. | Manually turn off water supply; clean or replace valve; check wiring for shorts. |
| Incorrect watering times/days. | Incorrect programming; power outage reset settings. | Re-program the controller according to Section 4; replace backup battery if applicable. |
7. Specifications
| Feature | Detail |
|---|---|
| Model Number | 3606-P |
| Number of Stations | 6 |
| Input Power | 110V AC |
| Output Power | 24V AC |
| Item Weight | 1 kg 130 g (2.49 lbs) |
| Shipping Weight | 1.54 Kilograms (3.4 lbs) |
| Dimensions (LxWxH) | 20.1 x 7.4 x 22.4 Centimeters (7.9 x 2.9 x 8.8 inches) |
| Assembly Required | No |
8. Warranty and Support
K-RAIN products are manufactured to high quality standards. For specific warranty information, please refer to the warranty card included with your product or visit the official K-RAIN website. For technical support, troubleshooting assistance, or replacement parts, please contact K-RAIN customer service through their official channels.
Important: Do not attempt to repair the controller yourself. Unauthorized repairs may void your warranty and could lead to electrical hazards.
Related documents3606-P


Ask a question about this manual
Ask about setup, troubleshooting, compatibility, parts, safety, or missing instructions. Manuals+ will review the question and use this page’s manual context to help answer it.