
1. Introduction
This manual provides detailed instructions for the assembly, use, and maintenance of your TOOLPORT 6x8m PVC Marquee Reception Tent. Designed for various events, this marquee offers a robust and reliable shelter solution. Please read these instructions carefully before assembly and retain them for future reference.
2. Safety Information
- Ensure the marquee is assembled on a level and stable surface.
- Always secure the marquee firmly to the ground using the provided pegs and guy ropes to prevent movement due to wind.
- Do not assemble or use the marquee during strong winds, heavy rain, or snow. Disassemble the marquee if adverse weather conditions are expected.
- Keep all heat sources, open flames, and electrical appliances away from the tent fabric.
- Children should be supervised around the marquee during assembly and use.
- Regularly inspect all components for wear or damage. Replace any damaged parts immediately.
3. Package Contents
Before beginning assembly, verify that all components are present:
- Galvanized Steel Frame (tubes and connectors)
- High-Quality PVC Roof Tarp (single element)
- PVC Side Tarps with wind deflectors
- Entrance Gable with zipper door
- Tensioners
- Ground Pegs / Stakes
- Guy Ropes
- Assembly Instructions and Tools
4. Setup and Assembly
Assembly requires at least two people. For optimal stability, ensure all connections are tight and the marquee is properly anchored.
4.1 Frame Assembly
- Unpack all frame components. Tubes are numbered for easy identification.
- Connect the galvanized steel tubes using the corresponding connectors. The frame utilizes bolted connections with wing nuts for strong resistance and ease of assembly.
- Assemble the roof structure first, then attach the vertical support legs.
- Ensure all bolts are securely tightened.

Figure 4.1: Detail of the galvanized steel frame connection with wing nut.
4.2 Tarp Installation
- Carefully unfold the PVC roof tarp. The roof is a single, stable element.
- Drape the roof tarp over the assembled frame, ensuring it is centered and evenly distributed.
- Attach the side tarps. These feature wind deflectors and allow for optimal air circulation.
- Install the entrance gable, which includes a zipper door for easy access.
- Secure all tarps to the frame using the provided tensioners and elastic fasteners.

Figure 4.2: Overview of marquee components and structure.
4.3 Ground Fixation
Ensure perfect ground fixation using the provided pegs/stakes and guy ropes. This is crucial for stability, especially in varying weather conditions.

Figure 4.3: Fully assembled TOOLPORT 6x8m marquee.
5. Usage and Operation
The TOOLPORT 6x8m Marquee is ideal for creating a pleasant and protected space for various events such as parties, receptions, or temporary shelters. The high-quality PVC tarp provides excellent weather protection, and the side panels with wind deflectors ensure optimal air circulation and temperature regulation inside.

Figure 5.1: Interior view of the marquee, ready for use.
6. Maintenance
- Cleaning: Clean the PVC tarps with mild soap and water. Avoid harsh chemicals or abrasive materials that could damage the fabric.
- Drying: Ensure all tarps are completely dry before folding and storing to prevent mold and mildew.
- Storage: Store the marquee components in a dry, cool place, protected from direct sunlight and extreme temperatures.
- Inspection: Periodically check the frame for rust or damage, and the tarps for tears or weak spots. Address any issues promptly.
- The PVC material is resistant to temperatures between -20 °C and +50 °C.
7. Troubleshooting
7.1 Marquee Instability
If the marquee feels unstable:
- Check that all frame connections are securely bolted.
- Ensure all ground pegs are fully inserted and guy ropes are properly tensioned.
- Verify that the marquee is on a level surface.
7.2 Water Leakage
If water is leaking through the tarp:
- Inspect the roof tarp for any tears or punctures.
- Ensure the tarp is correctly positioned and tensioned to allow water runoff. The PVC tarp is 100% waterproof due to thermo-welded seams.
8. Specifications
| Feature | Detail |
|---|---|
| Model Number | PRO Smart |
| Dimensions (L x W x H) | 800 x 600 x 200 cm (8m x 6m x 2m) |
| Item Weight | 139.8 kg |
| Material | Polychlorure de vinyle (PVC) |
| Frame Material | Galvanized Steel |
| Frame Tube Diameter | Approx. 38mm |
| Frame Connector Diameter | Approx. 42mm |
| Color | Grey-White |
| Water Resistance Level | Waterproof |
| UV Protection | True (UV 50+) |
| Temperature Resistance | -20 °C to +50 °C |
| Recommended Use | Parties, Receptions |
| Country of Origin | Germany |
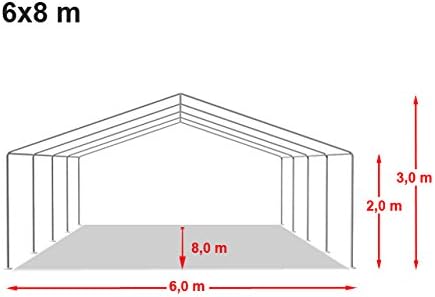
Figure 8.1: Marquee dimensions diagram.
9. Warranty and Support
For any questions regarding your TOOLPORT marquee, or if you require replacement parts, please contact the manufacturer or your retailer. While specific warranty details are not provided in this manual, TOOLPORT products are designed for durability and customer satisfaction. Please refer to your purchase documentation for warranty information.
Manufacturer: TOOLPORT
Model Reference: 6054


