
1. Introduction
This manual provides essential instructions for the safe and effective use of your SIMPSON 35009BK Axle Ratchet Tie-Down. This 8-foot black tie-down is designed for securing loads, particularly vehicle axles, during transport. Proper use ensures the safety of your cargo and prevents potential hazards.
2. Safety Information
WARNING: Failure to follow these safety instructions may result in property damage, serious injury, or death.
- Always inspect the tie-down strap, hooks, and ratchet mechanism for any signs of wear, cuts, fraying, corrosion, or damage before each use. Do not use damaged tie-downs.
- Ensure the working load limit (WLL) of the tie-down is appropriate for the weight of the cargo being secured. Never exceed the WLL of the tie-down or the anchor points on your vehicle/trailer.
- Ensure all hooks are securely attached to appropriate, structurally sound anchor points. Hooks must be fully engaged and not partially open.
- Protect the strap from sharp edges, abrasive surfaces, and extreme heat. Use corner protectors or padding if necessary.
- Keep hands and fingers clear of the ratchet mechanism during tensioning and releasing to prevent pinching.
- Periodically check the tension of the tie-down during transit, especially after the first few miles, and re-tension if necessary.
- Do not use tie-downs for lifting or towing.
3. Product Components
The SIMPSON 35009BK Axle Ratchet Tie-Down consists of the following main components:
- Ratchet Mechanism: Used to tension the strap and secure the load.
- Strap: The black polyester webbing, 8 feet in length.
- J-Hooks: Two metal hooks for attaching to anchor points.
- D-Ring: A metal ring sewn into the strap, often used for axle wrapping.

Figure 1: Full view of the SIMPSON 35009BK Axle Ratchet Tie-Down, showing the black strap, gold-colored ratchet mechanism, and two J-hooks.
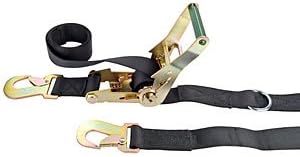
Figure 2: Close-up view of the ratchet mechanism and one J-hook, highlighting the tensioning lever and strap path.

Figure 3: Detailed view of the D-ring sewn into the black strap, indicating an attachment point for axle wrapping.
4. Setup and Installation
Follow these steps to properly set up and install your tie-down:
- Prepare the Load: Position your cargo securely on the transport vehicle or trailer. Ensure the load is stable and centered.
- Identify Anchor Points: Locate strong, suitable anchor points on your vehicle/trailer and on the cargo itself (e.g., vehicle frame, axle, designated tie-down points).
- Attach Hooks: Securely attach one J-hook to an anchor point on your vehicle/trailer. If using the D-ring for axle wrapping, loop the strap around the axle and hook the J-hook back onto the D-ring.
- Thread the Strap: Open the ratchet handle fully. Feed the free end of the strap through the slot in the rotating spindle of the ratchet mechanism. Pull the strap through until most of the slack is removed.
- Attach Second Hook: Attach the second J-hook to another secure anchor point, ensuring the strap runs straight and is not twisted.
5. Operating Instructions
Once the tie-down is set up, follow these steps to tension and release the strap:
5.1. Tensioning the Strap
- With the strap threaded and hooks attached, begin ratcheting the handle up and down. This will wind the strap onto the spindle, increasing tension.
- Continue ratcheting until the strap is taut and the load is securely held in place. Do not overtighten, as this can damage the cargo, the tie-down, or the anchor points.
- Once sufficient tension is achieved, ensure the ratchet handle is fully closed and locked into its resting position. This prevents accidental release.
- Secure any excess strap to prevent it from flapping during transit, which could cause damage or distraction.
5.2. Releasing the Strap
- Locate the release lever on the ratchet mechanism.
- While holding the ratchet handle, pull the release lever to disengage the locking mechanism.
- Open the ratchet handle fully (180 degrees) until it lies flat. This will allow the strap to unwind freely from the spindle.
- Carefully pull the strap out of the ratchet mechanism and unhook the J-hooks from the anchor points.
6. Maintenance
Proper maintenance extends the life of your tie-down and ensures continued safe operation.
- Cleaning: Clean straps with mild soap and water. Rinse thoroughly and allow to air dry completely before storage. Do not use harsh chemicals or bleach.
- Inspection: Regularly inspect the entire tie-down for any signs of damage, including cuts, tears, fraying, or excessive wear on the strap, and bends, cracks, or corrosion on the metal components (ratchet, hooks, D-ring).
- Lubrication: Occasionally apply a light lubricant to the moving parts of the ratchet mechanism to ensure smooth operation.
- Storage: Store tie-downs in a clean, dry place, away from direct sunlight, extreme temperatures, and corrosive chemicals. Coil the strap neatly to prevent tangling and damage.
7. Troubleshooting
Here are solutions to common issues you might encounter:
- Strap not ratcheting: Ensure the strap is correctly threaded through the spindle and not twisted. Check for any debris obstructing the ratchet mechanism.
- Strap stuck in ratchet: Fully open the ratchet handle (180 degrees) to release tension. If still stuck, gently wiggle the strap while ensuring the release lever is fully engaged.
- Hooks slipping: Verify that the hooks are fully engaged with secure anchor points. Ensure the anchor points are strong enough to withstand the load.
- Excessive strap flapping: Secure any loose strap ends by tying them off or using a strap winder to prevent them from flapping in the wind during transit.
8. Specifications
| Feature | Detail |
|---|---|
| Model Number | 35009BK |
| Brand | SIMPSON |
| Color | Black |
| Strap Length | 8 feet |
| Fastener Material | Stainless Steel |
| Fastener Type | Buckle (Ratchet Mechanism) |
| Number of Pieces | 1 |
| Item Weight | 4 pounds |
| Product Dimensions | 11.5 x 6.3 x 2.4 inches |
| UPC | 012324005371 |
9. Warranty and Support
For specific warranty information, technical support, or to inquire about replacement parts, please contact SIMPSON customer service directly. You may also visit the official SIMPSON website for additional resources.
SIMPSON Official Store: SIMPSON Store on Amazon