
Lanaform LA120119
Lanaform Vapolux LA120119 Cool Mist Humidifier User Manual
1. Introduction
Thank you for choosing the Lanaform Vapolux LA120119 Cool Mist Humidifier. This device is designed to restore and maintain optimal humidity levels in your indoor environment, contributing to improved air quality and comfort. Proper humidity can help alleviate issues associated with dry air, such as static electricity and respiratory discomfort. This manual provides essential information for the safe and effective use, maintenance, and troubleshooting of your humidifier.
2. Safety Instructions
Please read all safety instructions carefully before operating the humidifier and retain this manual for future reference. Failure to follow these instructions may result in electric shock, fire, or serious injury.
- Always place the humidifier on a firm, flat, water-resistant surface, away from walls and heat sources.
- Keep the appliance out of reach of children and pets.
- Do not immerse the base unit in water or other liquids.
- Unplug the humidifier from the power outlet before filling, cleaning, or moving it.
- Use only clean, cool tap water or distilled water. Do not use hot water.
- Do not add essential oils, medications, or other additives directly into the water tank or base, as this may damage the unit and void the warranty.
- Ensure the mist outlet is not blocked.
- Do not operate the humidifier if the power cord or plug is damaged, or if the unit malfunctions or has been dropped.
- Only use attachments and accessories specified by the manufacturer.
3. Product Overview
Familiarize yourself with the components of your Lanaform Vapolux LA120119 Humidifier.
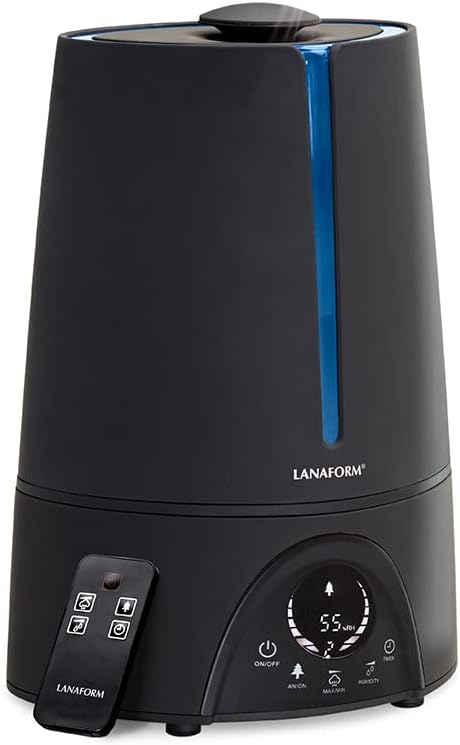
Figure 3.1: The Lanaform Vapolux LA120119 Cool Mist Humidifier, showcasing its sleek black design, integrated digital display, and accompanying remote control. The blue LED strip is visible on the front.

Figure 3.2: A close-up view of the humidifier's top, illustrating the cool mist being released into the air, indicating active operation.
Key Components:
- Water Tank: Removable reservoir for water.
- Base Unit: Contains the ultrasonic transducer, fan, and control electronics.
- Mist Outlet: Top opening where mist is dispersed.
- Control Panel: Touch-sensitive buttons and LCD display for operation.
- Remote Control: For convenient operation from a distance.
- Hygrostat: Sensor for detecting and displaying ambient humidity.
4. Setup
Follow these steps to set up your humidifier for first use.
- Unpack: Carefully remove all components from the packaging. Retain packaging for storage or transport.
- Placement: Place the humidifier on a flat, stable, and water-resistant surface at least 15 cm (6 inches) away from walls and furniture. Ensure it is not placed directly on carpet or near heat sources.
- Fill Water Tank:

Figure 4.1: Demonstrates the process of lifting the water tank from the humidifier's base for refilling or cleaning.
- Lift the water tank from the base unit using the integrated handle.
- Unscrew the tank cap at the bottom of the tank.
- Fill the tank with clean, cool tap water. Distilled or demineralized water is recommended, especially in hard water areas, to prevent mineral buildup. Do not fill past the maximum fill line.
- Securely screw the tank cap back on.
- Place the filled water tank back onto the base unit, ensuring it is seated correctly.
- Connect Power: Plug the power cord into a suitable electrical outlet. The unit will enter standby mode.
5. Operating Instructions
Your Lanaform Vapolux LA120119 Humidifier can be operated via the touch control panel or the remote control.

Figure 5.1: A detailed view of the LCD display, indicating the current humidity level (e.g., 55% RH) and a warning icon for low water level, alongside other operational indicators.
Control Panel & Remote Functions:
- ON/OFF Button: Press to turn the humidifier on or off. The LCD display will illuminate upon activation.
- Humidity Setting (Hygrostat): Press the 'Humidity' button to set your desired humidity level (e.g., 40% to 80% RH). The humidifier will automatically operate to maintain this level and pause when reached.
- Mist Output (MIN/MAX): Press the 'MIN/MAX' button to cycle through different mist output levels (Low, Medium, High).
- Timer Function: Press the 'Timer' button to set an operating duration (e.g., 1 to 12 hours). The humidifier will automatically turn off once the set time expires.
- Negative Ion (ANION) Function: Press the 'ANION' button to activate the negative ion generator, which helps to purify the air.
- LCD Display: Shows current ambient humidity, set humidity, mist output level, timer setting, and other operational indicators.
6. Maintenance and Cleaning
Regular cleaning is crucial for optimal performance and hygiene. Always unplug the humidifier before cleaning.
Daily Maintenance:
- Empty and rinse the water tank with fresh water.
- Refill with clean, cool water.
Weekly Cleaning:
- Clean Water Tank: Remove the tank, unscrew the cap, and clean the inside with a soft brush and mild detergent. Rinse thoroughly to remove any soap residue.
- Clean Base Unit & Transducer: Empty any remaining water from the base. Gently wipe the inside of the base with a soft, damp cloth. Carefully clean the ultrasonic transducer (the small metal disc) with a soft brush to remove any mineral deposits. Do not scratch the transducer.
- Descaling (for hard water areas): If mineral deposits (white scale) accumulate, fill the base with a mixture of equal parts white vinegar and water. Let it soak for 20-30 minutes, then gently scrub with a soft brush. Rinse thoroughly with clean water. Repeat for the water tank if necessary.
Storage:
When not in use for an extended period, ensure the humidifier is completely empty and clean. Dry all parts thoroughly and store in a cool, dry place, preferably in its original packaging.
7. Troubleshooting
If you encounter issues with your humidifier, refer to the following common problems and solutions.
| Problem | Possible Cause | Solution |
|---|---|---|
| No mist or very little mist | Low water level Water tank not seated correctly Transducer dirty or scaled | Refill water tank Ensure tank is properly placed on the base Clean the transducer as per maintenance instructions |
| Unusual noise | Unit not on a level surface Foreign object in water tank or base | Place on a flat, stable surface Check and remove any foreign objects |
| Water leakage | Water tank cap not tightened Water tank not seated correctly Crack in water tank | Tighten the water tank cap Re-seat the water tank properly Contact customer support if tank is damaged |
| Display shows low water warning (Figure 5.1) | Water level is too low | Refill the water tank immediately |
If the problem persists after attempting these solutions, please contact Lanaform customer support.
8. Specifications
Technical details for the Lanaform Vapolux LA120119 Cool Mist Humidifier.
- Brand: Lanaform
- Model Number: LA120119
- Dimensions (L x W x H): 28.5 x 21.8 x 38.6 cm
- Weight: 2.44 kg
- Water Tank Capacity: 4.5 Liters
- Power: 30 Watts
- Material: Rubber
- Noise Level: 35 Decibels
- Autonomy: Up to 8 hours (depending on mist output)
- Special Feature: Hygrostat (Automatic Humidity Control)
- Operating Mode: Ultrasonic
- Control Method: Touch Control Panel, Remote Control
9. Warranty and Support
For information regarding warranty coverage, terms, and conditions, please refer to the documentation provided with your purchase or visit the official Lanaform website. For technical support or service inquiries, please contact Lanaform customer service through their official channels.
Related documentsLA120119


Ask a question about this manual
Ask about setup, troubleshooting, compatibility, parts, safety, or missing instructions. Manuals+ will review the question and use this page’s manual context to help answer it.