
EUG X660S+
EUG X660S+ Multimedia Projector User Manual
Model: X660S+
Introduction
Thank you for purchasing the EUG X660S+ Multimedia Projector. This projector is designed for versatile use, including home theater, gaming, conferences, school presentations, and office business applications. Featuring a 170W LED lamp with a lifespan of over 50,000 hours, 2800 lumens brightness, and built-in 5W speakers, it delivers a high-quality viewing experience. This manual provides detailed instructions for setup, operation, maintenance, and troubleshooting to ensure optimal performance and longevity of your device.
Important Safety Information
- Ventilation: Ensure adequate ventilation around the projector. Do not block ventilation openings.
- Power Source: Use only the specified power supply (AC 100-240V/50-60Hz).
- Heat: The projector generates heat during operation. Do not touch the ventilation areas directly.
- Liquid Exposure: Do not expose the projector to rain or moisture to prevent fire or electric shock.
- Cleaning: Unplug the projector before cleaning. Use a soft, dry cloth.
- Servicing: Do not attempt to service this product yourself. Refer all servicing to qualified service personnel.
- Direct Eye Contact: Avoid looking directly into the projector lens when the lamp is on, as the bright light can cause eye damage.
Package Contents
Please check that all the following items are included in your package:
- 1 x EUG X660S+ Projector
- 1 x AC Power Cable
- 1 x HDMI Cable
- 1 x VGA Cable
- 1 x AV Cable
- 1 x Remote Control
- 1 x User Manual (this document)
Product Overview
Projector Views

Figure 1: Angled view of the EUG X660S+ Projector, showing the lens, ventilation grilles, and top panel controls.

Figure 2: Top view of the EUG X660S+ Projector, highlighting the control panel with power key, indicator light, source button, menu button, and direction operation keys.
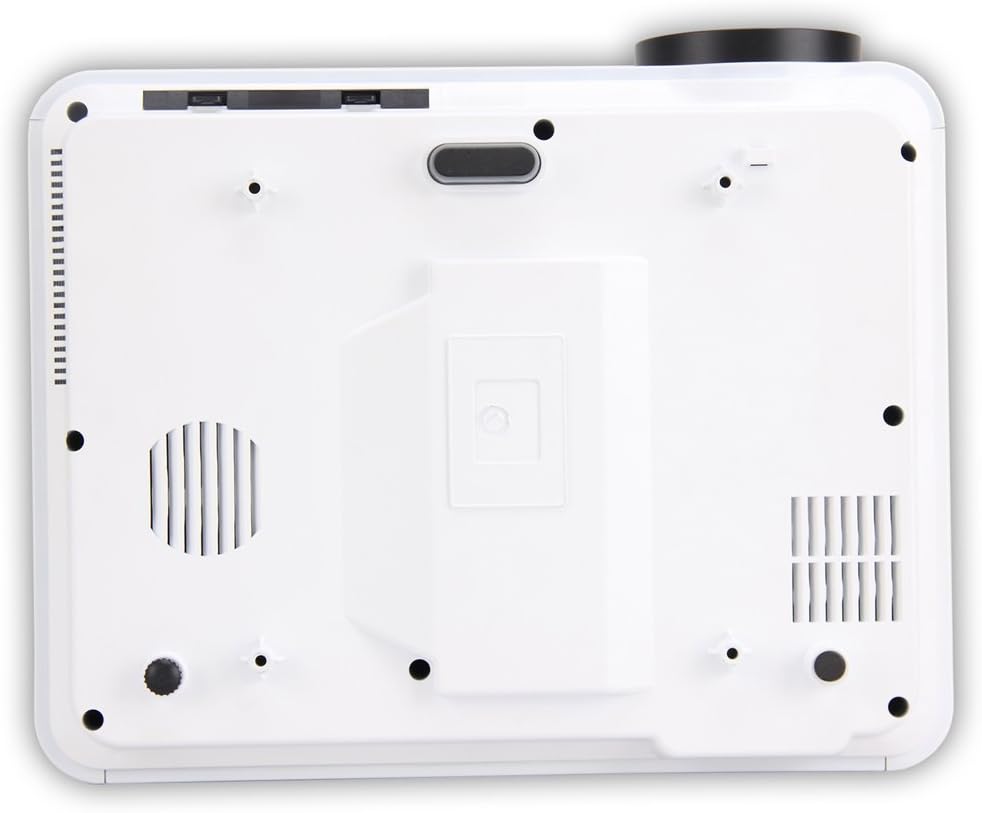
Figure 3: Bottom view of the EUG X660S+ Projector, showing the level-stand adjustment, product label area, projector mount hole, and cool winds input ventilation.

Figure 4: Rear panel of the EUG X660S+ Projector, detailing the input/output ports including USB, HDMI, VGA, Component Video (YPbPr), Audio IN/OUT, and ATV.
Control Panel and Indicators
- Power Key: Press to power on or off the projector.
- Indicator Light: Red indicates standby mode, Green indicates working mode.
- Sources: Selects the input signal source (e.g., HDMI, VGA, USB).
- Menu: Accesses the projector's on-screen display (OSD) menu.
- Direction Operation Keys (Up/Down/Left/Right/OK): Used for navigating menus and making selections.
Input/Output Ports
- HDMI x2: For connecting devices like laptops, Blu-ray players, gaming consoles.
- USB x2: For connecting USB drives to play multimedia content.
- VGA: For connecting computers or laptops.
- Component Video (YPbPr): For connecting devices with component video output.
- Stereo Audio (L-OUT, L-IN, R-OUT, R-IN): Audio input/output connections.
- TV Input (ATV): For connecting to an antenna for television broadcasting.
Setup Guide
1. Projector Placement and Screen Size
The optimal projection distance for the EUG X660S+ ranges from 1.2 to 5 meters, yielding a screen size of 50 to 150 inches. Refer to the projection chart below for recommended distances for various screen sizes.

Figure 5: Chart illustrating recommended projection distances for various 16:9 image aspect ratios and screen sizes.
2. Power Connection
- Connect the supplied AC power cable to the projector's power input port.
- Plug the other end of the AC power cable into a standard electrical outlet (AC 100-240V/50-60Hz).
- The power indicator light will turn red, indicating standby mode.
3. Connecting External Devices
The EUG X660S+ supports a wide range of devices. Connect your desired device to the appropriate port on the projector's rear panel.

Figure 6: Diagram illustrating common devices that can be connected to the projector, including laptops, set-top boxes, HDD players, Xbox, personal computers, iPhones, digital video cameras, and DVD players.
- HDMI: Use an HDMI cable to connect your laptop, Blu-ray player, game console (e.g., Xbox), or set-top box to one of the two HDMI ports.
- VGA: Use a VGA cable to connect your desktop computer or older laptop.
- USB: Insert a USB flash drive into one of the two USB ports to play supported multimedia files directly.
- AV (Composite Video): Use the supplied AV cable to connect devices with composite video output.
- Component Video (YPbPr): Connect devices using component video cables for higher quality analog video.
4. Focus and Keystone Adjustment
After positioning the projector and connecting your source, adjust the image for clarity and proper geometry.

Figure 7: Diagram illustrating the keystone correction function, showing how to adjust the image to be rectangular when the projector is not perfectly perpendicular to the screen.
- Focus Ring: Rotate the focus ring on the projector lens until the projected image is sharp and clear.
- Keystone Correction: If the projected image appears trapezoidal (wider at the top or bottom), use the keystone adjustment knob (typically on the rear or top of the projector) to correct the image to a rectangular shape. The EUG X660S+ supports manual keystone correction.
Operating Instructions
1. Powering On/Off
- Power On: Press the Power button on the projector's control panel or the remote control. The indicator light will turn green.
- Power Off: Press the Power button again. The projector will enter standby mode, and the indicator light will turn red. Always allow the projector to cool down properly before unplugging it.
2. Selecting Input Source
After powering on, select the input source corresponding to your connected device.
- Press the "Source" button on the projector or remote control.
- Use the Direction Operation Keys (Up/Down) to navigate through the input options (e.g., HDMI1, HDMI2, VGA, USB1, USB2, AV, YPbPr, TV).
- Press the "OK" button to confirm your selection.
3. Menu Navigation and Settings
The projector's On-Screen Display (OSD) menu allows you to adjust various settings.
- Press the "Menu" button on the projector or remote control to open the OSD menu.
- Use the Direction Operation Keys to navigate between menu categories (e.g., Picture, Sound, Time, Option).
- Press "OK" or the Right arrow key to enter a sub-menu.
- Use the Direction Operation Keys to adjust values or select options.
- Press "Menu" again to exit the OSD menu.
4. Multimedia Playback (USB)
When a USB drive is connected, the projector can play various media files directly.
- Insert your USB drive into one of the USB ports.
- Select "USB" as the input source.
- Navigate through the file browser to select the desired audio, image, or video file.
- Press "OK" to play the selected file.
Supported File Formats:
- Audio: WMA, MP3
- Image: JPEG, BMP
- Video: MPG, MPEG-1, MPEG-2, MPEG-4, AVI, MP4, DIVX, TS, TRP, MKV, WMV, RM, RMVB
Maintenance
Regular maintenance ensures optimal performance and extends the lifespan of your projector.
- Cleaning the Lens: Use a soft, lint-free cloth specifically designed for optical lenses. Do not use abrasive cleaners or cloths that could scratch the lens. Gently wipe the lens in a circular motion.
- Cleaning the Projector Body: Wipe the exterior of the projector with a soft, dry cloth. For stubborn stains, a slightly damp cloth with mild detergent can be used, but ensure no liquid enters the projector.
- Ventilation: Regularly check and clean the ventilation grilles to prevent dust buildup, which can impede airflow and cause overheating. Use a soft brush or compressed air to remove dust.
- Storage: When not in use for extended periods, store the projector in a cool, dry, and dust-free environment.
Troubleshooting
| Problem | Possible Cause | Solution |
|---|---|---|
| No image projected | Power cable not connected; Incorrect input source selected; Device not powered on or connected properly. | Ensure power cable is securely connected. Select the correct input source (HDMI, VGA, USB). Check if the connected device is powered on and its cable is firmly inserted. |
| Image is blurry | Focus not adjusted; Projector too close/far from screen. | Adjust the focus ring on the lens. Ensure the projector is within the recommended projection distance (1.2-5m). |
| Image is trapezoidal | Projector not perpendicular to the screen. | Adjust the keystone correction knob until the image is rectangular. |
| No sound | Volume too low; Muted; Audio cable not connected (for analog sources); Source device audio settings. | Increase projector volume. Check if muted. Ensure audio cables are correctly connected. Verify audio output settings on the source device. |
| Remote control not working | Batteries low/dead; Obstruction between remote and projector; Remote sensor blocked. | Replace batteries. Remove any obstructions. Ensure the remote sensor on the projector is clear. |
Specifications
| Model | EUG-660S (X660S+) |
| Type | LCD Projector |
| Light Source | 170W LED Lamp |
| Lamp Life | Above 50,000 hours |
| Brightness | 2800 Lumens |
| Native Resolution | 1280 x 720 |
| Max. Resolution | WUXGA (1920 x 1200) |
| Contrast Ratio | 3000:1 (Full On/Off) |
| Projection Distance | 1.2 - 5 Meters |
| Projection Size | 50 - 150 inches |
| Image Aspect Ratio | 16:9 Native, 4:3 Compatible |
| Built-in Speakers | 5W x2 |
| Power Supply | AC 100-240V/50-60Hz |
| Input/Output Ports | Component Video (YPbPr), VGA, HDMI x2, USB x2, TV, Stereo Audio |
| Power Consumption | <180W |
| Product Dimensions | 33.78 x 26.42 x 13.97 cm |
| Product Weight | 3.18 kg |
Warranty and Support
For warranty information, technical support, or service inquiries, please refer to the warranty card included with your product or contact EUG customer service through their official website or the retailer where you purchased the product. Please have your model number (X660S+) and purchase details ready when contacting support.
Ask a question about this manual
Ask about setup, troubleshooting, compatibility, parts, safety, or missing instructions. Manuals+ will review the question and use this page’s manual context to help answer it.