
1. Introduction
This manual provides detailed instructions for the installation, operation, and maintenance of your Antec P50 Window R Mid-Tower PC Case. The Antec P50 Window R is designed for silent computing with optimized airflow and support for Micro ATX and Mini-ITX motherboards. It features a dual-chamber structure, liquid cooling support, and multiple drive bays for a versatile build.
Please read this manual thoroughly before beginning installation to ensure proper setup and to maximize the performance and longevity of your system.
2. Setup and Installation
2.1 Unpacking and Inspection
Carefully remove the PC case from its packaging. Inspect the case for any signs of damage that may have occurred during shipping. Retain the packaging for future transport or warranty claims.
2.2 Removing Side Panels
Locate and unscrew the thumbscrews on the rear of the case. Slide the side panels backward and lift them off to access the interior.

Image: Angled view of the Antec P50 Window R PC Case, showing its compact mid-tower design and front panel.
2.3 Motherboard Installation
- Install the I/O shield into the rear opening of the case.
- Ensure the motherboard standoffs are correctly aligned for your Micro ATX or Mini-ITX motherboard.
- Carefully place the motherboard onto the standoffs, aligning the screw holes.
- Secure the motherboard with the provided screws.

Image: Interior view of the Antec P50 Window R PC Case, highlighting the motherboard tray and cable routing options.
2.4 Power Supply Installation
The P50 Window R supports bottom-mount power supplies. Install your power supply into the designated compartment at the bottom rear of the case and secure it with screws.
2.5 Drive Installation
The case features 6 drive bays:
- One 5.25" external drive bay (for optical drives).
- Three 3.5" HDD drive bays.
- Two 2.5" SSD drive bays.
Follow the case's internal guides for tool-less or screw-based installation of your storage devices.

Image: Interior view of the Antec P50 Window R PC Case, showing the rear of the motherboard tray with cable management space and drive bay locations.
2.6 Expansion Card Installation
The case provides 4 expansion slots. Remove the slot covers as needed and install your graphics card or other expansion cards, securing them with screws.
2.7 Fan and Radiator Installation
The P50 Window R comes with pre-installed fans: two 120mm fans and one 80mm fan at the front, and one 80mm fan at the rear. It supports additional 80mm/120mm fan mounts and a 240mm radiator in the front or top for liquid cooling.
- For liquid cooling, install the 240mm radiator in the designated front or top mounting points.
- Ensure fans are oriented correctly for optimal airflow (intake at front, exhaust at rear/top).
2.8 Cable Management
Utilize the cable routing cutouts and tie-down points behind the motherboard tray to manage cables. This improves airflow and aesthetics.
2.9 Connecting Front Panel I/O
Connect the front panel cables (USB 3.0, USB 2.0, HD Audio, Power Switch, Reset Switch, Power LED, HDD LED) to the corresponding headers on your motherboard. Refer to your motherboard manual for header locations.
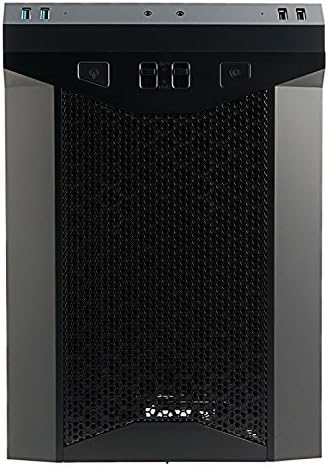
Image: Front view of the Antec P50 Window R PC Case, showing the mesh intake and front panel controls.
3. Operation
3.1 Front Panel Controls and Ports
The front panel provides convenient access to:
- Power Button: To turn the system on or off.
- Reset Button: To restart the system.
- USB 3.0 Ports (x2): For high-speed data transfer.
- USB 2.0 Ports (x2): For standard USB devices.
- Audio Jacks: For headphones and microphone.
- Fan Controls: Two fan control switches are available to adjust fan speeds for optimal balance between cooling and noise.
3.2 Airflow and Cooling
The P50 Window R features a dual-chamber structure designed for direct airflow, separating heat-generating components. The pre-installed fans and additional mounting options ensure efficient cooling for your system.
4. Maintenance
4.1 Cleaning Dust Filters
Regularly clean the dust filters to maintain optimal airflow and prevent dust buildup inside the case. Dust filters are typically located at the front, top, and bottom (for the power supply intake). Gently remove them and clean with compressed air or rinse with water (ensure they are completely dry before reinstallation).
4.2 General Cleaning
Use a soft, damp cloth to clean the exterior surfaces of the case. Avoid abrasive cleaners. For interior cleaning, use compressed air to remove dust from components and internal surfaces.
5. Troubleshooting
5.1 System Not Powering On
- Ensure all power cables (24-pin ATX, 8-pin CPU, GPU power) are securely connected to the motherboard and components.
- Verify the power supply switch is in the 'ON' position.
- Check that the front panel power switch cable is correctly connected to the motherboard header.
5.2 Excessive Noise
- Check if any cables are obstructing fan blades.
- Ensure all fans are securely mounted.
- Utilize the front panel fan controls to adjust fan speeds.
5.3 Poor Cooling Performance
- Clean all dust filters to ensure unrestricted airflow.
- Verify that fans are oriented correctly (intake/exhaust).
- Ensure proper cable management to avoid blocking airflow.
5.4 Front Panel USB/Audio Ports Not Working
- Confirm that the front panel USB and audio cables are correctly connected to the corresponding headers on your motherboard.
6. Specifications
| Feature | Detail |
|---|---|
| Model Name | P50 WINDOW R |
| Case Type | Mid Tower |
| Motherboard Compatibility | Micro ATX, Mini-ITX |
| Dimensions (D x W x H) | 355mm x 260mm x 355mm (13.98"D x 355"H) |
| Material | Polycarbonate (PC) |
| Drive Bays | 1 x 5.25" (external), 3 x 3.5" HDD, 2 x 2.5" SSD |
| Expansion Slots | 4 |
| Front I/O Ports | 2 x USB 3.0, 2 x USB 2.0, Audio In/Out, 2 x Fan Controls |
| Pre-installed Fans | Front: 2 x 120mm, 1 x 80mm; Rear: 1 x 80mm |
| Liquid Cooling Support | 240mm radiator (front/top) |
| Max Video Card Size | 300mm |
| Max CPU Cooler Height | 130mm |
| Power Supply Mounting | Bottom Mount |
| Item Weight | 11.7 Pounds |
7. Warranty Information
The Antec P50 Window R PC Case comes with a Limited Warranty period (parts): 1 year. Please retain your proof of purchase for warranty claims. For specific terms and conditions, refer to the official Antec website or contact customer support.
8. Support
For further assistance, technical support, or to inquire about replacement parts, please visit the official Antec website or contact their customer service department. You can often find FAQs, driver downloads, and additional resources on the manufacturer's support pages.
Antec Official Website: www.antec.com